


Magic color
Split-screen
using two apps side by side

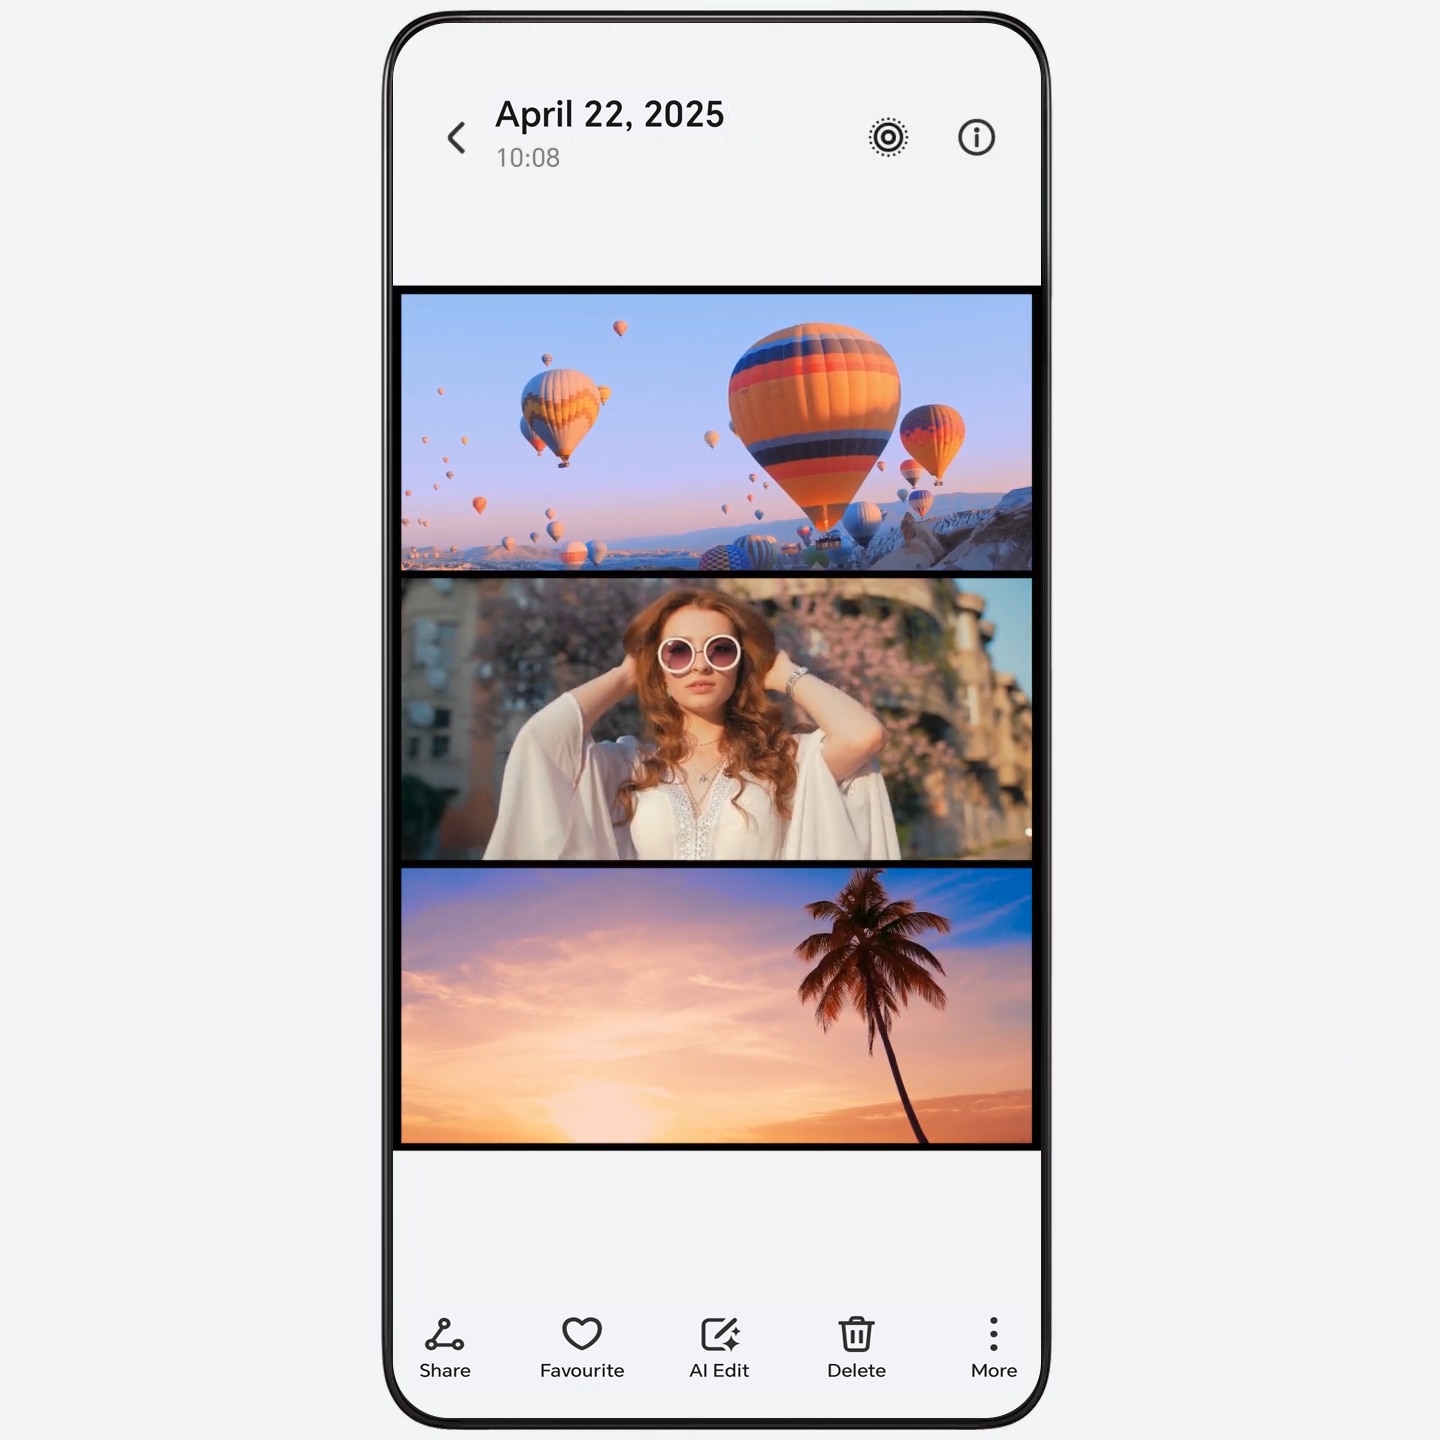
Bring collages to life


Portrait film photography
-
![Camera Hovering mode for shooting high-quality and stable photos and Videos]()
Camera Hovering mode for shooting high-quality and stable photos and Videos
With the Hovering mode, your phone camera can take photos/videos from various angles as if it were placed on a tripod, making it easy to shoot portraits, buildings or time-lapse sunrise from various angles. One screen is for shooting, and the other is for previewing. You can view your creation while you are shooting and you can use it for both landscape and portrait orientations.
![Floating windows, making multitasking easier]()
Floating windows, making multitasking easier
Full-screen apps can be displayed in windows, with flexible arrangement. When replying messages while watching video, there is no need to exit the app or switch back and forth. Immersion without interruption, and quickly multitasking.
![Air scroll]()
Air scroll
Wave in the air and scroll the page. You can also easily browse news, videos or chat history when your hands are occupied and can’t touch the screen.
![Horizontal Split Provides Spacious View and Enables High-efficient Work]()
Horizontal Split Provides Spacious View and Enables High-efficient Work
The Horizontal split mode provides a spacious, uncluttered and relaxing viewing experience. It enables you to process multitasks more efficiently. For example, you can watch videos on the upper screen while gaming on the lower screen, or attend a meeting on the upper screen while taking notes on the lower screen.
![Swipe down with three fingers to collect everything]()
Swipe down with three fingers to collect everything
Swipe down with three fingers to quickly save images, web pages or documents, etc. You can check and review them at any time.
![Take a Screenshot by Air Gestures]()
Take a Screenshot by Air Gestures
Make a fist to capture the current screen. You can capture screen highlights even when your hands are occupied and can’t touch the screen.
-
![AI De-reflection, Turning Failed Shots into Clear and Realistic Images]()
AI De-reflection, Turning Failed Shots into Clear and Realistic Images
When taking photos of scenery, exhibits, people, animals through the glass, or when wearing glasses, reflections from the glass and lenses will affect the quality of the final image. AI De-reflection automatically identifies and precisely eliminates the reflective parts in the photo, effortlessly restoring clear visuals and portrait details, avoiding failed shots.
![Auto Generate Instant Movie Clips]()
Auto Generate Instant Movie Clips
Select videos and photos, intelligently pick out highlight moments and use them with video templates to automatically create high-quality movie clips with better artistic effect.
![AI Face Tune, perfect group photos guaranteed]()
AI Face Tune, perfect group photos guaranteed
Using AI Face tune can intelligently identify and analyze multiple similar facial photos from the same scene, automatically select the best facial expression from adjacent photos, repair closed eyes.
![Select and Compare Images to Find Your Favorite]()
Select and Compare Images to Find Your Favorite
Compare similar images side by side, with the added convenience of zooming in on them together to spot every little detail. This feature is designed to help you effortlessly choose your favorite image.
![Enhance Your Photos with AI Eraser]()
Enhance Your Photos with AI Eraser
AI Eraser in Gallery allows you to effortlessly remove passersby with just one tap. Additionally, you can precisely remove unwanted text and clutter from your images by circling or brushing them. This feature works smoothly, making your photos look better and more appealing.
![AI Enhanced Zoom – Crisp Details Even at Extreme Distances]()
AI Enhanced Zoom – Crisp Details Even at Extreme Distances
When capturing distant landscapes and buildings during the day, use the AI Ultra-Clear Telephoto feature to instantly enhance photo details and improve image quality, bringing faraway scenes into sharp focus.
-
![Quickly hide apps to create a minimalist Home screen]()
Quickly hide apps to create a minimalist Home screen
Quickly hide apps from the Home screen to create a distraction-free and minimalist interface with refreshing visuals and secure privacy.
![With Parallel Space, You Can Use One Phone as Two]()
With Parallel Space, You Can Use One Phone as Two
Securely store confidential documents, photos, and other content. Download and use the app without affecting the main space. Easily separate life and work, hide usage traces, doubling privacy protection with just one mobile phone.
![Emergency SOS]()
Emergency SOS
When you use Emergency SOS, your device will send a help message promptly and covertly with your location to an emergency contact or make a call with a preset help recording.
-
![AI-Generated Minutes, Meetings Made Easier]()
AI-Generated Minutes, Meetings Made Easier
Effortless cross-language transcription during meetings, instant summaries after each session, and a quick recap of key points—no more time spent on note-taking, enhancing office efficiency.
![AI writing, three steps to boost your creation]()
AI writing, three steps to boost your creation
When you post on social media or write reviews on e-commerce platforms, AI writing can use Compose to generate personalized copywriting with one tap, saving your time and effort. It can also provide you with Rewrite, spell check, helping you easily cope with various writing needs.
![Call translation, real-time cross-language dialogue interpretation]()
Call translation, real-time cross-language dialogue interpretation
During cross-language phone communication, enabling call translation allows for real-time interpretation of the conversation content and voice broadcasting of the translated text. Both parties can freely communicate in their native languages, making it easy to handle business negotiations or travel consultations.
![AI Privacy Call, Safeguard Call Privacy]()
AI Privacy Call, Safeguard Call Privacy
Reduce sound leakage to ensure call privacy when you are using the handset to make or receive calls.
![Motion sickness relief display]()
Motion sickness relief display
When using a phone while driving, dynamic dots will appear on both sides of the screen to show the vehicle's motion status, relieving motion sickness discomfort.
![Enhanced Contrast for a More Vivid Experience]()
Enhanced Contrast for a More Vivid Experience
Switch on the Super Dynamic Vivid Display to bring out richer contrasts and more vivid light-dark scenes in videos in 1080p or above.
-
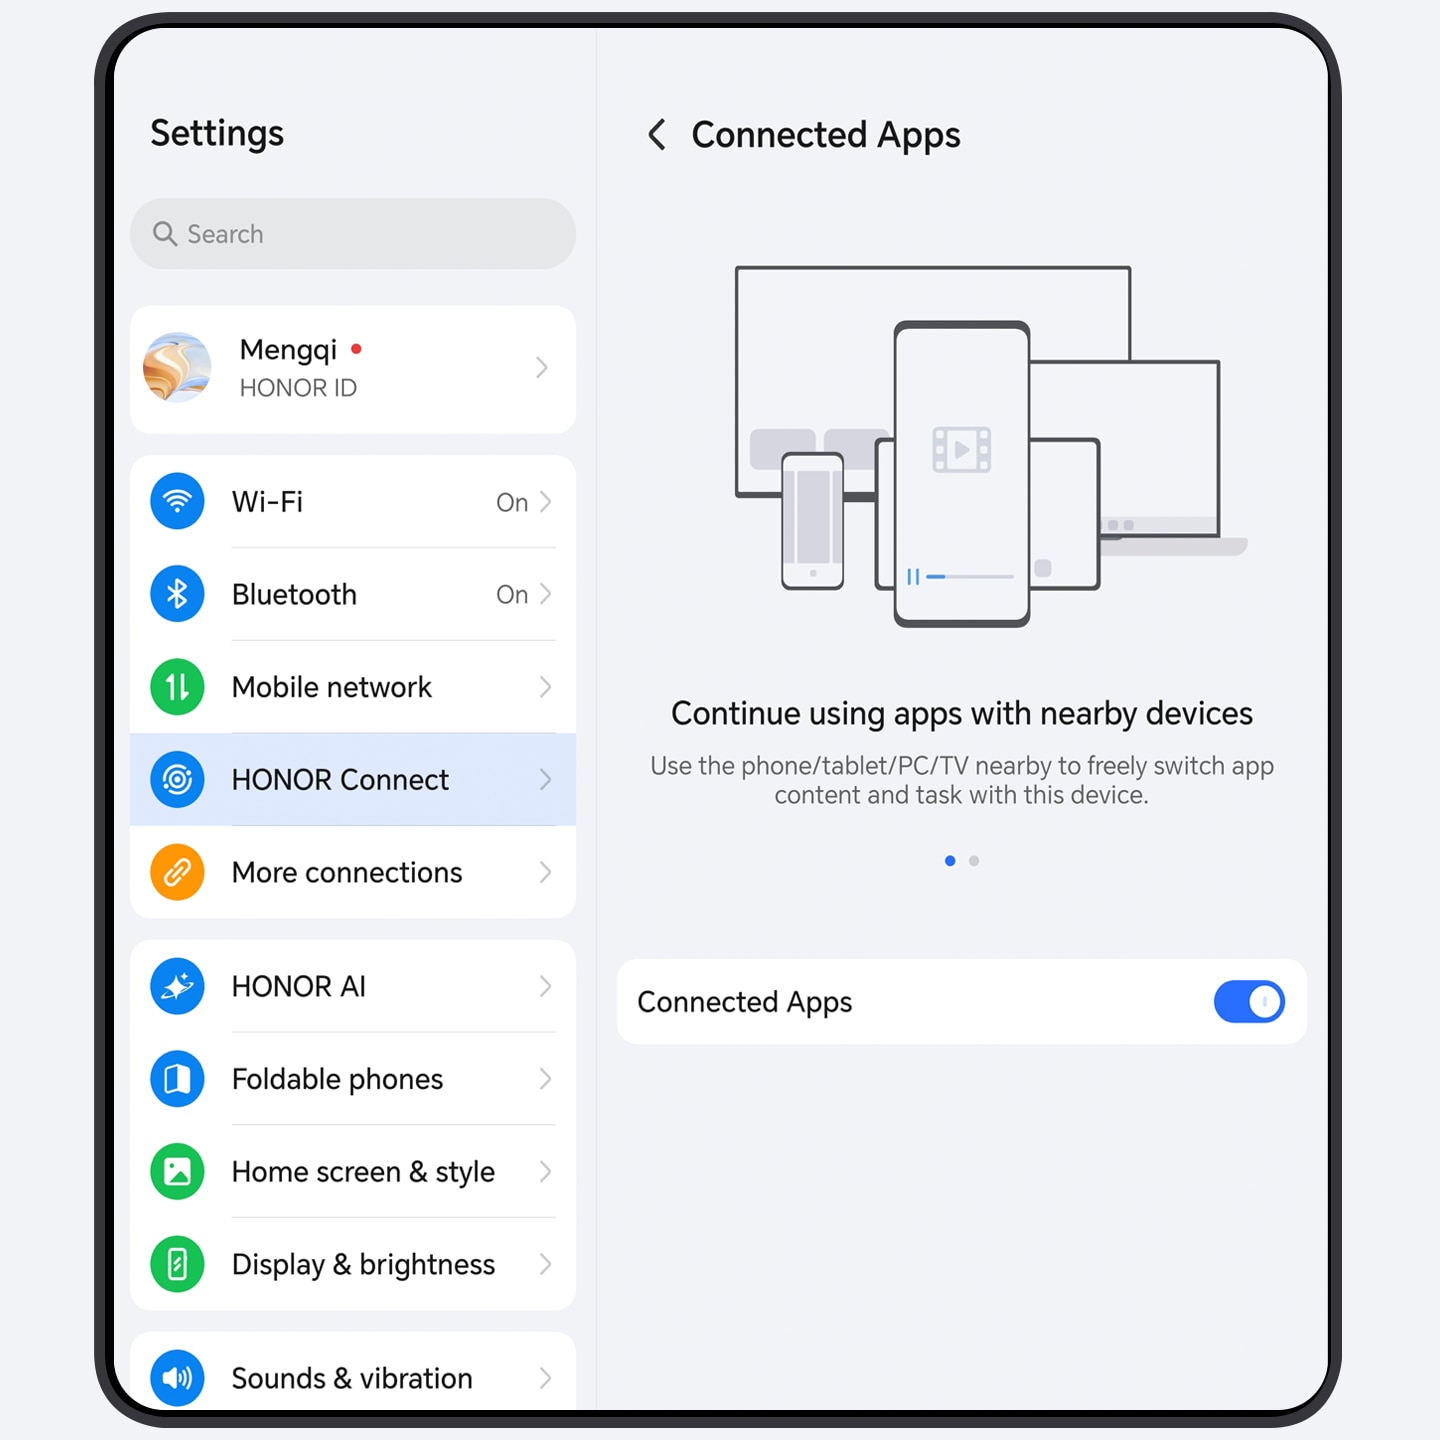
![Smart Collaboration with HONOR Connect]()
Smart Collaboration with HONOR Connect
When you sign in to your HONOR ID on your phone, tablet and laptop, you can transfer calls, notifications, files, and videos seamlessly across devices, which is efficient and convenient.
![One watch connecting to two phones: seamlessly manage work and life]()
One watch connecting to two phones: seamlessly manage work and life
With one watch, you can connect to two phones simultaneously, receiving notifications and calls from both while you wear it, ensuring you never miss a beat.
![Transfer Calls Seamlessly with Connected Call]()
Transfer Calls Seamlessly with Connected Call
Automatically sync incoming calls from your phone to nearby devices. Make or answer a call on any device to improve efficiency.
![Connected Camera for Flexible and HD Views]()
Connected Camera for Flexible and HD Views
When you have a video conference or live stream on your computer, you can use the front and rear camera of your phone to flexibly switch shooting angles, and take professional clear pictures.
![Seamless Experience with Connected Apps]()
Seamless Experience with Connected Apps
Continue to use apps seamlessly across devices. For example, you can transfer Notes from your phone to your computer, and continue editing without interruption.
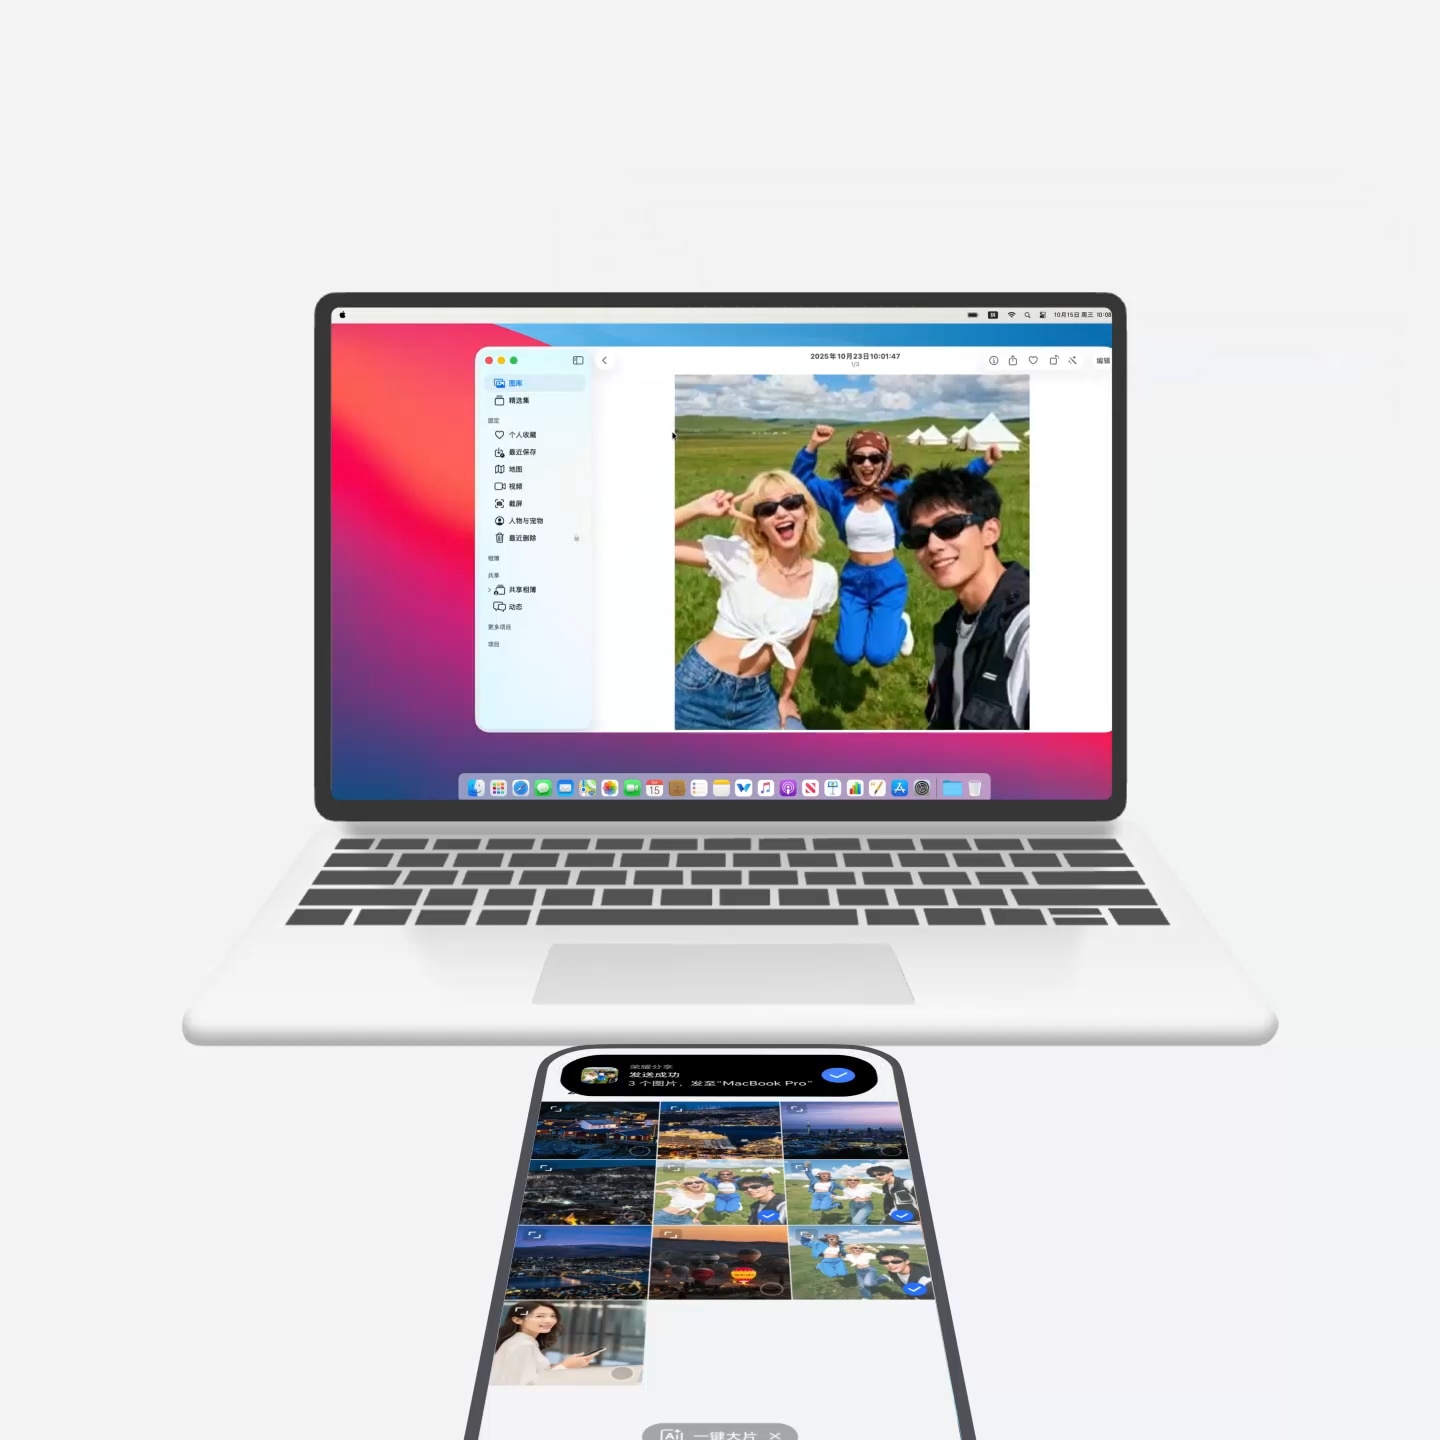
![Tap to Transfer files with Mac]()
Tap to Transfer files with Mac
Simply tap your Honor phone against the Mac to quickly transfer photos, videos, documents, and more. Whether it's work files or life moments, just a tap lets you enjoy seamless transfers, saying goodbye to cables and complicated steps.
-
![Customize Your Home Screen]()
Customize Your Home Screen
Access your personalized space in one step and choose from trendy themes to fit your style. Customize Icon style, Rounded corners, Color and more to create your unique home screen.
![Access App Services With a Single Tap on Home Screen]()
Access App Services With a Single Tap on Home Screen
Create shortcuts for diverse atomic services on your Home screen and access apps quickly and easily. Personalize your Home screen with simple drag-and-drop actions.
![Dual-Screen Layout]()
Dual-Screen Layout
When you unfold your device, embrace the dual-screen layout to to unlock the full potential of a larger screen. Enjoy the convenience of swiftly navigating through more apps and card sets.
![Better Sleep with Night Display]()
Better Sleep with Night Display
When you use the mobile phone before going to bed, screen exposure will suppress the production of sleep hormone. Night display can mitigate that effect to help you fall asleep faster.
![Magic lock screen: make your screen shine]()
Magic lock screen: make your screen shine
Personalized lock screens with customizable templates and decorations, bringing a surprise with every unlock.
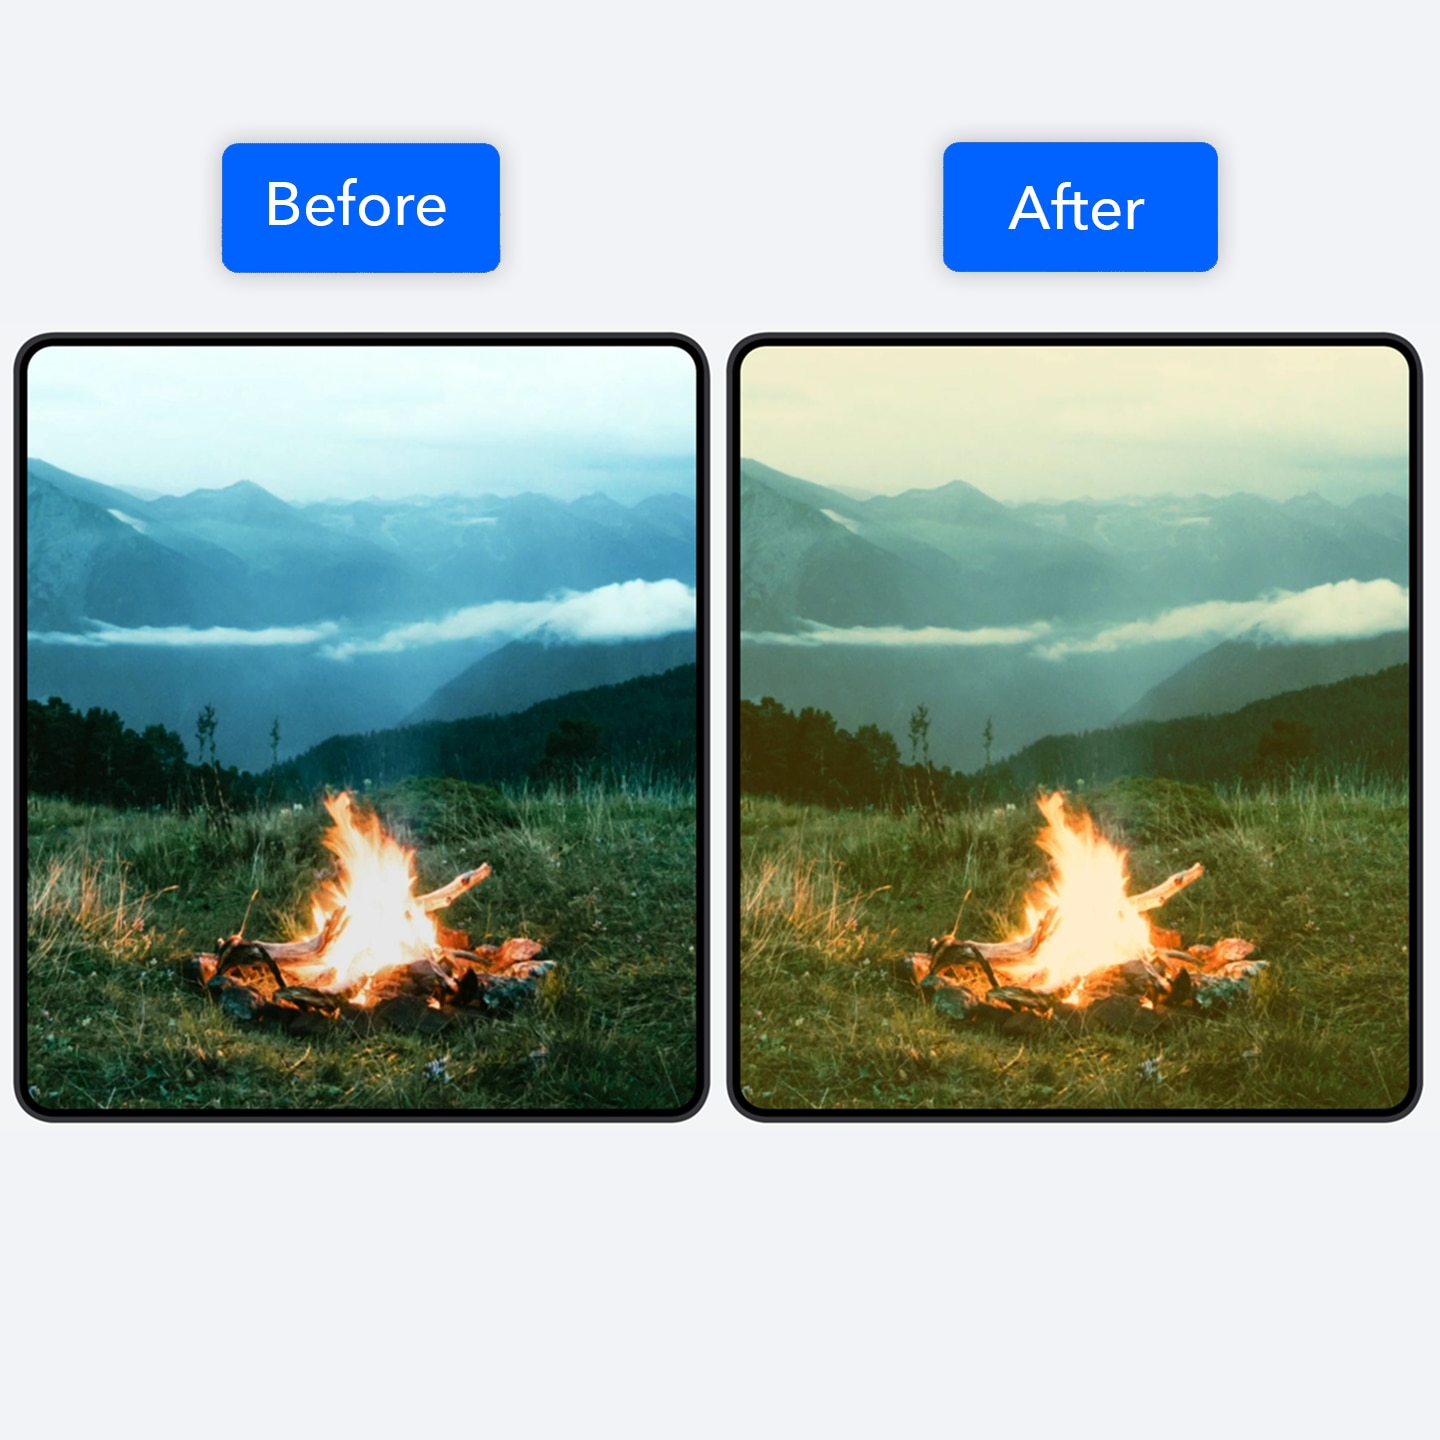
Magic Color – Replicate Desired Color Styles
No need to adjust complex parameters. Magic Color intelligently identifies target colors and quickly replicates them to your photos or post-processed images, creating the same atmosphere with one tap.
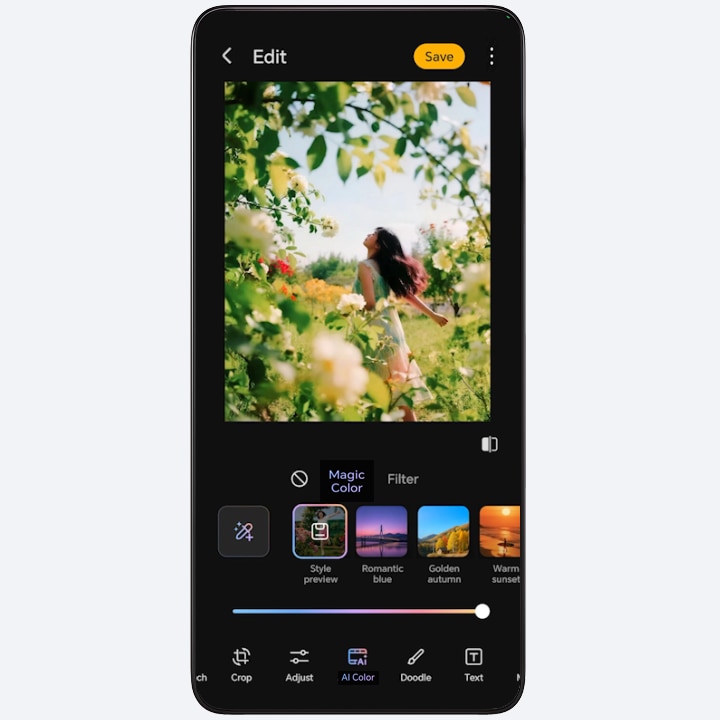
Photo color matching
- Go to Camera > PHOTO >
 (or >
(or >  ). Tap
MAGIC COLOR.
). Tap
MAGIC COLOR.
- Select a preset color style, or tap
 to choose the image you want
to match colors with, and
then tap
to choose the image you want
to match colors with, and
then tap  . You can tap
  to save the color style.
 - Tap
 to shoot.
Image color matching
- Go to Gallery. Select the image to be
edited, and tap
 > AI Color >
Magic
Color. Choose a preset color style, or tap
> AI Color >
Magic
Color. Choose a preset color style, or tap  to select the image you want to match colors with. Tap
  to preview the color-matching effect. You can tap
  to save the color style.
 - You can continue editing the image or tap Save to save it directly.
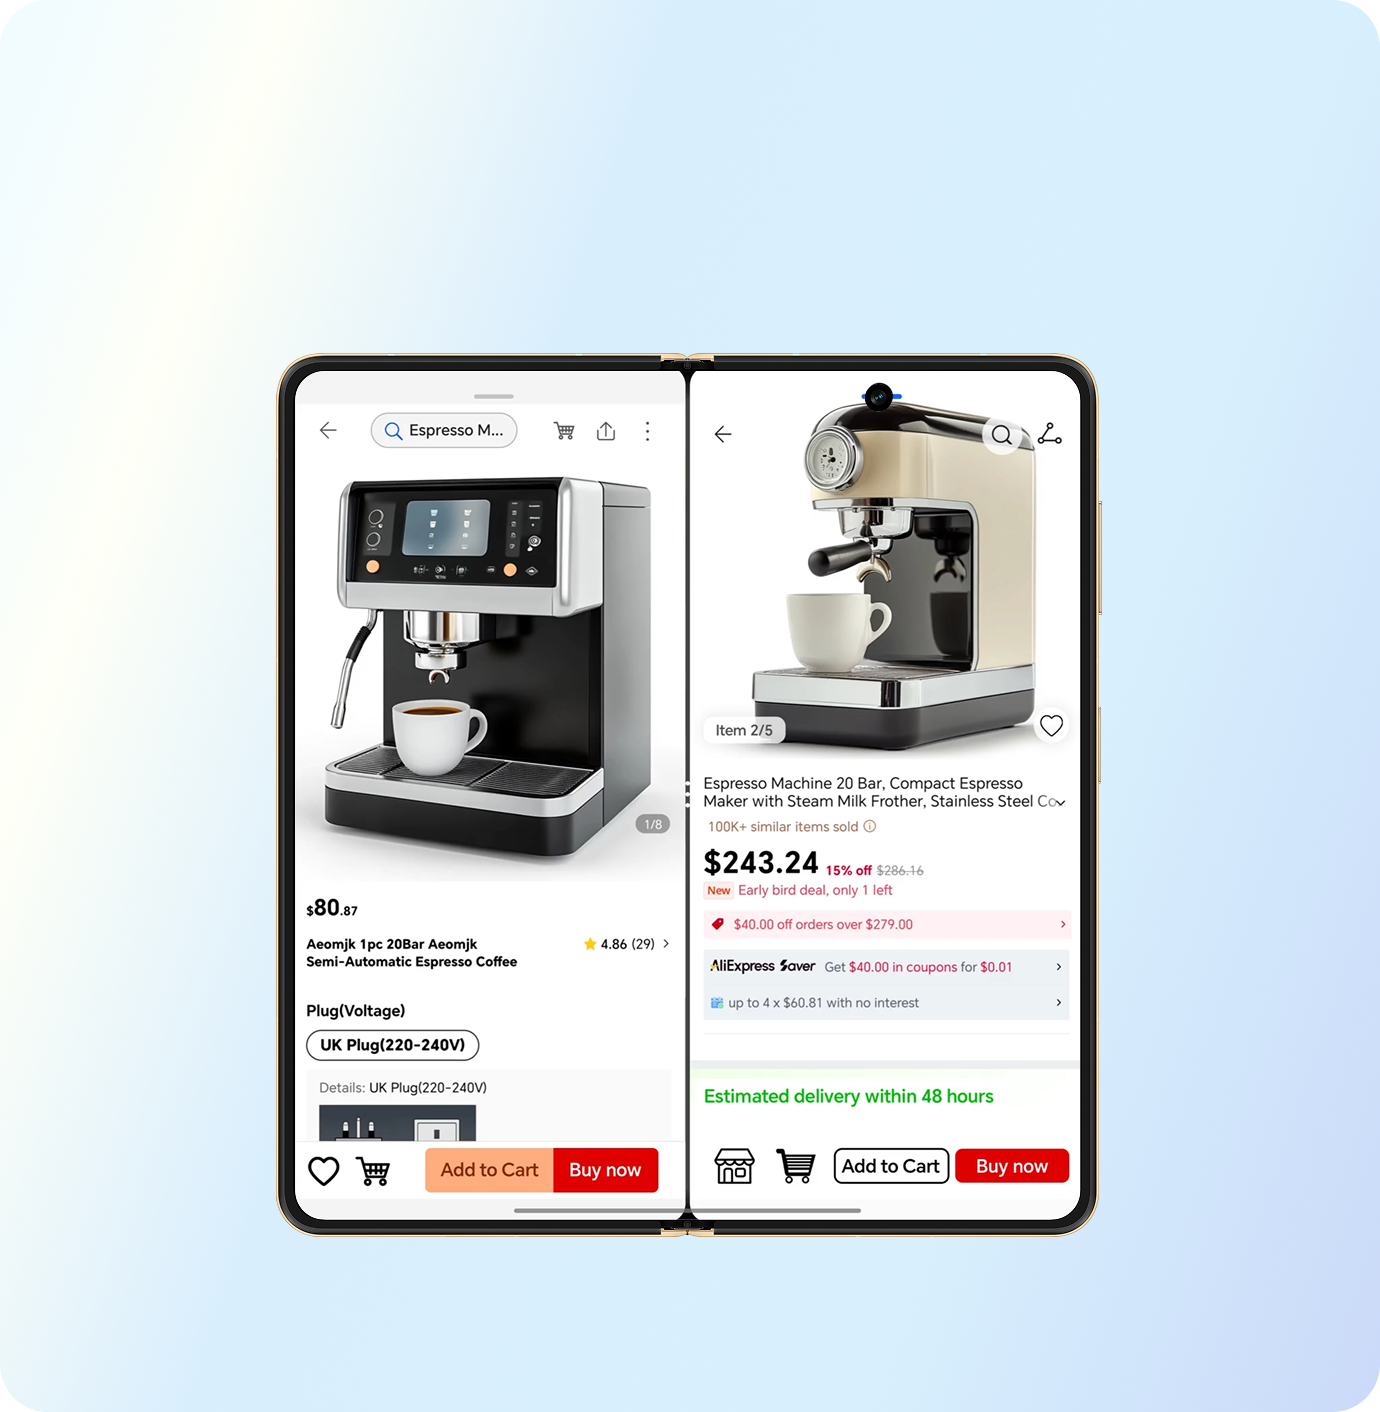
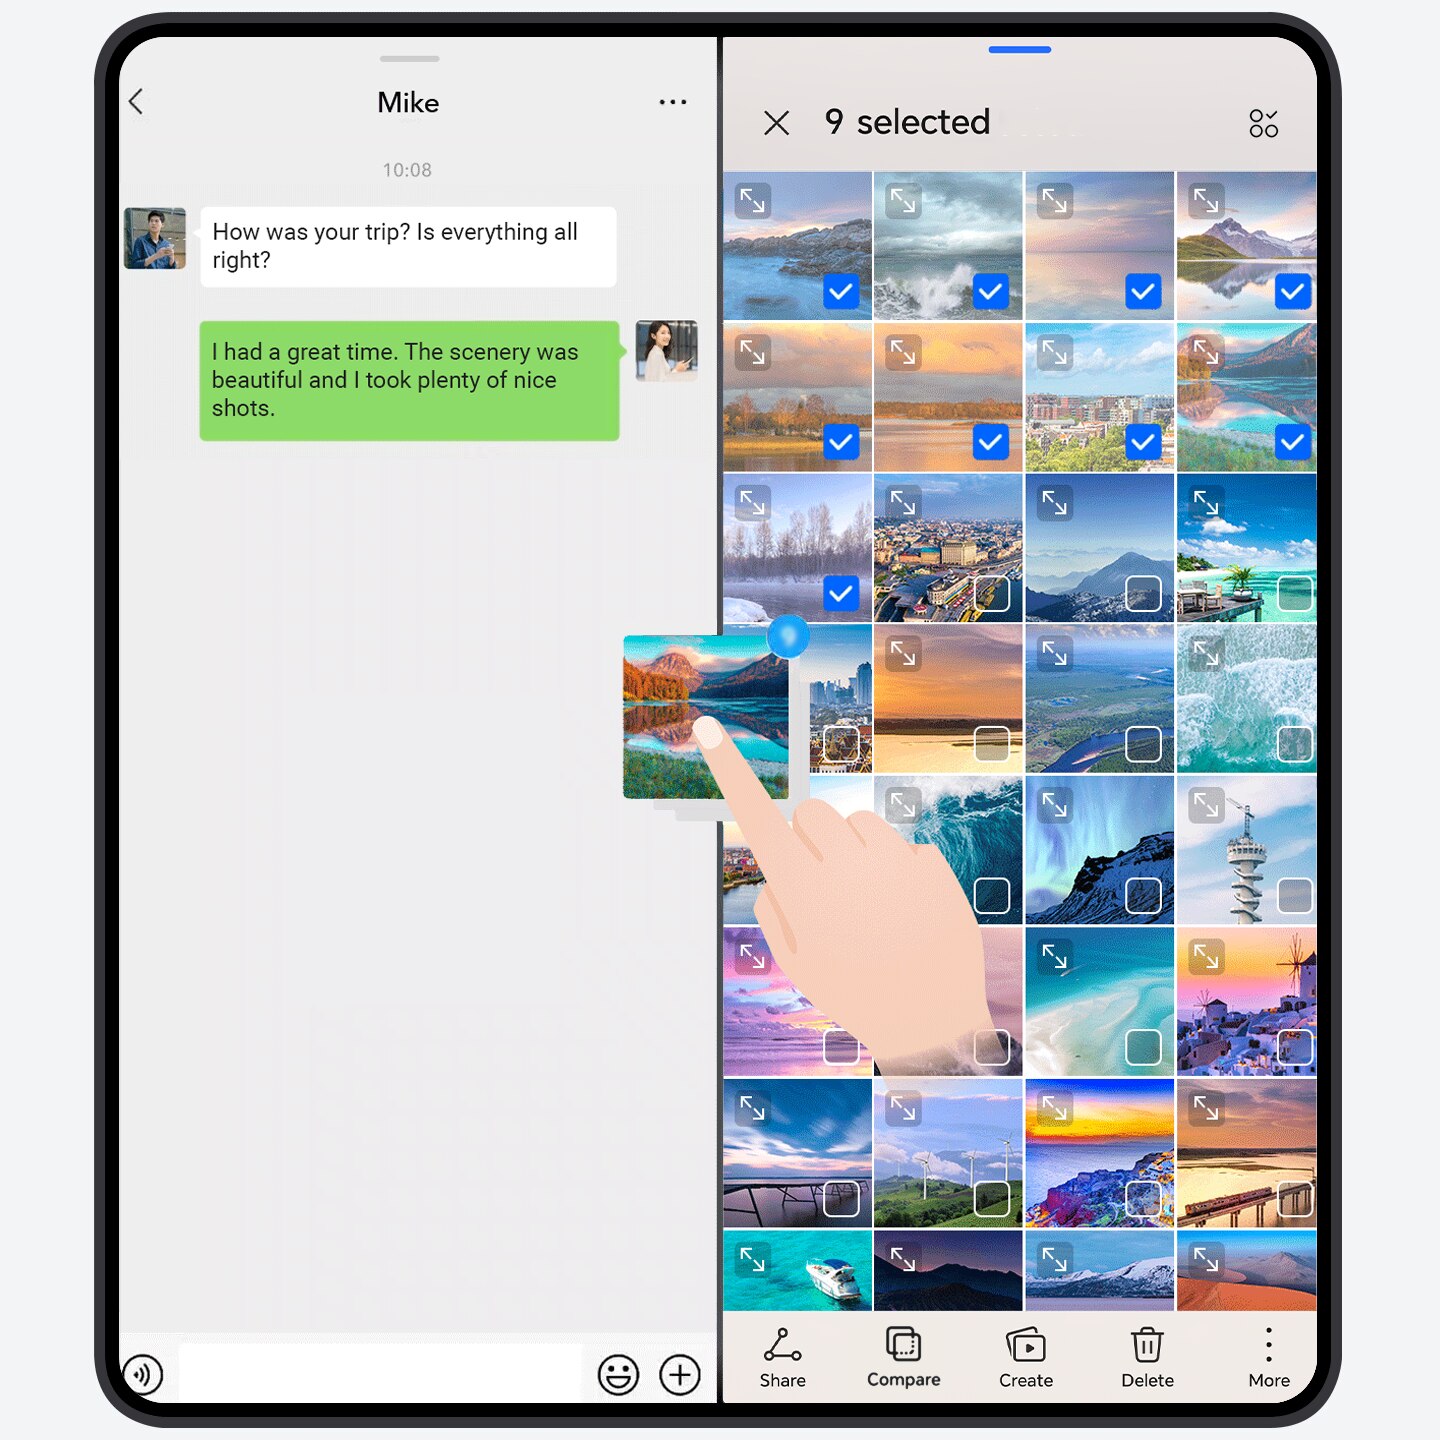
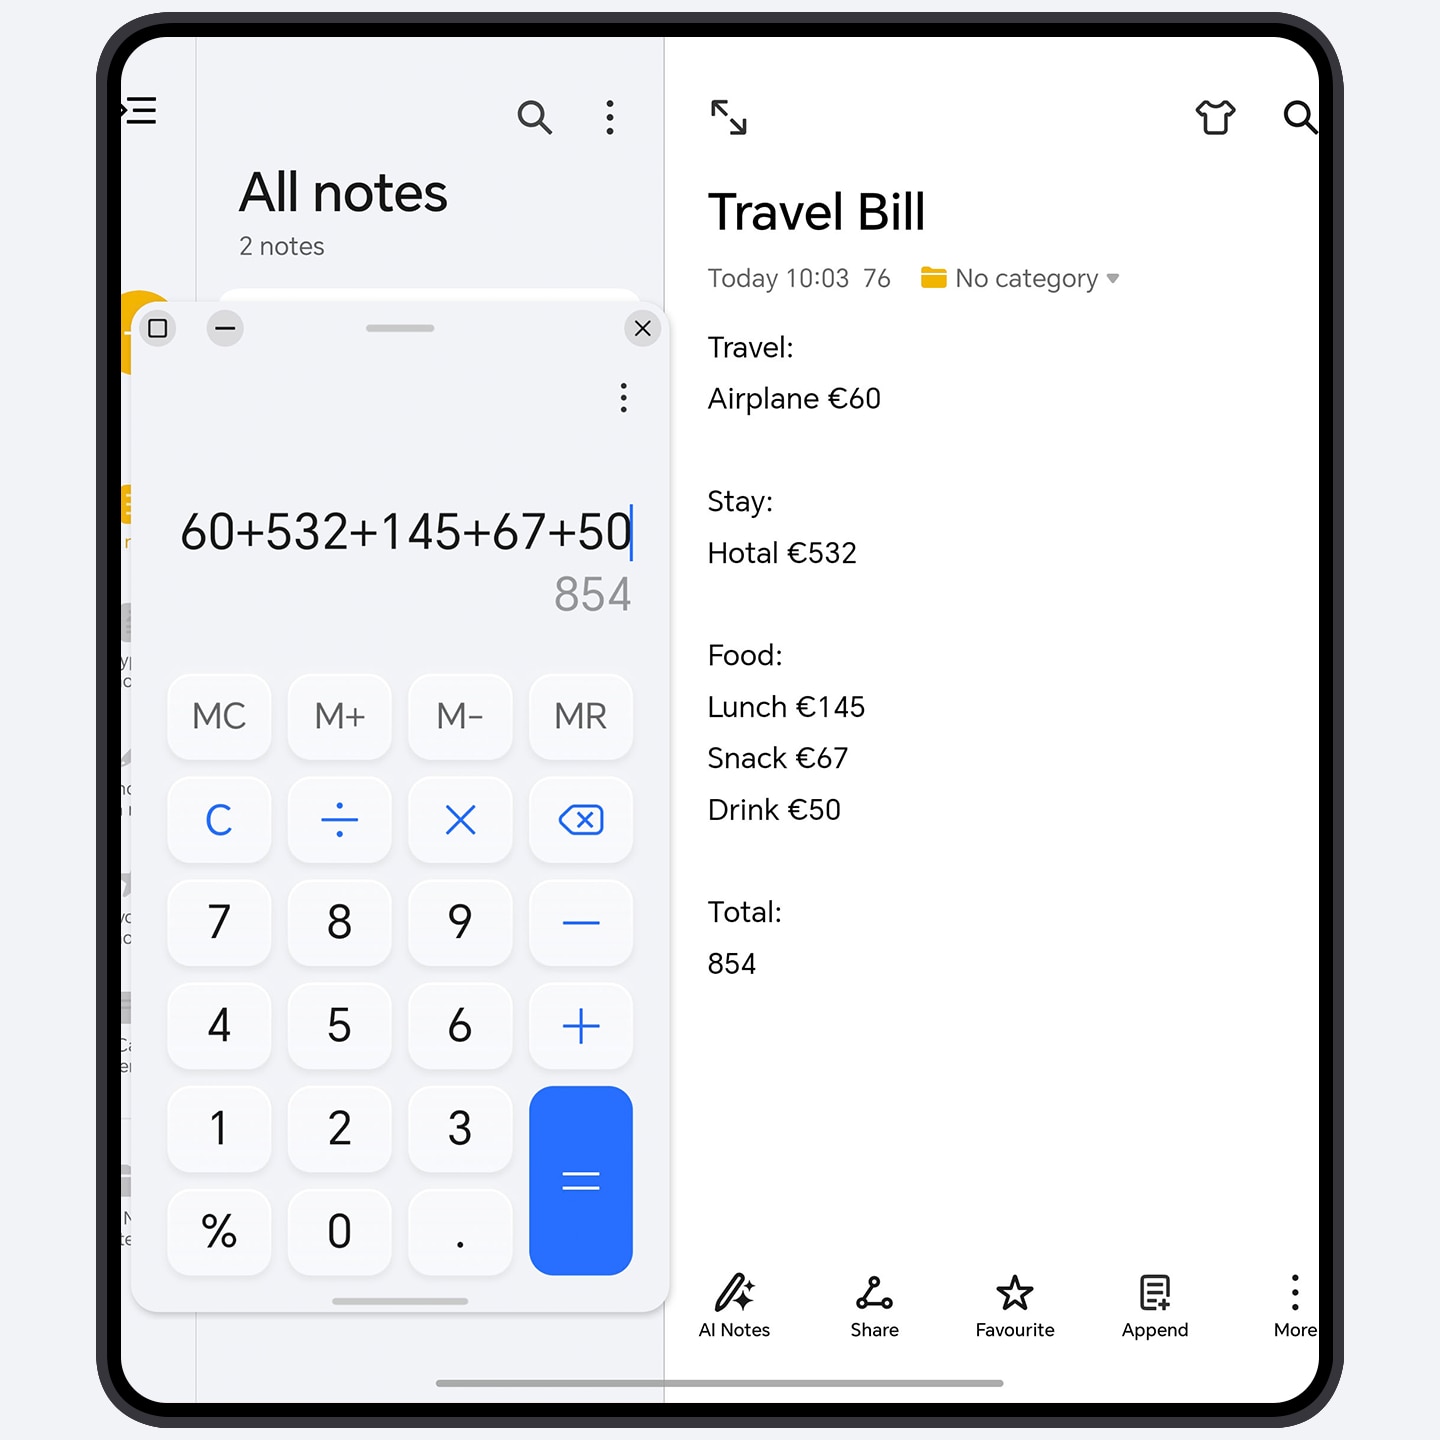
Split-screen, using two apps side by side
Use two apps on the same screen. You can chat while watching video, or directly drag and drop pictures and copy text between apps, which is convenient for sharing and editing, without repeatedly switching back-end apps.
- Enable split screen with one-step
gesture: When the screen
is unfolded, drag
 at the top of the
full-screen app to the edge of the screen and lift your finger to
enter the split-screen. On the other side of the screen, you can choose
a split-screen app.
at the top of the
full-screen app to the edge of the screen and lift your finger to
enter the split-screen. On the other side of the screen, you can choose
a split-screen app.
- Swap split-screen positions: Drag at the top of the
split-screen app to the other side and lift your finger.
- Adjust the split-screen ratio: Slide
the screen divider
 .
. - Switch the split-screen to full-screen:
Slide the screen
dividerto the edge of
the screen.
- When the screen is folded, first open an app that supports split-screen, and then swipe inward from the edge of the screen and pause, to bring up Multi-Window dock. Tap & hold on the app icon and drag it to the screen and lift your finger to enter the split-screen. Some apps do not support split-screen display, please refer to the actual situation.
Bring collages to life
Present your travel, street photography, or life moments in Moving Photos with a collage format, making your works more vibrant and cinematic.
- Go to Gallery > Create > Collage, and select Moving Photos following the on-screen instructions.
- Tap Create to choose your favorite Templates, Frame, Filters, Trim video to edit Moving Photos, or add Text.
- Tap Play preview to preview the effect. Once done, tap Save.
- You can tap 2K in the Collage interface, select the Format of the collage from the drop-down menu, and set up Resolution and FPS.
Portrait film photography, directly capturing the feeling of storytelling
The Portrait mode simulates professional-grade film filters, allowing you to freely choose from fresh and artistic, bright and soft, warm and vintage film styles for portraits. With just one tap, you can capture portrait street photography and portrait landscapes full of stories.
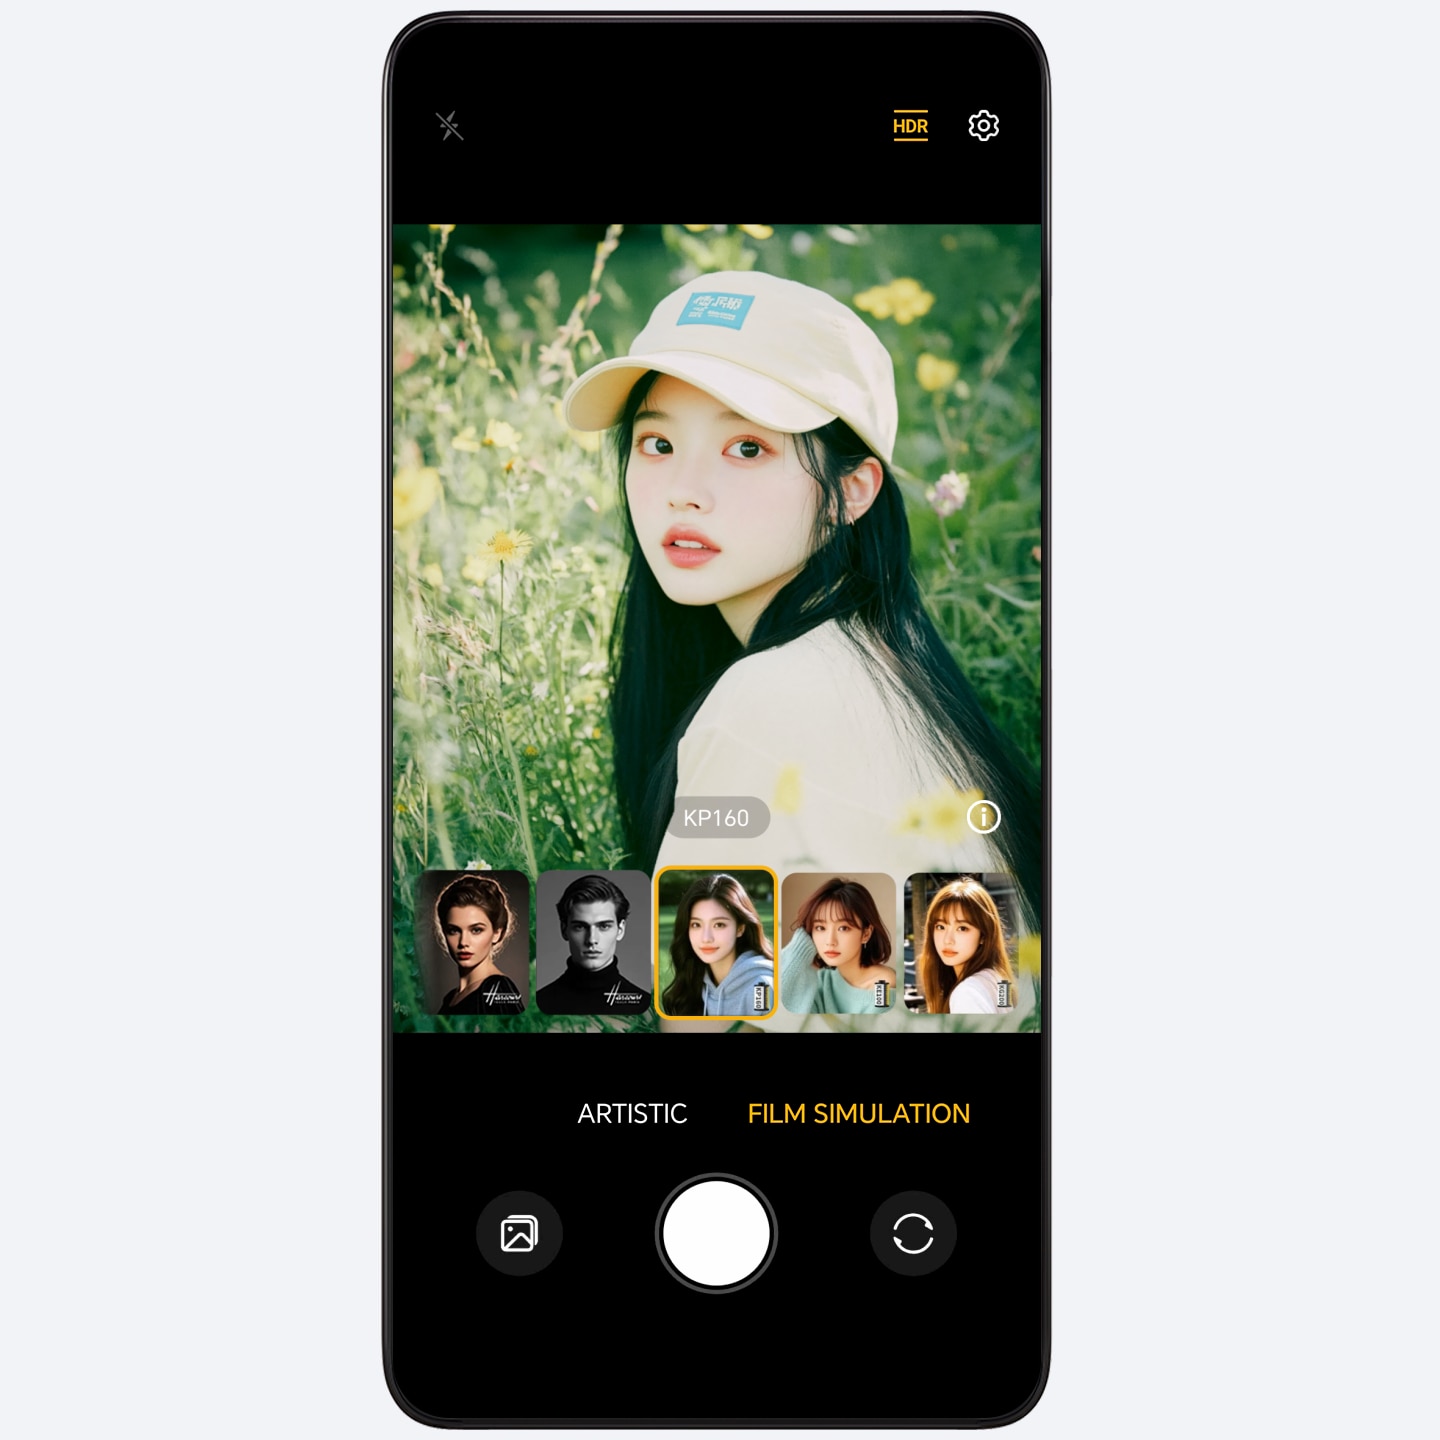
- Open Camera > PORTRAIT, and switch to the rear camera.
- Tap
 > Film simulation, and select
your favorite film style.
> Film simulation, and select
your favorite film style. - Tap
 to take a photo.
Camera Hovering mode for shooting high-quality and stable photos and Videos
With the Hovering mode, your phone camera can take photos/videos from various angles as if it were placed on a tripod, making it easy to shoot portraits, buildings or time-lapse sunrise from various angles. One screen is for shooting, and the other is for previewing. You can view your creation while you are shooting and you can use it for both landscape and portrait orientations.
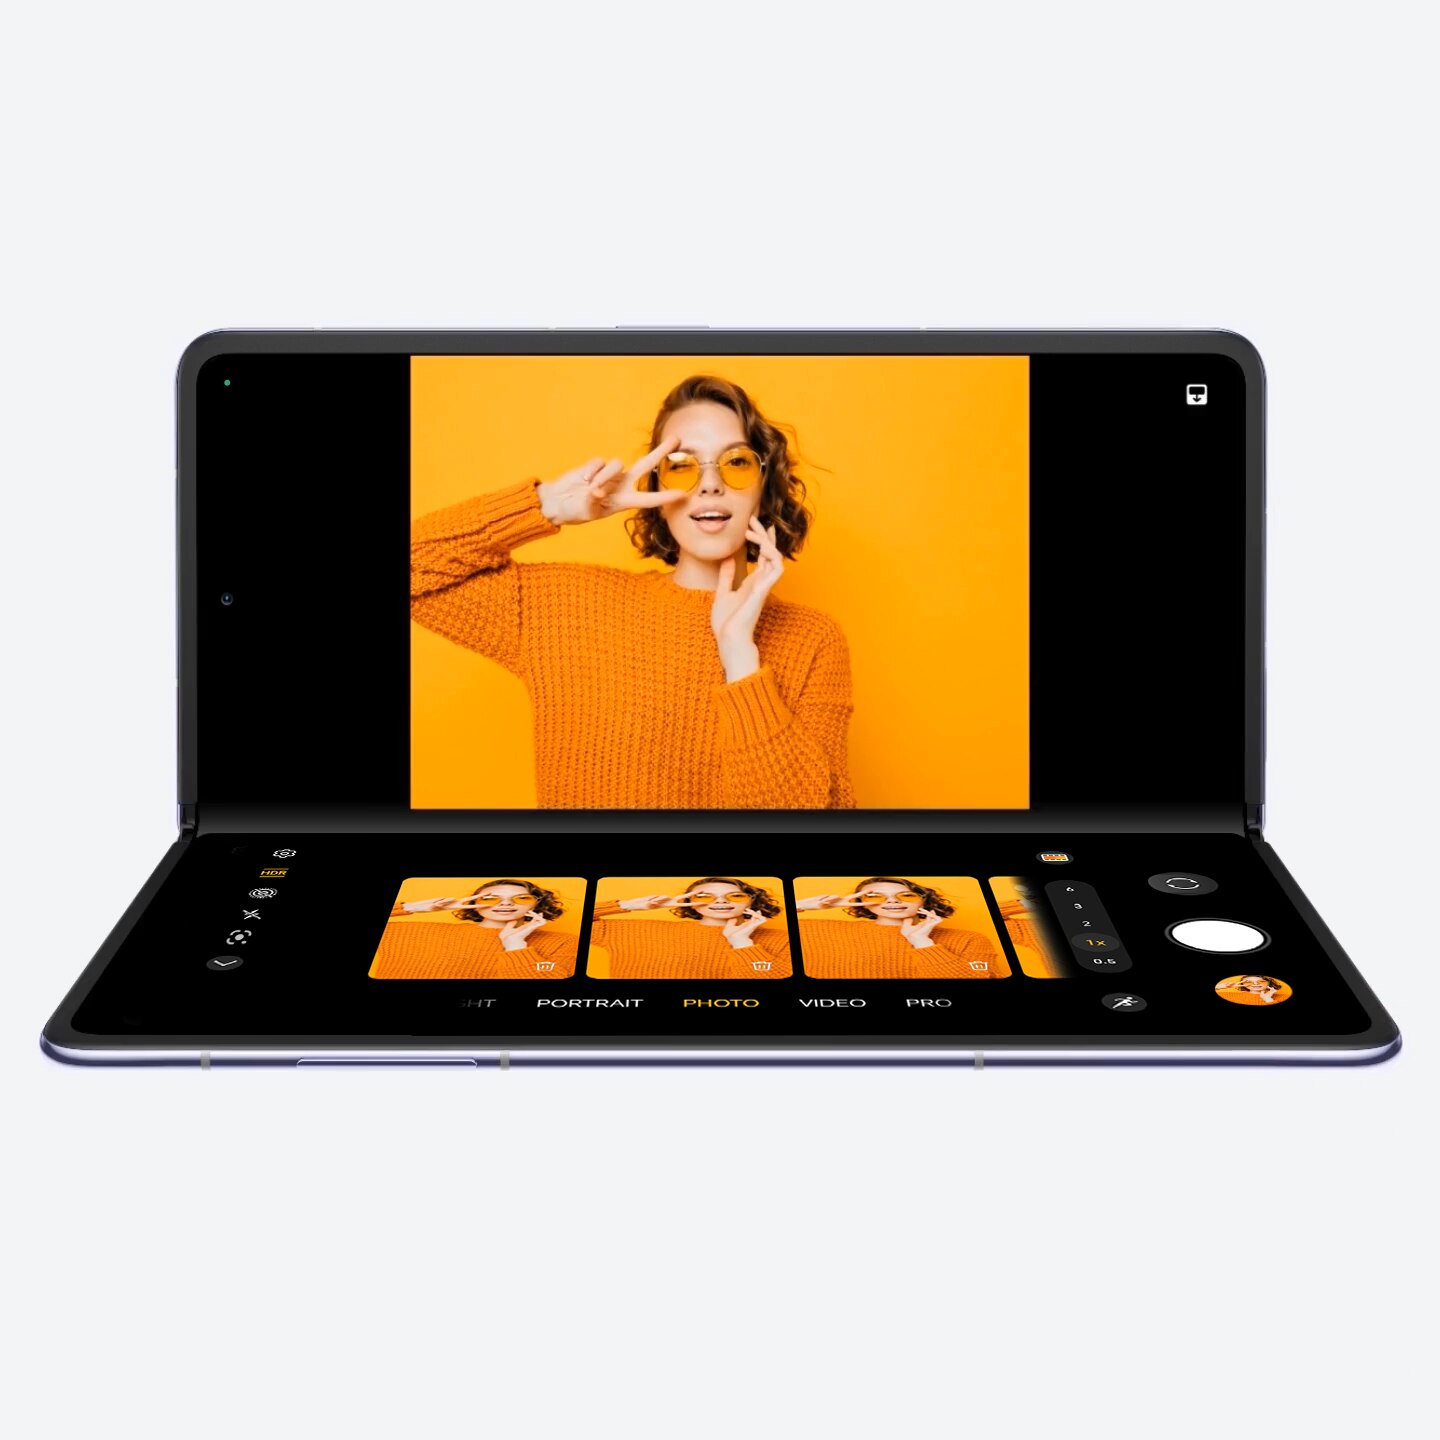
Enable Hovering mode
- Go to Camera, bend your screen, and the
view will enter split-screen mode automatically,
which means Hovering mode is enabled. Hold the phone in your hands
or place it on a stable surface, and adjust the screen angle for
shooting.
During the shooting, you can slide on the other preview screen to
view the photos and tap
 to delete.
 - When the angle between the two screens is less than 90°, the
viewfinder area will automatically switch to the lower screen. You
can also tap
 on the upper right
of your screen to manually switch the viewfinder.
on the upper right
of your screen to manually switch the viewfinder.
Exit Hovering mode
You can unfold the screen during shooting to return to the full screen.
Floating windows, making multitasking easier
Full-screen apps can be displayed in windows, with flexible arrangement. When replying messages while watching video, there is no need to exit the app or switch back and forth. Immersion without interruption, and quickly multitasking.
Enable the floating window with one-step
gesture: When the
screen is unfolded, drag ![]() at the top of the
full-screen app vertically down to the center of the screen and lift
your finger to open the floating window.
at the top of the
full-screen app vertically down to the center of the screen and lift
your finger to open the floating window.
- Adjust the window size: Slide the bottom two corners of the floating window.
- Move the window: Drag
 at the top.
 - Minimize the window: Quickly drag at the top to
the edge of the screen to minimize it to a floating ball.
- Switch the window to full-screen: Swipe
down at the bottom to switch it to full screen (or
swipe up to close it).
- When the screen is folded, swipe inward from the edge of the screen and pause, to bring up Multi-Window dock, and tap the app icon to enable the floating window. Some apps do not support floating window display, please refer to the actual situation.
Air scroll
Wave in the air and scroll the page. You can also easily browse news, videos or chat history when your hands are occupied and can’t touch the screen.
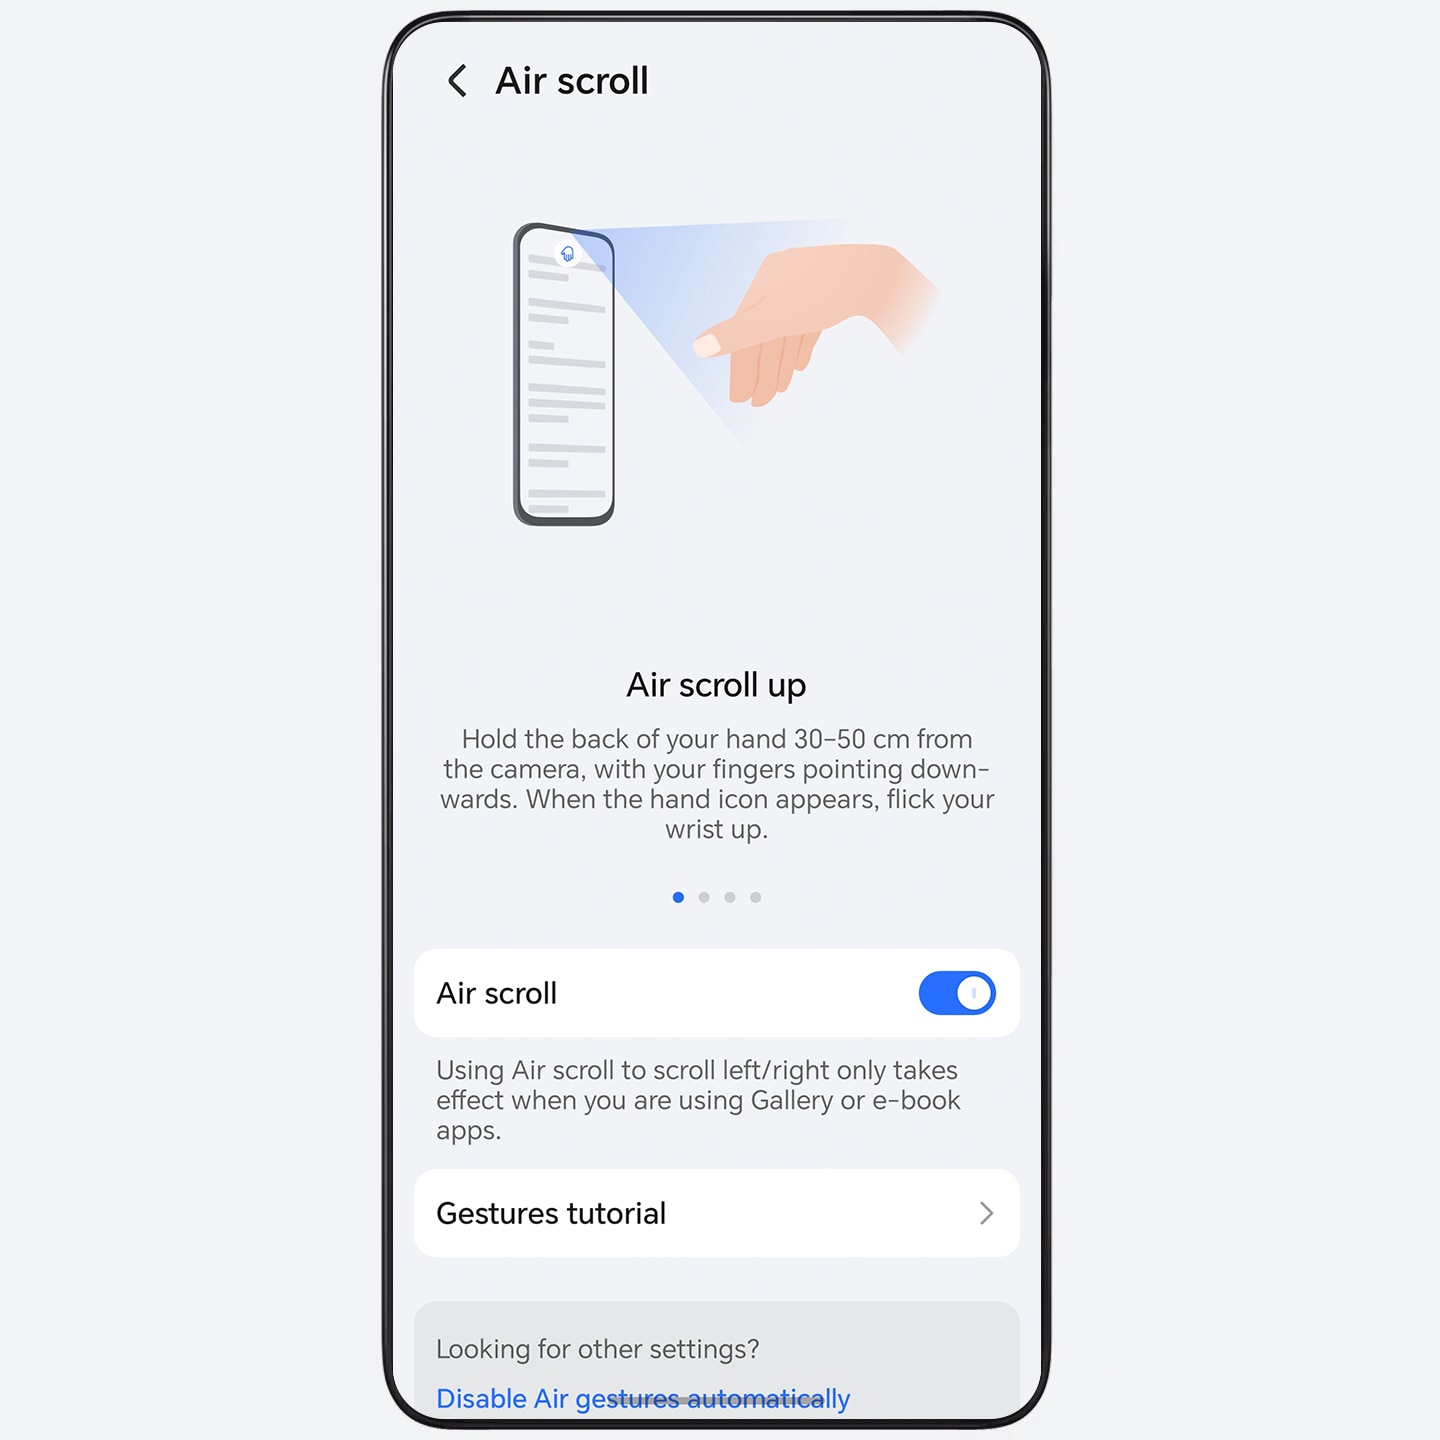
Go to Settings > HONOR AI > Air Gestures > Air scroll, and turn on Air scroll.
- Scroll up the screen: Close all five fingers together, hold
the back of your hand towards the front camera and keep it about 40
cm away. Fingertips pointing down and wave your hand up when
 appears on the screen.
 - Scroll down the screen: Close all five fingers together, hold
your palm towards the front camera and keep it about 40 cm away.
Fingertips
pointing up and wave your hand down when
 appears on the screen.
 - Swipe left the screen: Close all five fingers together, hold
your palm towards the front camera and keep it about 40 cm away.
Fingertips
pointing right and wave your hand left when
 appears on the screen.
 - Swipe right the screen: Close all five fingers together, hold
the back of your hand towards the front camera and keep it about 40
cm away. Fingertips pointing left and wave your hand right when
 appears on the screen.
Please ensure that your palm is towards the front camera and not the center of the screen, and you start to wave when the hand icon appears on the screen. Maintain an appropriate frequency, movement range and distance.
- Go to Settings > HONOR AI > Air Gestures to learn more about air gestures.
- Some apps or interfaces do not support air gestures. Please refer to actual situation.
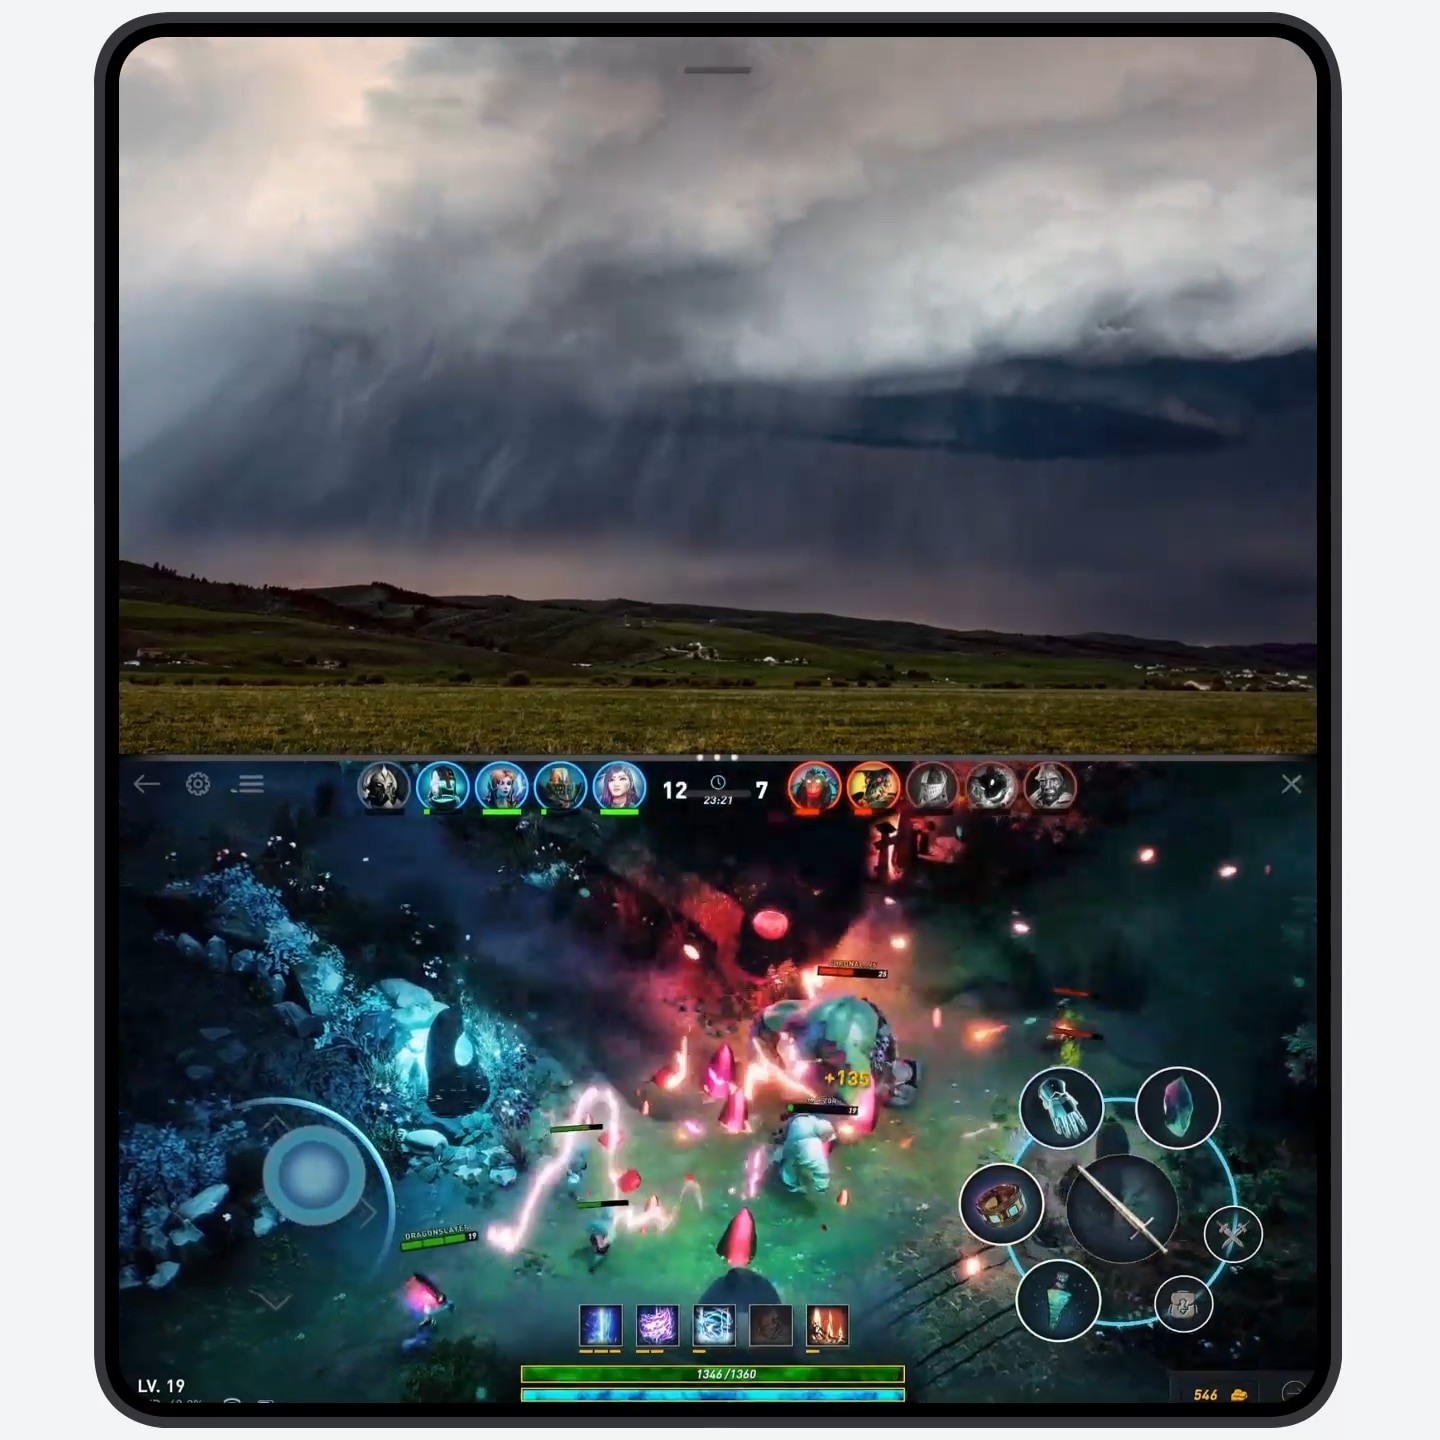
Horizontal Split Provides Spacious View and Enables High-efficient Work
The Horizontal split mode provides a spacious, uncluttered and relaxing viewing experience. It enables you to process multitasks more efficiently. For example, you can watch videos on the upper screen while gaming on the lower screen, or attend a meeting on the upper screen while taking notes on the lower screen.
- Before using this function, you need to unfold your phone.
- Switch from Vertical split to Horizontal split
mode: Tap the screen divider
 , and then tap
  .
.
- Adjust the window
size: Slide the screen divider
 .
. - Change display
position: Drag
 at the top of
the split-screen app to the other side and lift your finger.
at the top of
the split-screen app to the other side and lift your finger. - Change to floating
window: Drag at the top of
the split-screen app to the edge of the screen and lift your finger.
- You can also enter the horizontal split-screen via Multi-Window dock. Some apps do not support horizontal split-screen display, please refer to the actual situation.
Swipe down with three fingers to collect everything
Swipe down with three fingers to quickly save images, web pages or documents, etc. You can check and review them at any time.
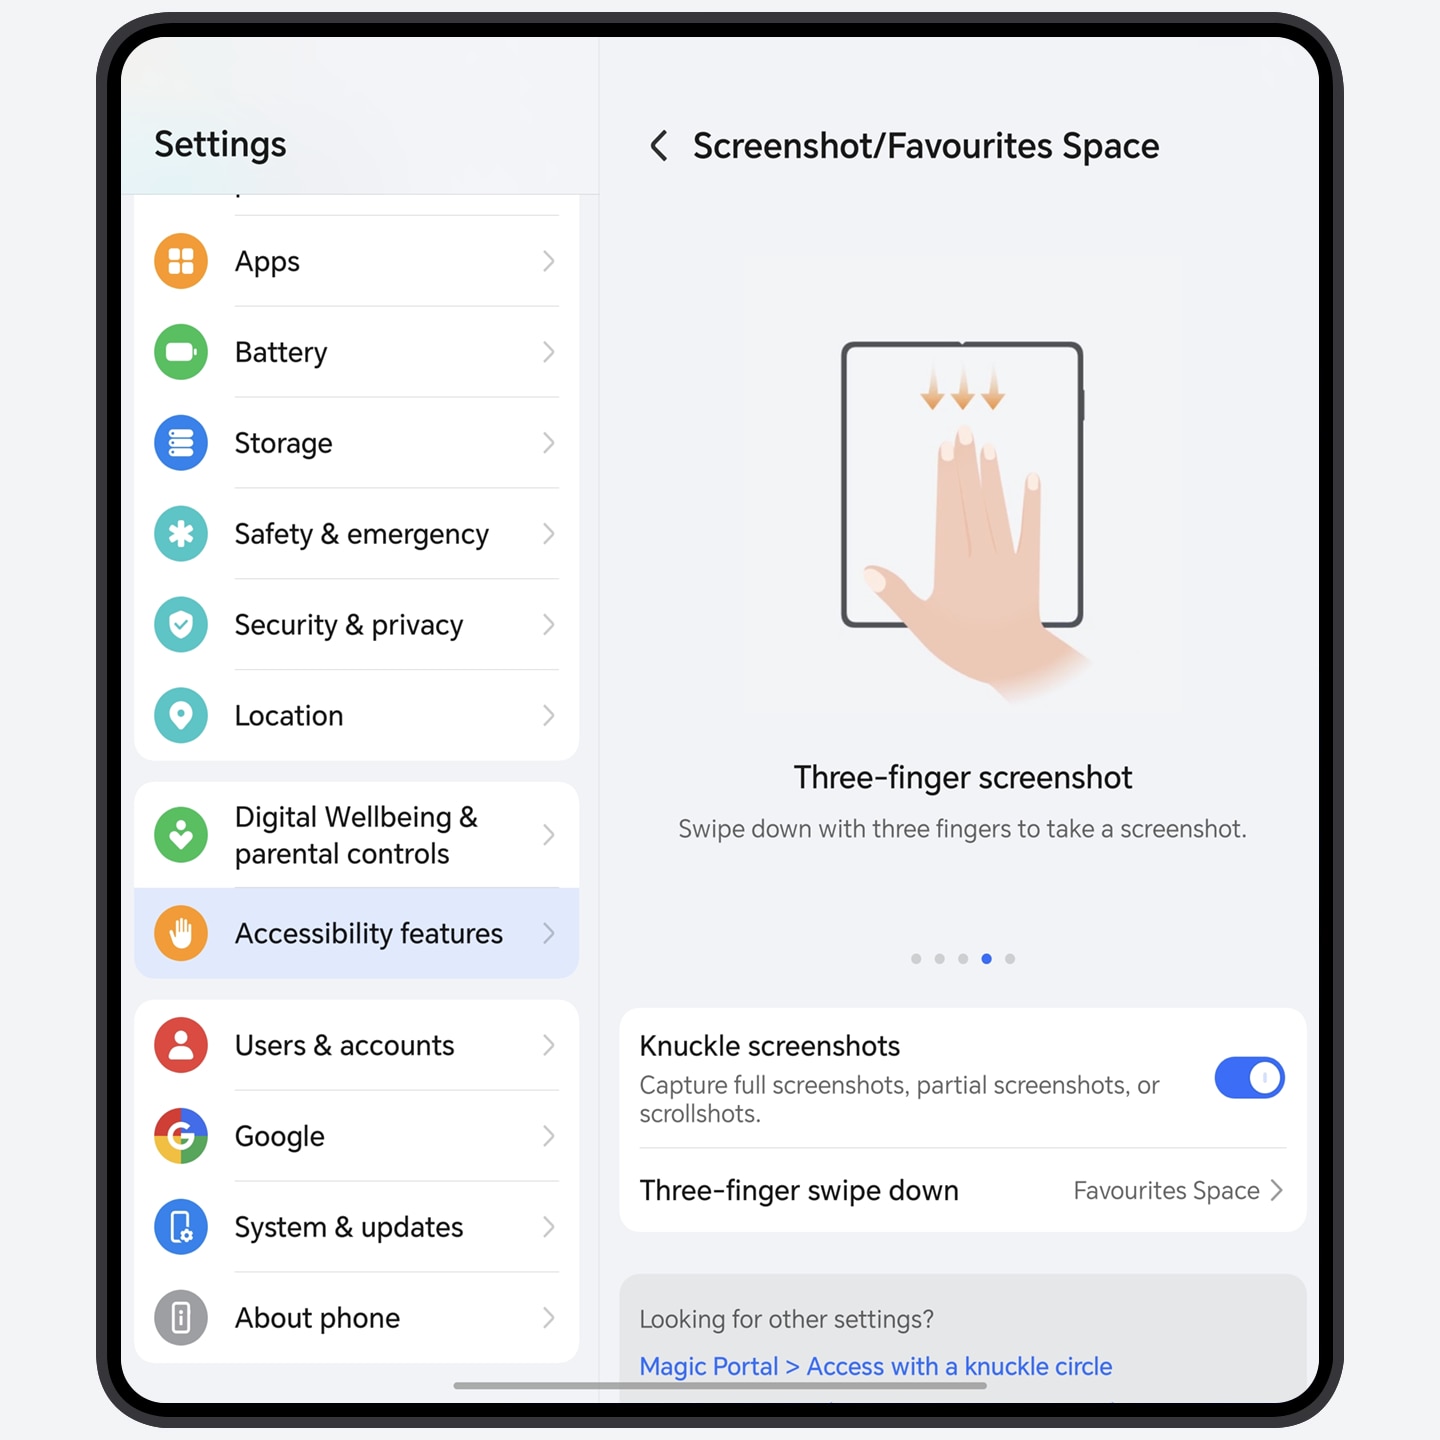
- Web page collection: Swipe down with three fingers when browsing web pages to save the content, and you can view and edit it anytime even if the original web page link is not working.
- Document collection: Swipe down with three fingers to quickly save documents that are already open. This allows for easy access at a later time.
- Image collection: Tap an image on a web page or in a social app and swipe down with three fingers to quickly save it.
- The function interface may vary depending on the model, application, etc. Please refer to the actual situation.
Take a Screenshot by Air Gestures
Make a fist to capture the current screen. You can capture screen highlights even when your hands are occupied and can’t touch the screen.
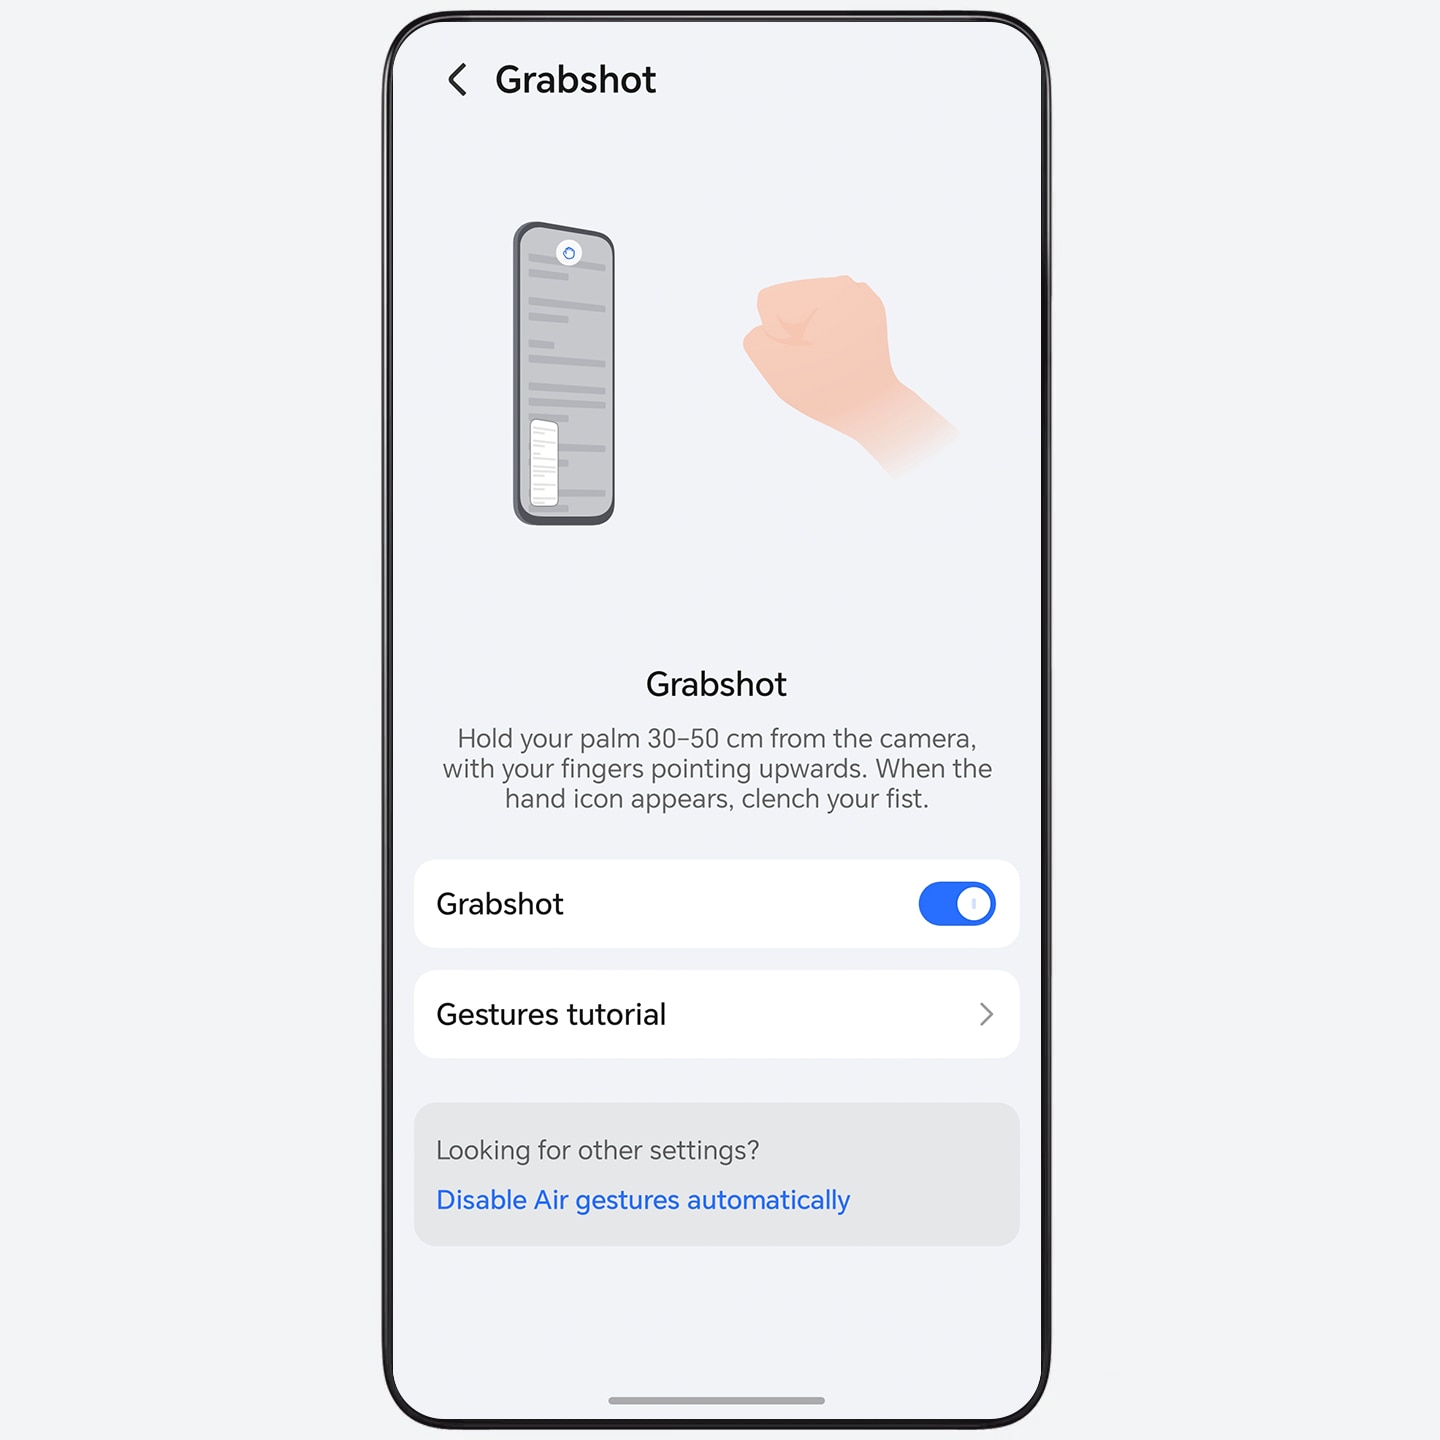
- Go to Settings > HONOR AI > Air Gestures > Grabshot, and turn on Grabshot.
- Take a screenshot: Close all five fingers together, hold your palm
towards the front camera and keep it about 40cm away. Fingertips
pointing
up and grab and make a fist when
 appears on the screen.
 - Please ensure that your palm is towards the front camera and not
the center of the screen, and you start to grab and make a fist when
appears on the screen.
- Go to Settings > HONOR AI > Air Gestures to learn more about air gestures.
- Some apps or interfaces do not support screenshot. Please refer to the actual situation.
AI De-reflection, Turning Failed Shots into Clear and Realistic Images
When taking photos of scenery, exhibits, people, animals through the glass, or when wearing glasses, reflections from the glass and lenses will affect the quality of the final image. AI De-reflection automatically identifies and precisely eliminates the reflective parts in the photo, effortlessly restoring clear visuals and portrait details, avoiding failed shots.
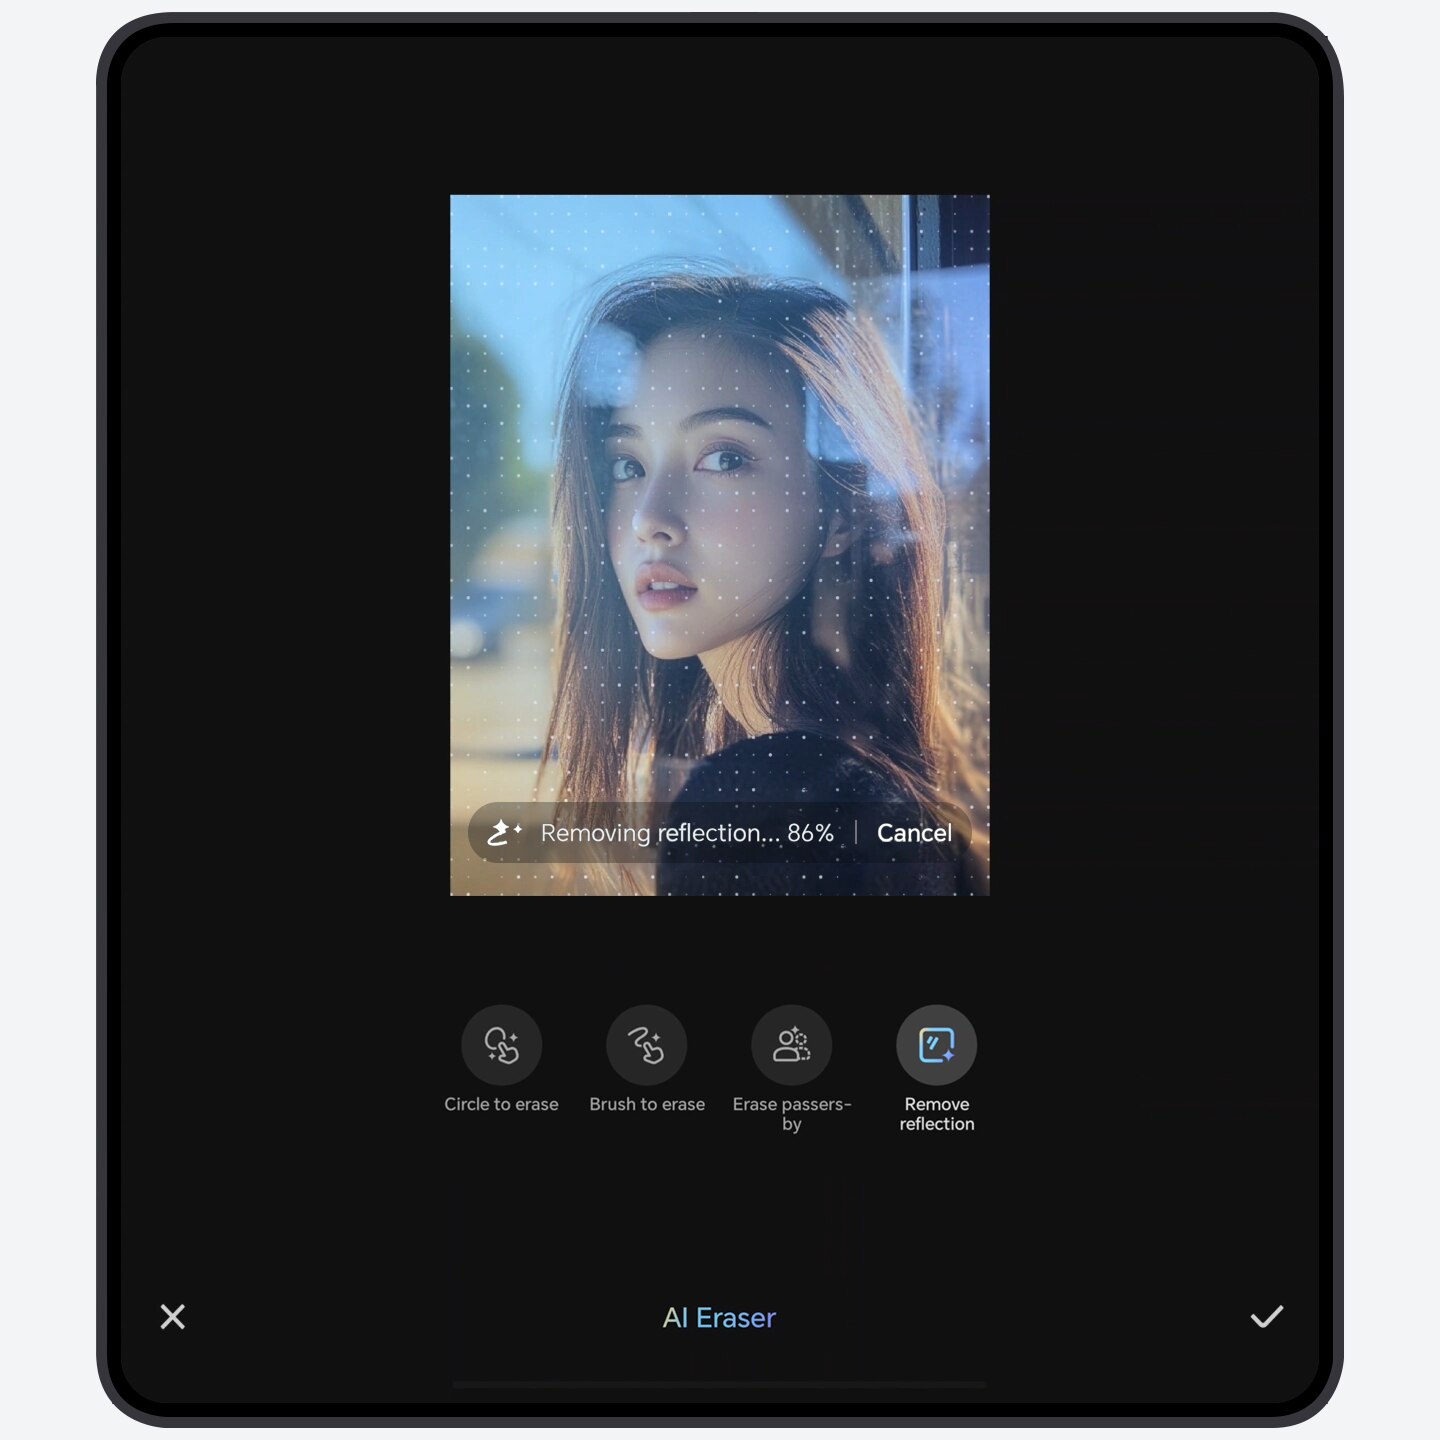
- Go to Gallery > Albums, select the
photo to be refined, and tap
 > Magic Retouch > AI Eraser.
- Tap Remove reflection to automatically identify and remove the reflective parts.
- Tap
 to compare the before and after effects of
the removal. Once finished, tap
to compare the before and after effects of
the removal. Once finished, tap  > SAVE to
save the photo.
> SAVE to
save the photo.
Auto Generate Instant Movie Clips
Select videos and photos, intelligently pick out highlight moments and use them with video templates to automatically create high-quality movie clips with better artistic effect.
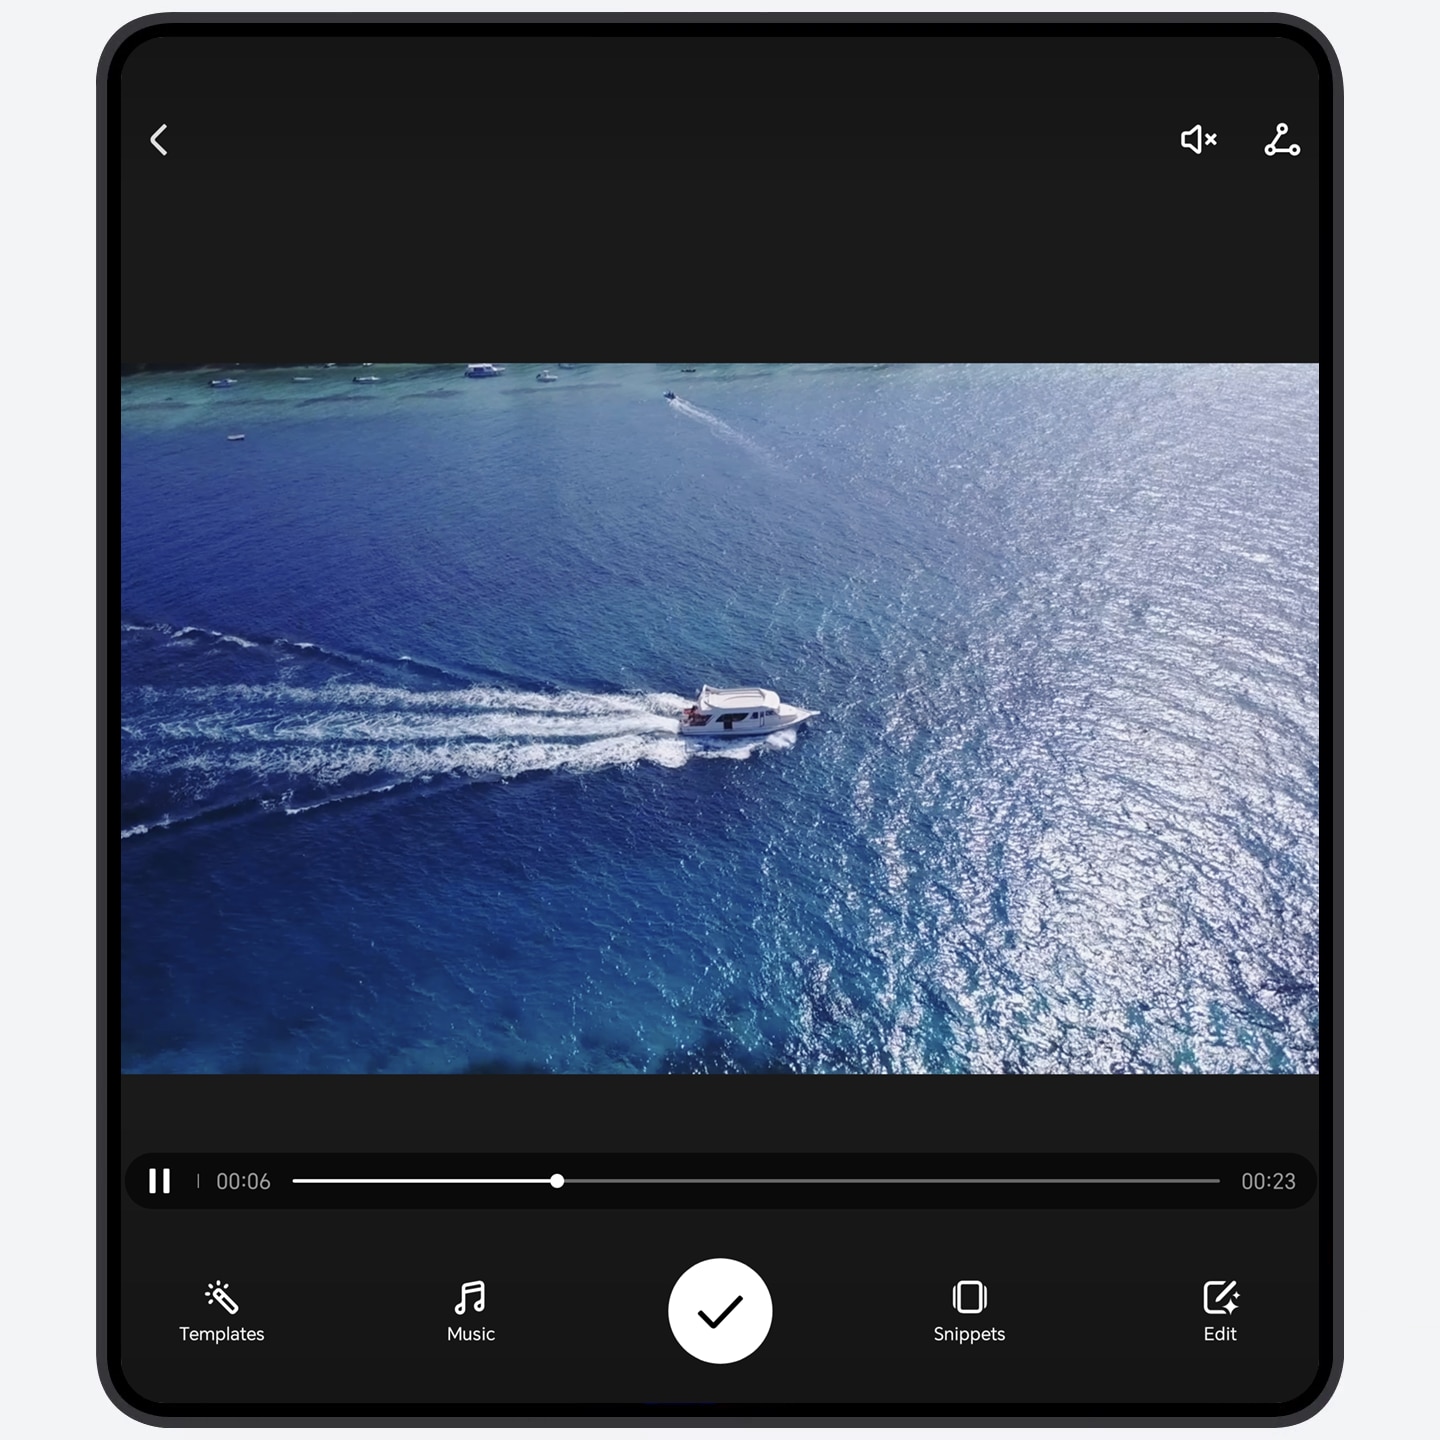
- Go to Gallery > Albums. Choose an album, press and hold a photo or video to enter multi-select mode, then select multiple items, and tap Instant movie that pops up. Movie clips will be automatically created.
- You can change templates and music, and adjust snippets. For more
options, tap
 .
. - Tap
 to save. Tap
  to quickly share.
- You can also go to Gallery > Create > Instant movie and select multiple videos and photos to create a movie clip.
AI Face Tune, perfect group photos guaranteed
Using AI Face tune can intelligently identify and analyze multiple similar facial photos from the same scene, automatically select the best facial expression from adjacent photos, repair closed eyes.
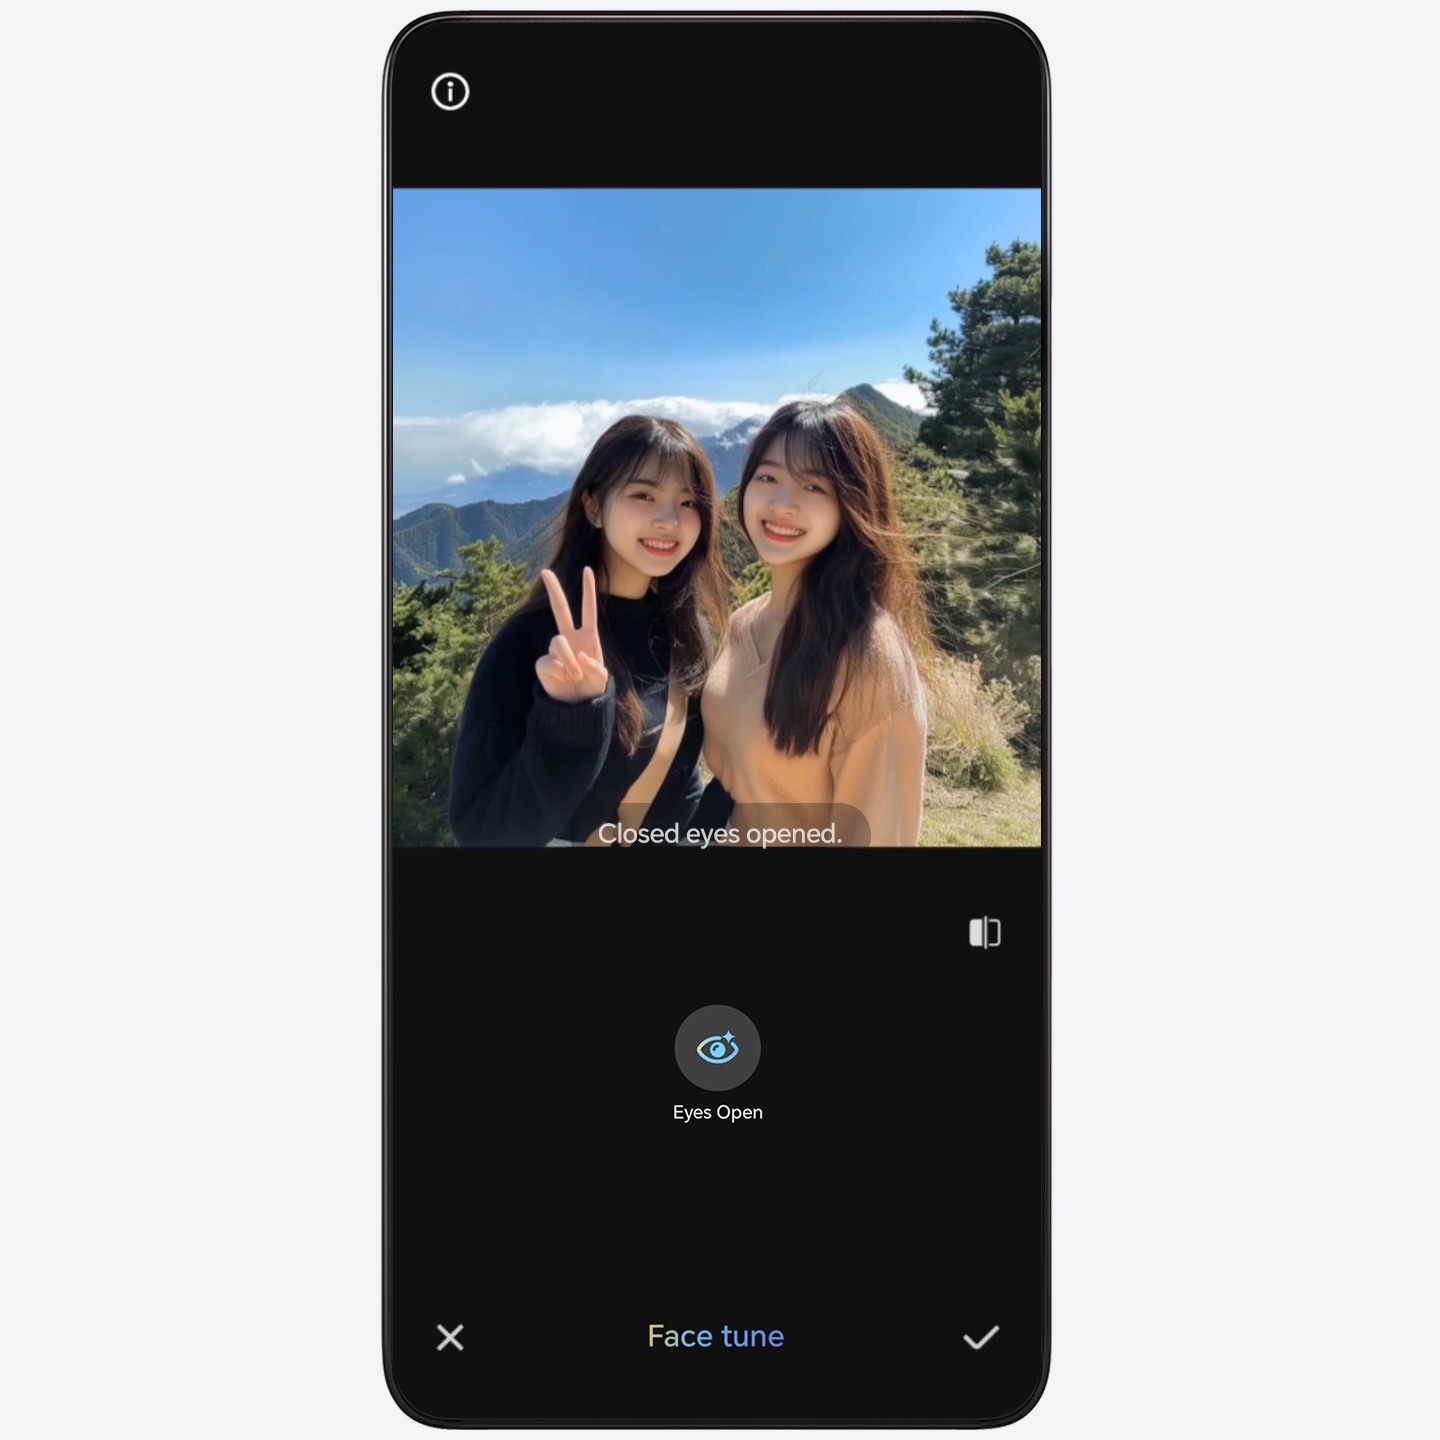
- Go to Gallery, select the photo that
needs restoration, then
tap
 > Magic
Retouch.
> Magic
Retouch. - Tap Face tune, and you can perform any of the following actions, either individually or in sequence:
- Tap Eyes Open, and closed eyes will automatically be opened.
- Tap
 > SAVE to
save the photo.
> SAVE to
save the photo.
- If there are no available photos with open eyes from similar faces adjacent to the current photo, Eyes Open cannot be applied.
- Photos of the same scene taken locally, imported, or downloaded all support multi-image fusion calculation.
Select and Compare Images to Find Your Favorite
Compare similar images side by side, with the added convenience of zooming in on them together to spot every little detail. This feature is designed to help you effortlessly choose your favorite image.
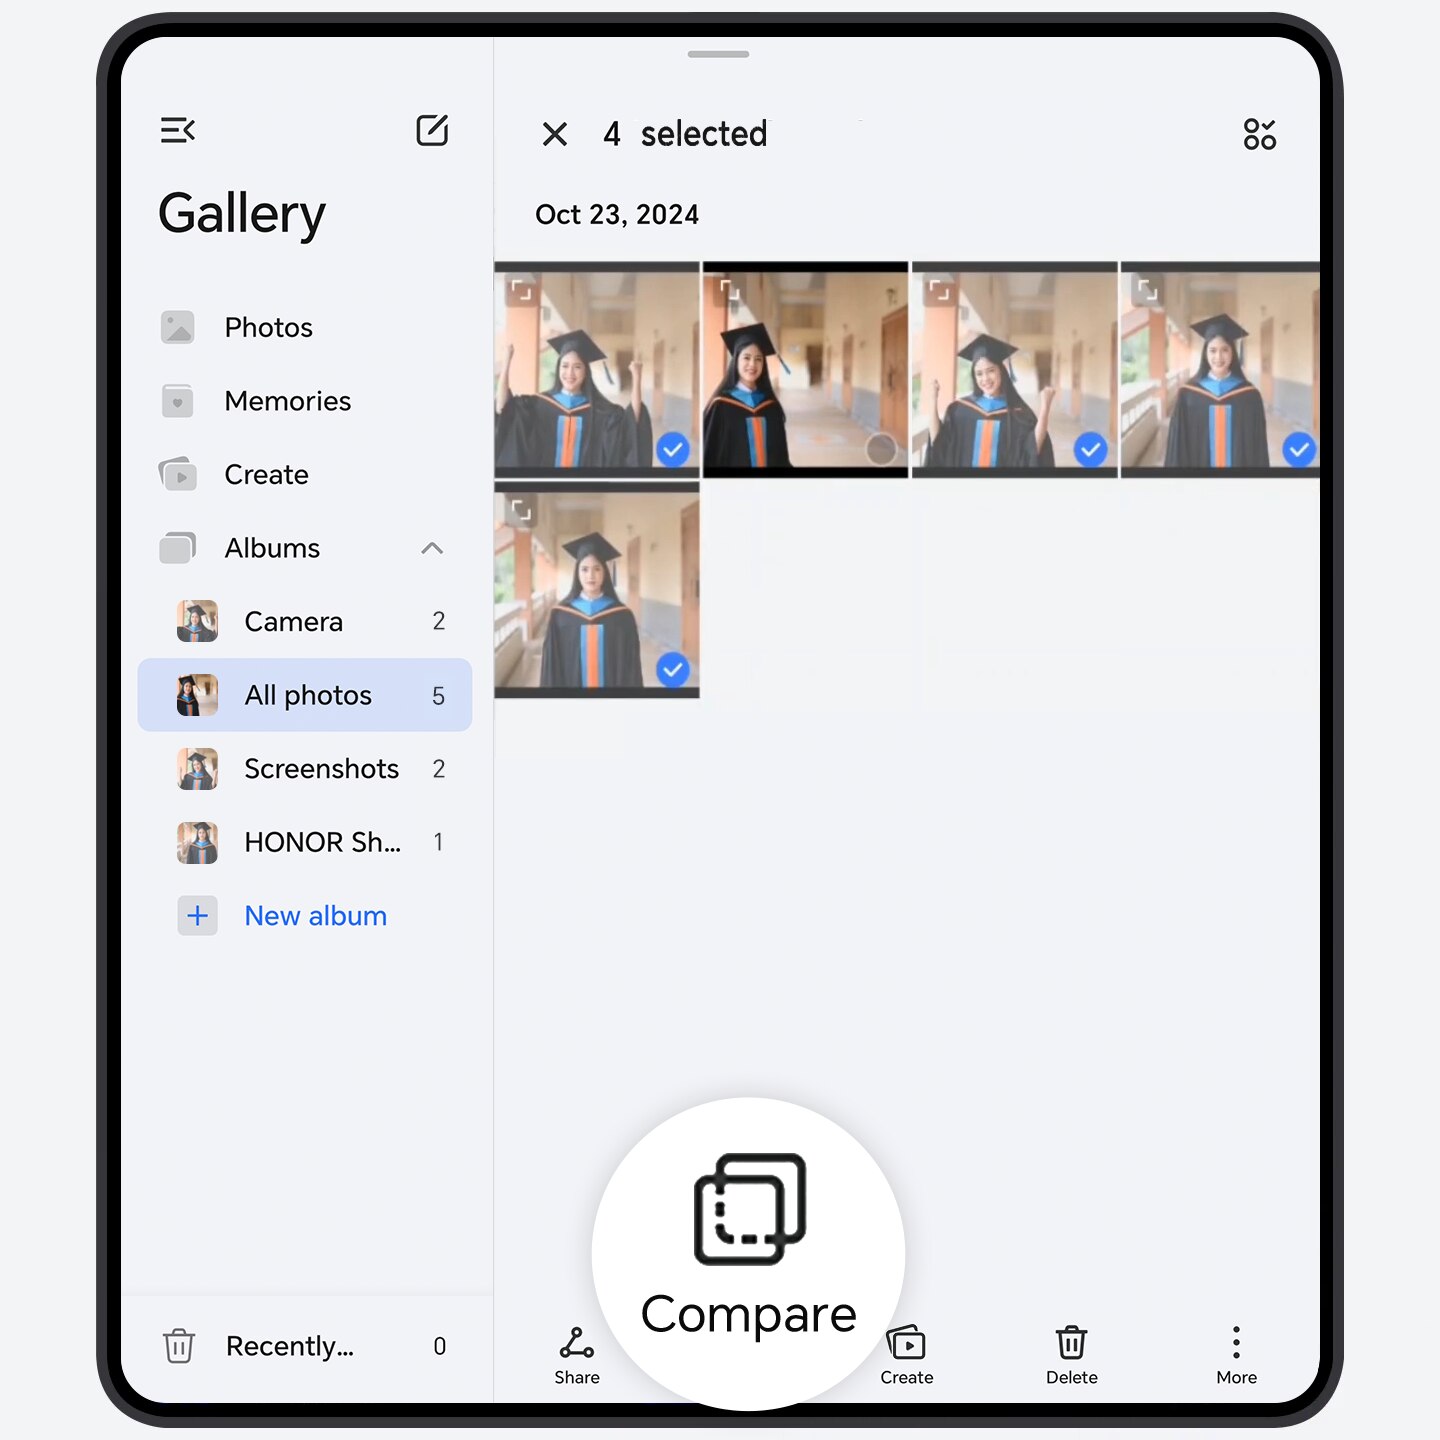
- Go to Gallery, long press the photos you want to compare to select them.
- Tap Compare, and your chosen photos will appear on the screen at the same time for easy comparison. Then, you can:
- Zoom and move in sync: All selected photos
will zoom and move in sync by default. To turn off this synchronized
view, simply tap
 .
. - Modify selection: Tap on any selected photo to remove it from the lineup, or tap an unselected photo to throw it into the mix.
- While comparing, you can tap
 to favorite a photo or
  to delete any you don't want, making it
easier for you to find the one you love.
to delete any you don't want, making it
easier for you to find the one you love.
- You can compare up to 4 images at once for your convenience.
Enhance Your Photos with AI Eraser
AI Eraser in Gallery allows you to effortlessly remove passersby with just one tap. Additionally, you can precisely remove unwanted text and clutter from your images by circling or brushing them. This feature works smoothly, making your photos look better and more appealing.
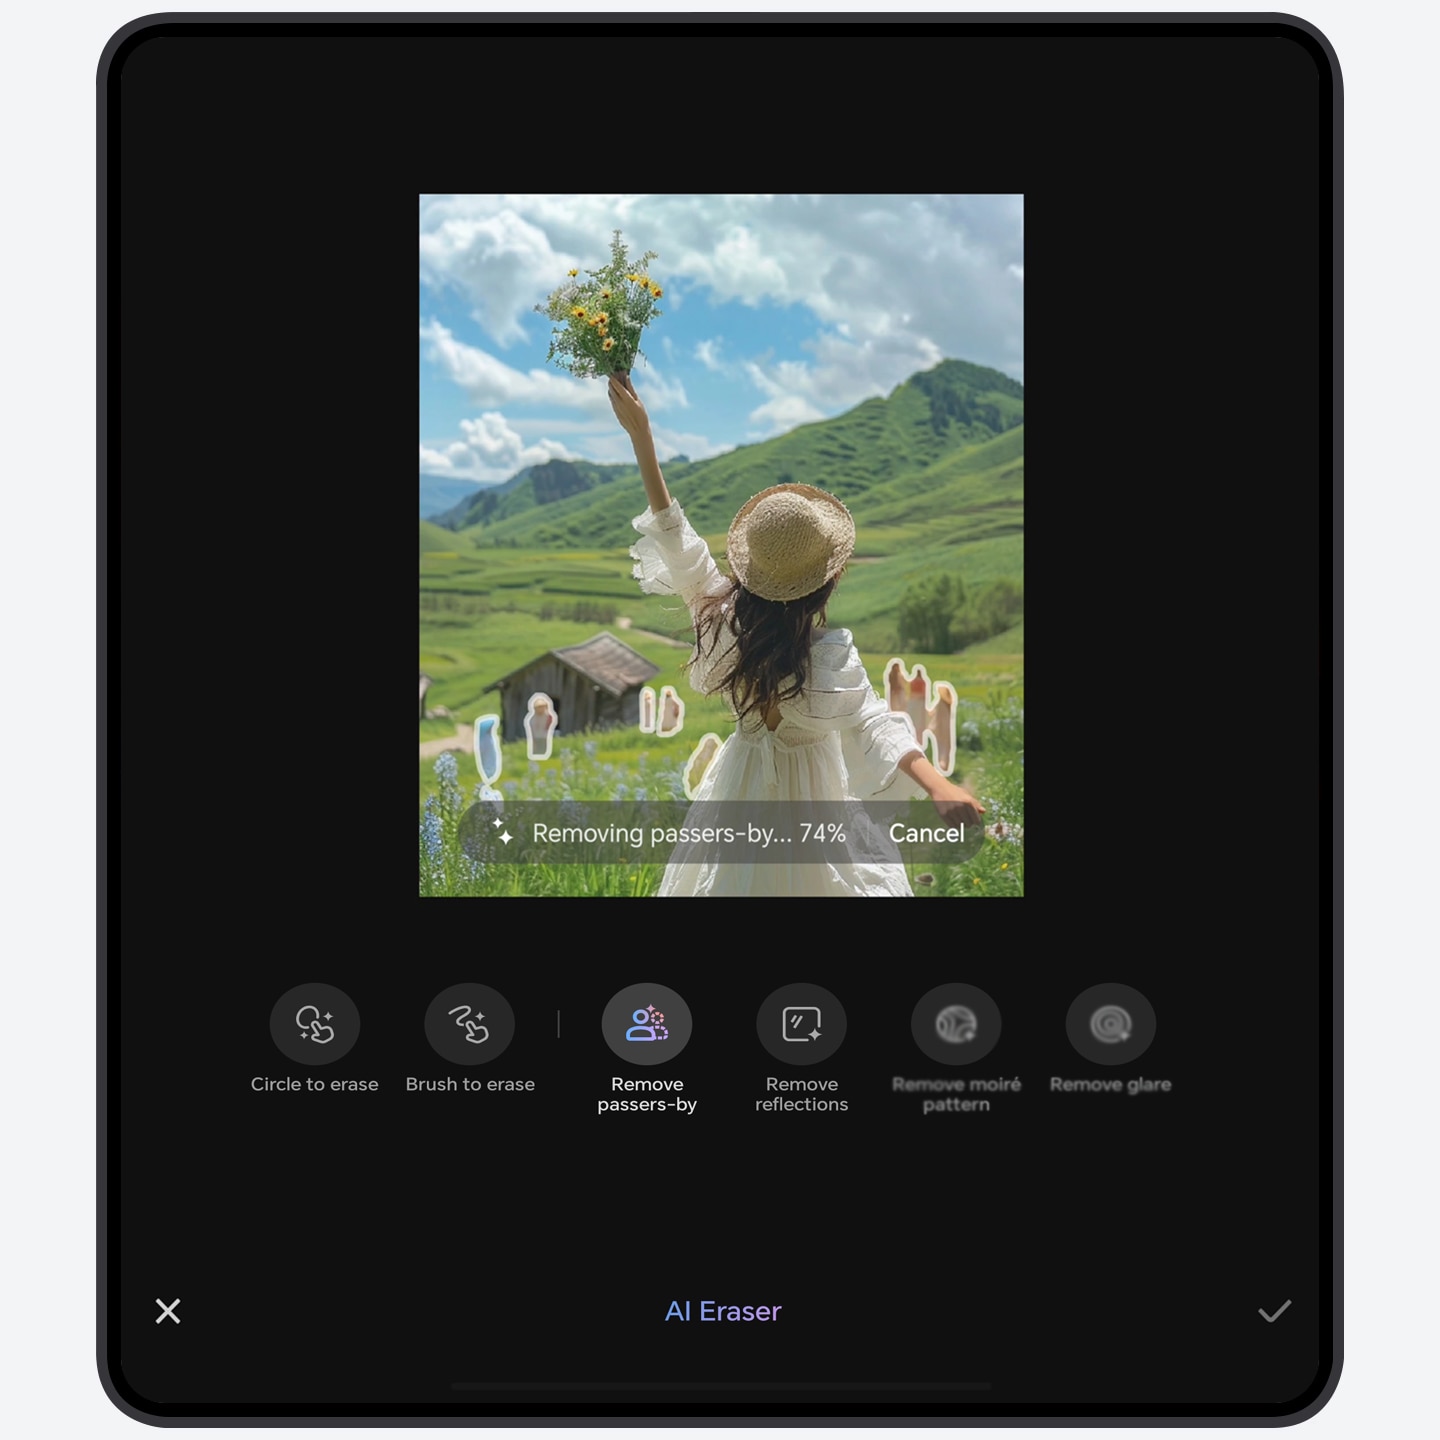
- Go to Gallery > Albums and select an image to be edited.
- Tap > Magic Retouch
> AI Eraser, then remove unwanted objects in the following
ways,
and tap > Save to
save the current edit.
- Remove passers-by: Tap to intelligently identify all passersby and remove them all at once.
- Circle to erase: Draw a circle on animals, plants, buildings, vehicles, text, or people to intelligently recognize and remove objects within the circled area.
- Brush to erase: Brush target objects like watermarks or fine lines. Select the appropriate brush size based on the target object for more precise removal in one go.
AI Enhanced Zoom – Crisp Details Even at Extreme Distances
When capturing distant landscapes and buildings during the day, use the AI Ultra-Clear Telephoto feature to instantly enhance photo details and improve image quality, bringing faraway scenes into sharp focus.
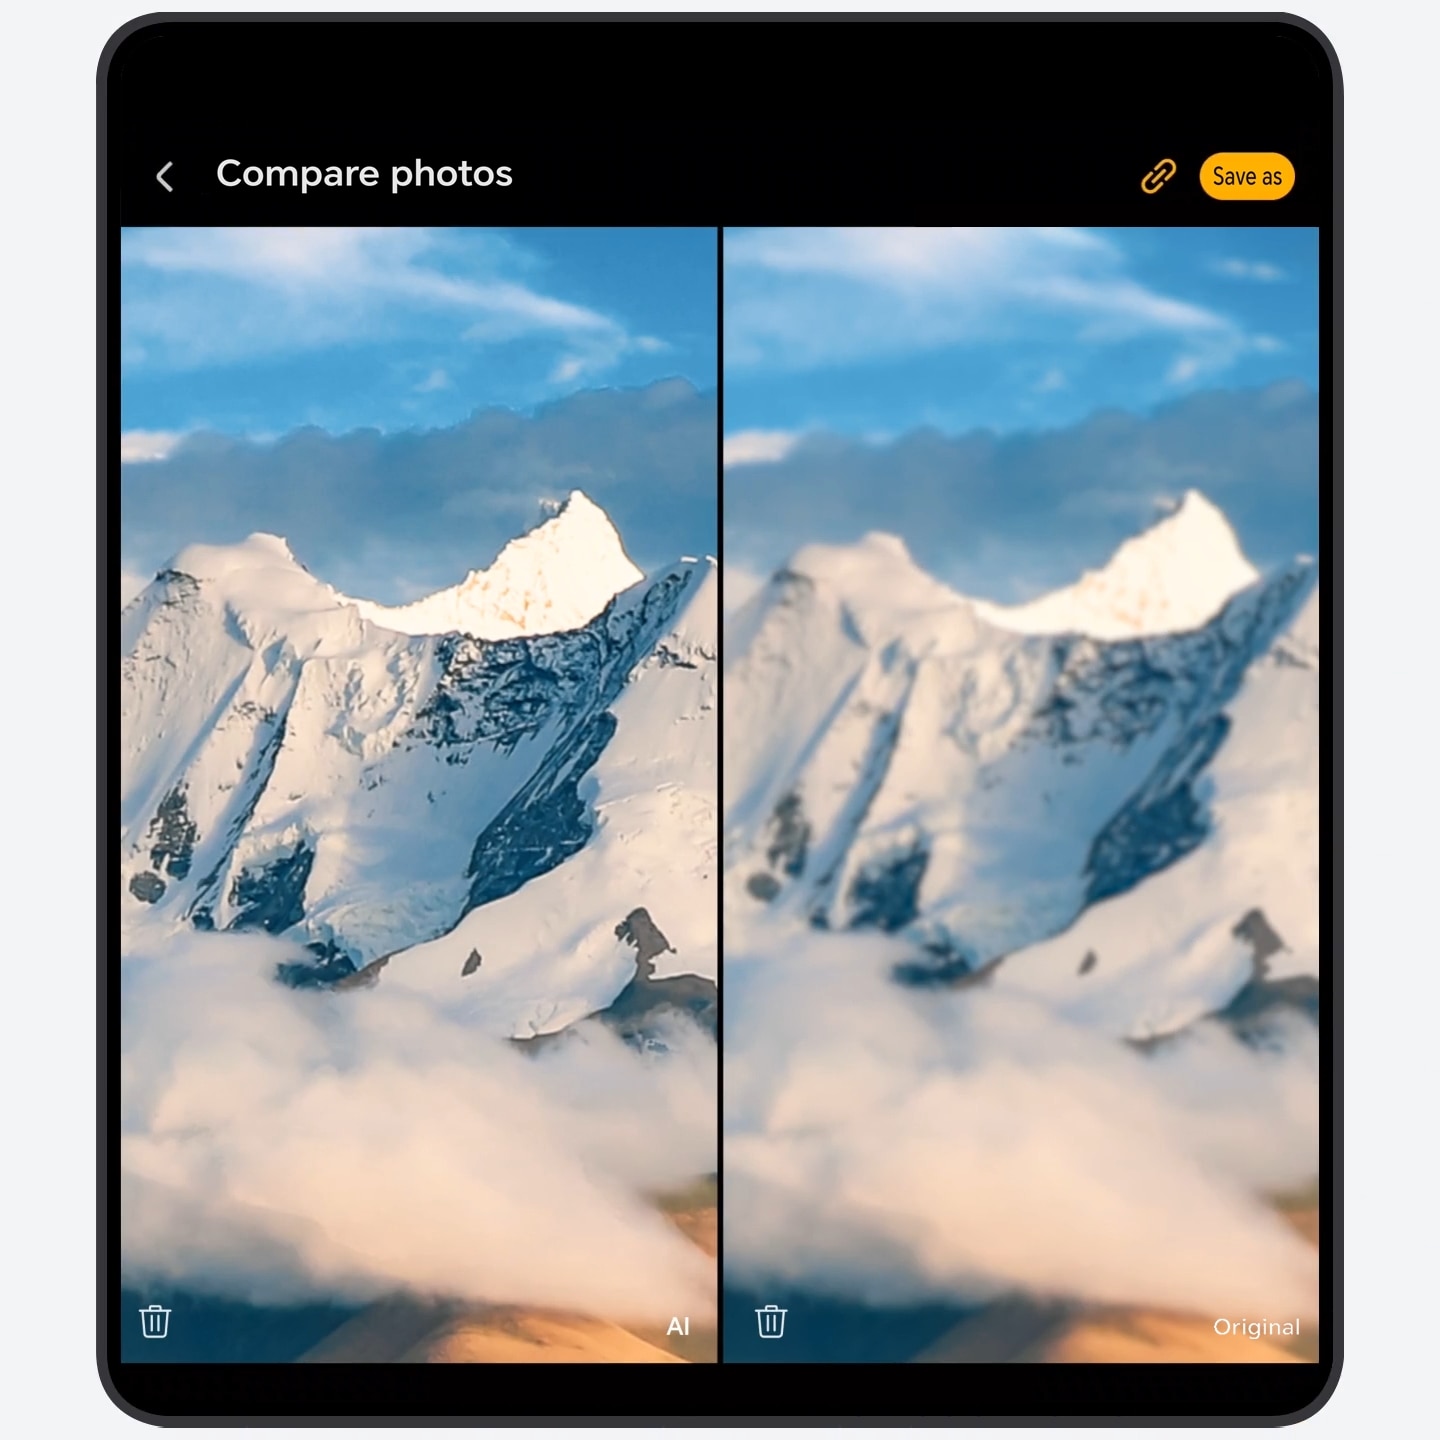
- Open Camera > PHOTO, and select the rear camera.
- Aim at distant scenery, buildings, or still objects. Adjust the zoom by
sliding the zoom bar or pinching the screen. When
 appears on the screen, tap to enable the AI
Enhanced Zoom mode (
appears on the screen, tap to enable the AI
Enhanced Zoom mode ( indicates it is on).
 - Tap
 to take the photo, and the enhancement will
be applied automatically.
to take the photo, and the enhancement will
be applied automatically. - View your AI Enhanced Zoom photos in Albums. Tap
 in the top right corner to compare the photo
before and after enhancement.
in the top right corner to compare the photo
before and after enhancement.
- The zoom level at which AI Enhanced Zoom can be enabled varies by device.
Quickly hide apps to create a minimalist Home screen
Quickly hide apps from the Home screen to create a distraction-free and minimalist interface with refreshing visuals and secure privacy.
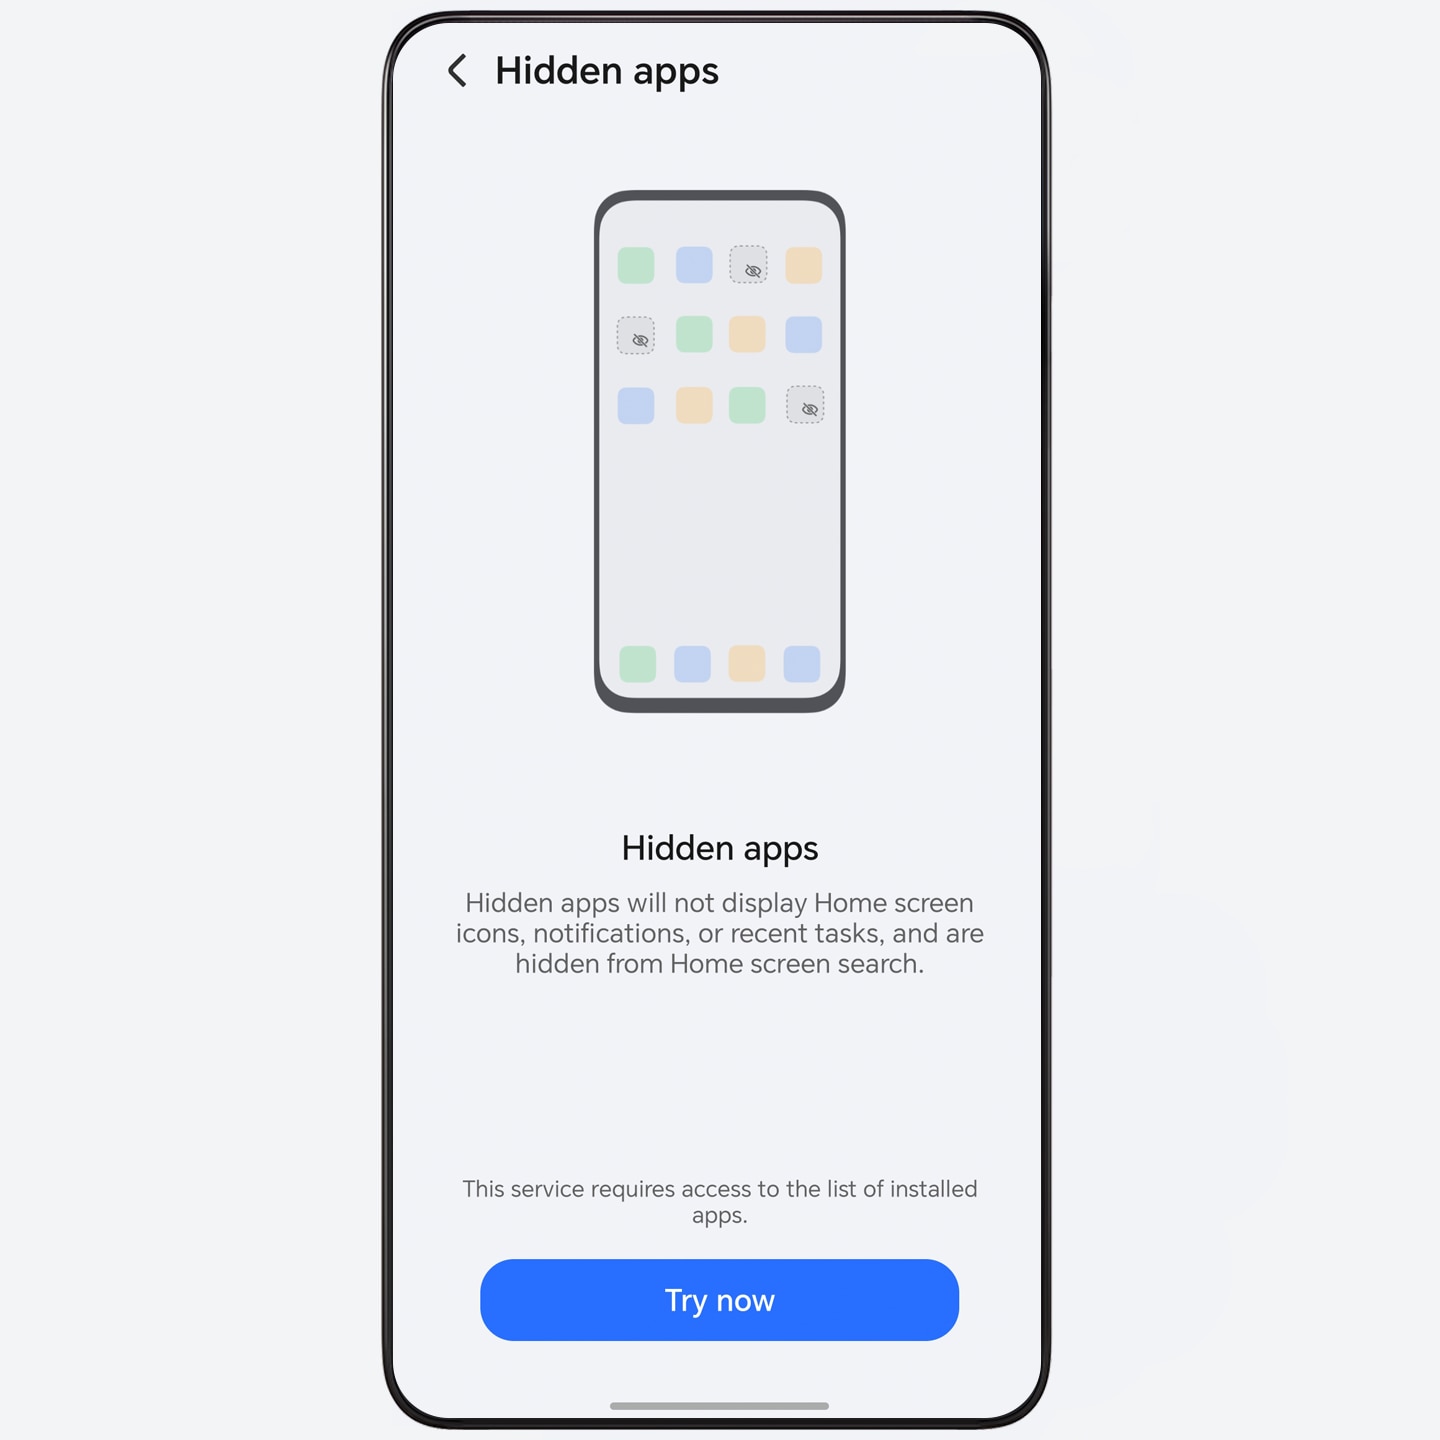
- Go to Settings > Security & privacy > Device & data protection > Hidden apps, and enter the password to access the Hidden apps interface.
- On the Hidden apps interface, perform the following operations as needed:
- Hide apps from the Home screen: Tap Add and turn on the switch for the app you want to hide.
- Unhide apps on the Home screen: Touch and hold a hidden app and tap Restore to Home screen > Restore.
- Return to the Home screen to confirm that the target app has been hidden or unhidden.
- Only third-party apps can be hidden from the Home screen. Please refer to the actual situation.
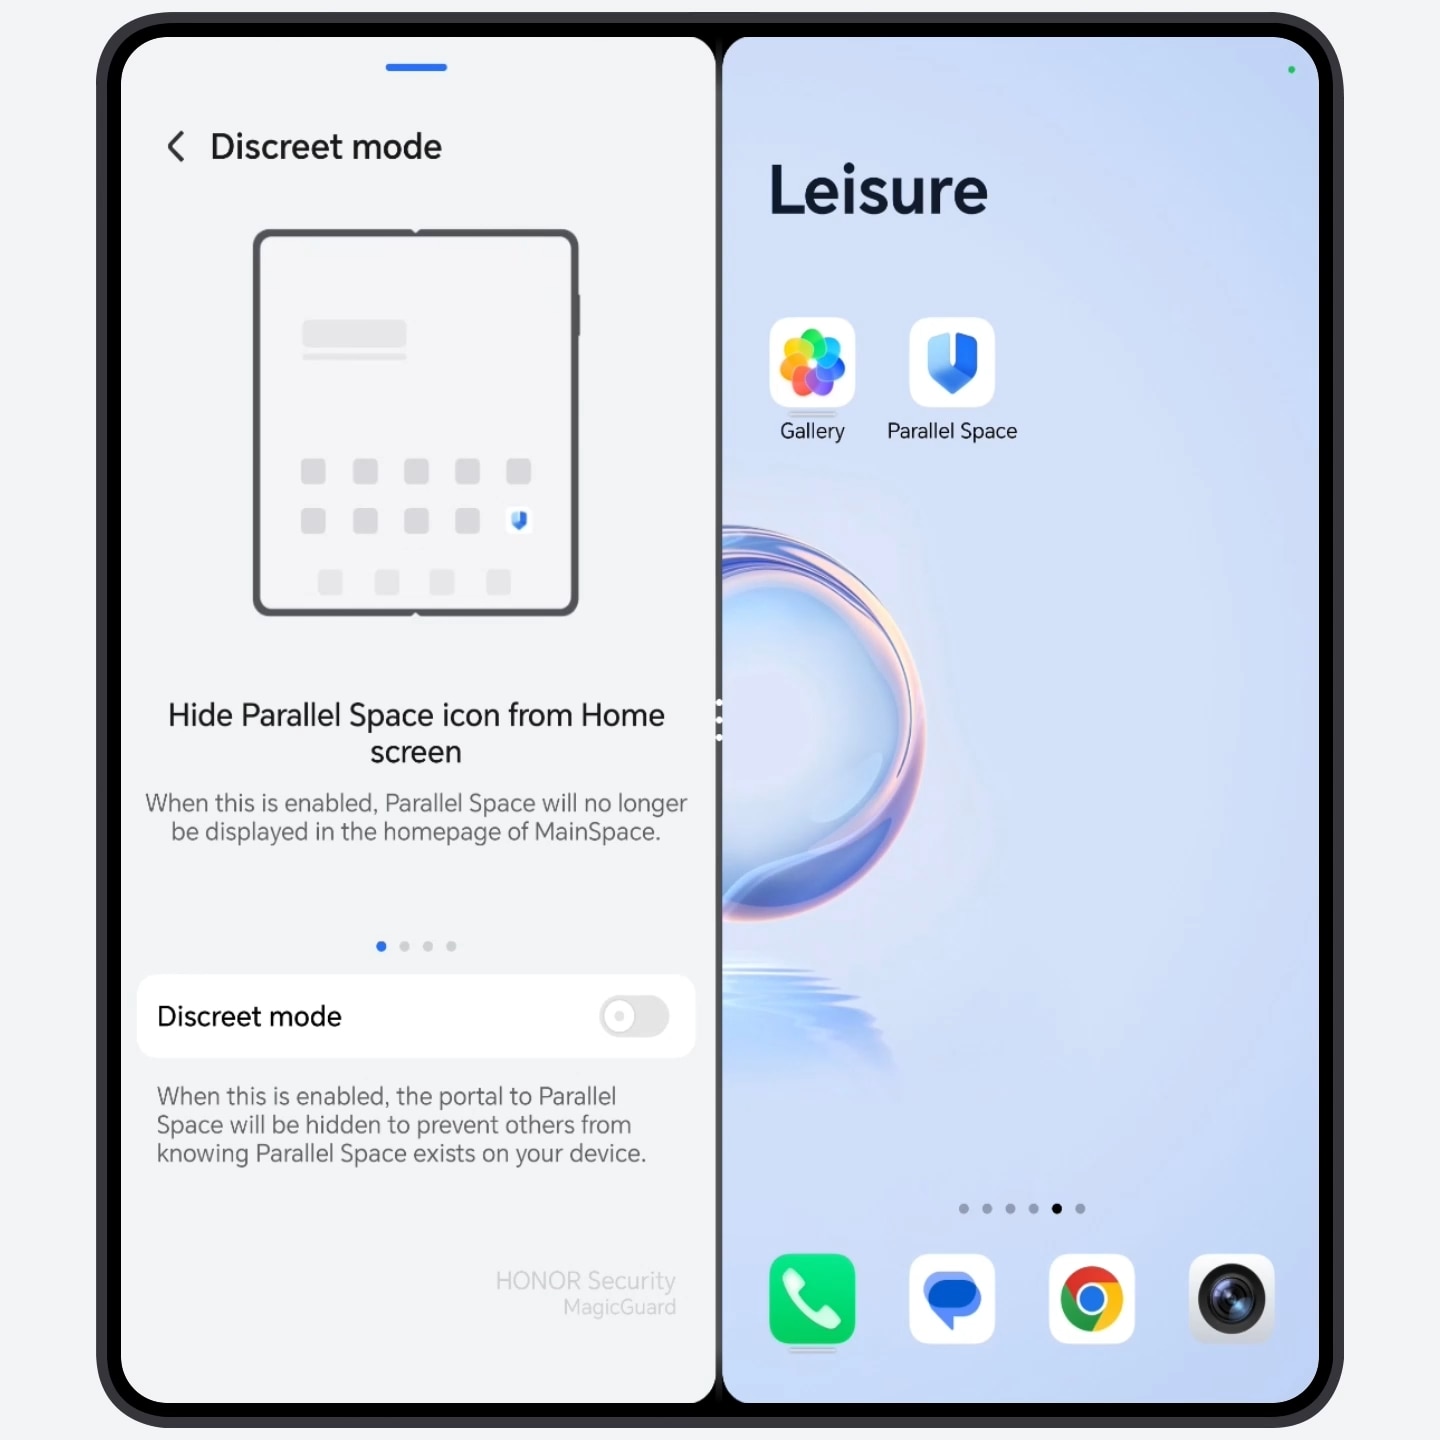
With Parallel Space, You Can Use One Phone as Two
Securely store confidential documents, photos, and other content. Download and use the app without affecting the main space. Easily separate life and work, hide usage traces, doubling privacy protection with just one mobile phone.
On the home screen, spread two fingers apart and follow the on-screen instructions to create Parallel Space.
- Use Apps in Parallel Space
- Data stored here is not accessible from the main space; you may go to App Market or tap Add apps to install more apps.
- Quick switch between dual spaces
- Swipe up from the bottom edge of the home screen to return to the main space; spread two fingers apart to enter Parallel Space.
- Hide Parallel Space
- In Parallel Space, go to Settings > Discreet mode to hide Parallel Space icons (on home screen and in Magic Portal), recent tasks, and setting entry, doubling protection for your privacy.
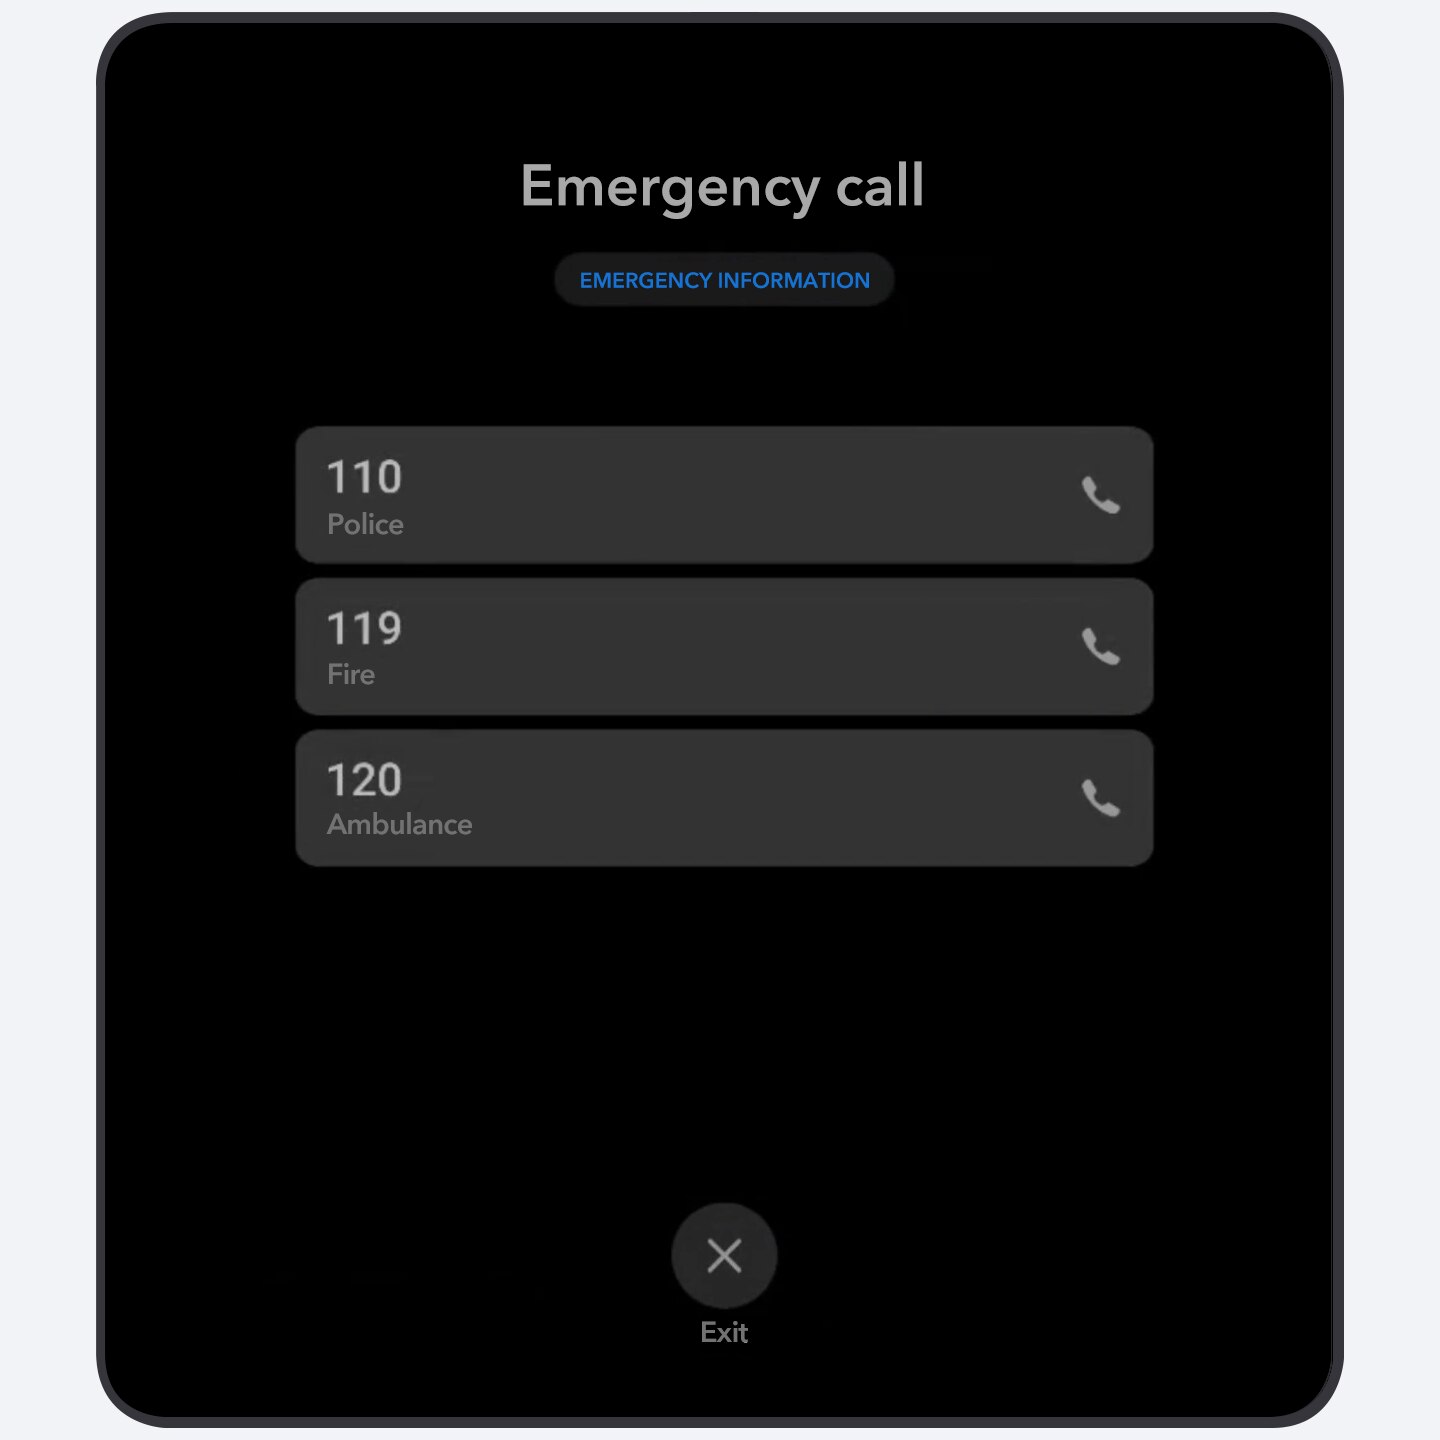
Emergency SOS
When you use Emergency SOS, your device will send a help message promptly and covertly with your location to an emergency contact or make a call with a preset help recording.
- Enable Emergency SOS: Go to Settings > Safety & emergency > Emergency SOS, turn on the switch for Send SOS message automatically, Make SOS call automatically.
- In case of emergency: Press the power button five times in a row and the phone will send a help message and call the emergency contact automatically.
AI-Generated Minutes, Meetings Made Easier
Effortless cross-language transcription during meetings, instant summaries after each session, and a quick recap of key points—no more time spent on note-taking, enhancing office efficiency.
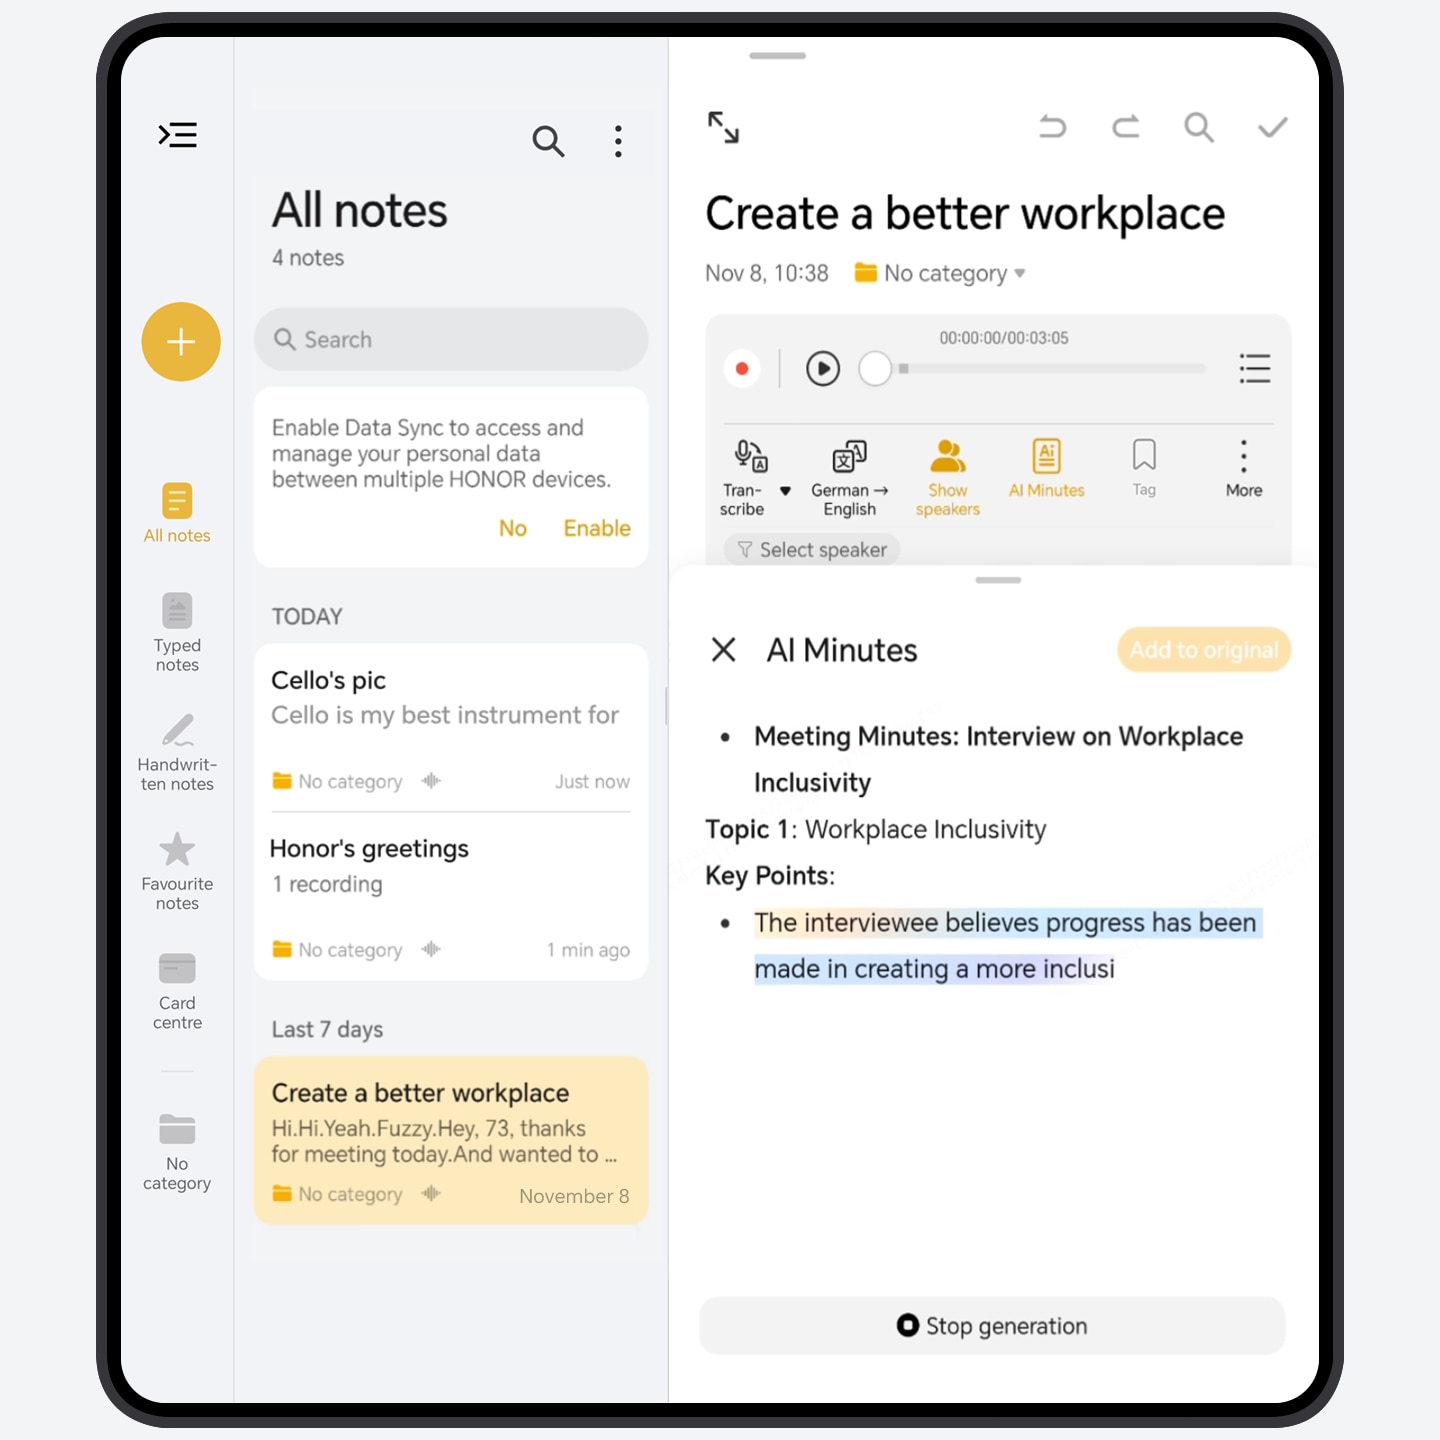
- Record audio with Notes during the meeting, tap Show speakers to easily differentiate between speakers. You can also switch the speech-to-text languages or translations without interrupting multilingual discussions.
- After the meeting, tap AI Minutes in the note to select the type of meeting summary you want, and it will be generated automatically.
- Tap Add to original to add the meeting summary to your notes.
- Currently, only some languages are supported. Please refer to actual usage for details.
AI writing, three steps to boost your creation
When you post on social media or write reviews on e-commerce platforms, AI writing can use Compose to generate personalized copywriting with one tap, saving your time and effort. It can also provide you with Rewrite, spell check, helping you easily cope with various writing needs.
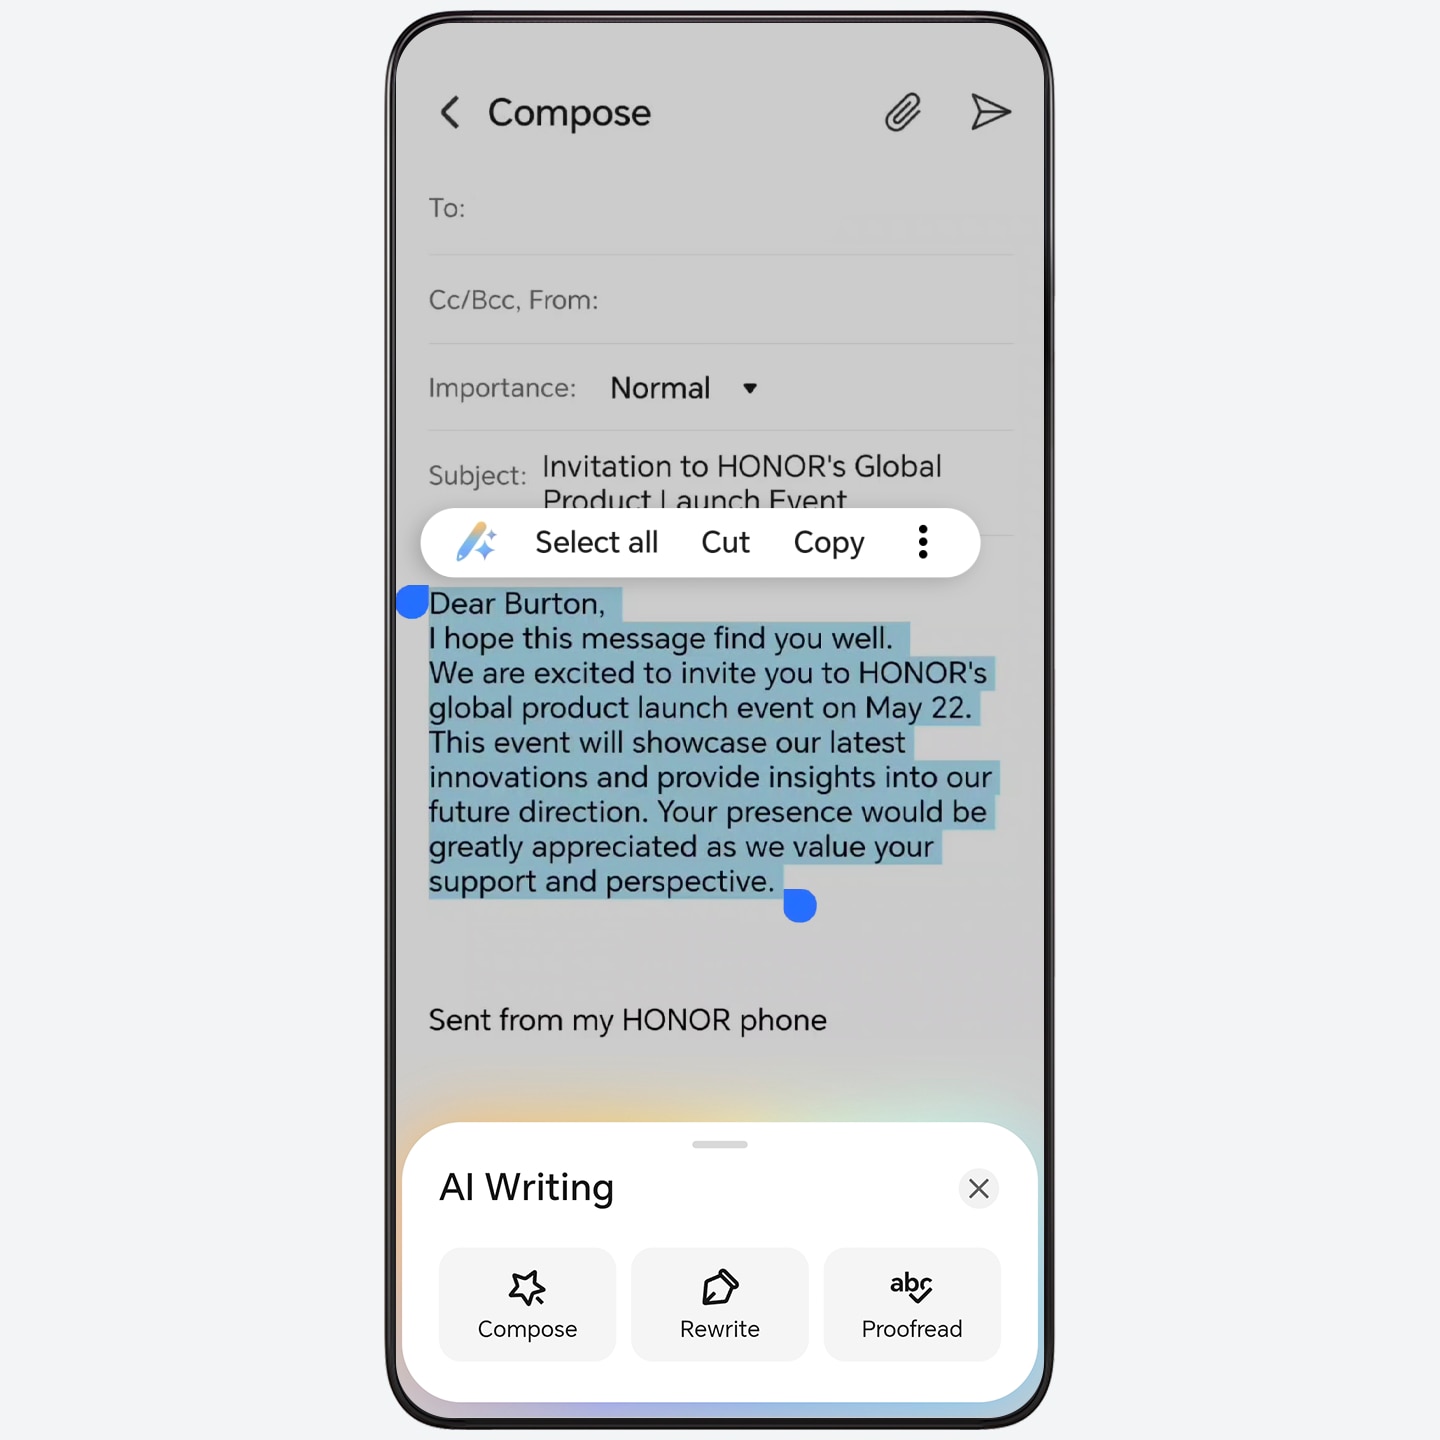
- Go to Settings > HONOR AI > AI writing and turn on the AI writing switch.
- When posting or commenting, touch and hold the input box or select text, and tap AI writing, then you can perform the following operations:
- Compose:
after entering the
creation theme, tap
 to obtain the AI-generated content.
 - Rewrite: Tap Change style, and you can choose formal, humorous and casual tones, as well as letter writing styles.
- Proofread: AI will mark and correct errors in the selected text, such as English capitalization and spelling mistakes.
- After the content is generated, tap Replace or Input and paste it into the page.
- The Compose function of AI writing varies across different platforms, please refer to the actual interface.
Call translation, real-time cross-language dialogue interpretation
During cross-language phone communication, enabling call translation allows for real-time interpretation of the conversation content and voice broadcasting of the translated text. Both parties can freely communicate in their native languages, making it easy to handle business negotiations or travel consultations.

- Enable call translation: The Call translation function is turned off by default. To use it, go to Settings > Honor AI > Call Translation, turn on the Call translation switch, and complete the download of the required resources.
- Use call translation: In the call interface, tap Call translation and set the languages for both parties as needed to start real-time translation.
- The interface of different devices may vary; please refer to the actual display for specifics.
AI Privacy Call, Safeguard Call Privacy
Reduce sound leakage to ensure call privacy when you are using the handset to make or receive calls.
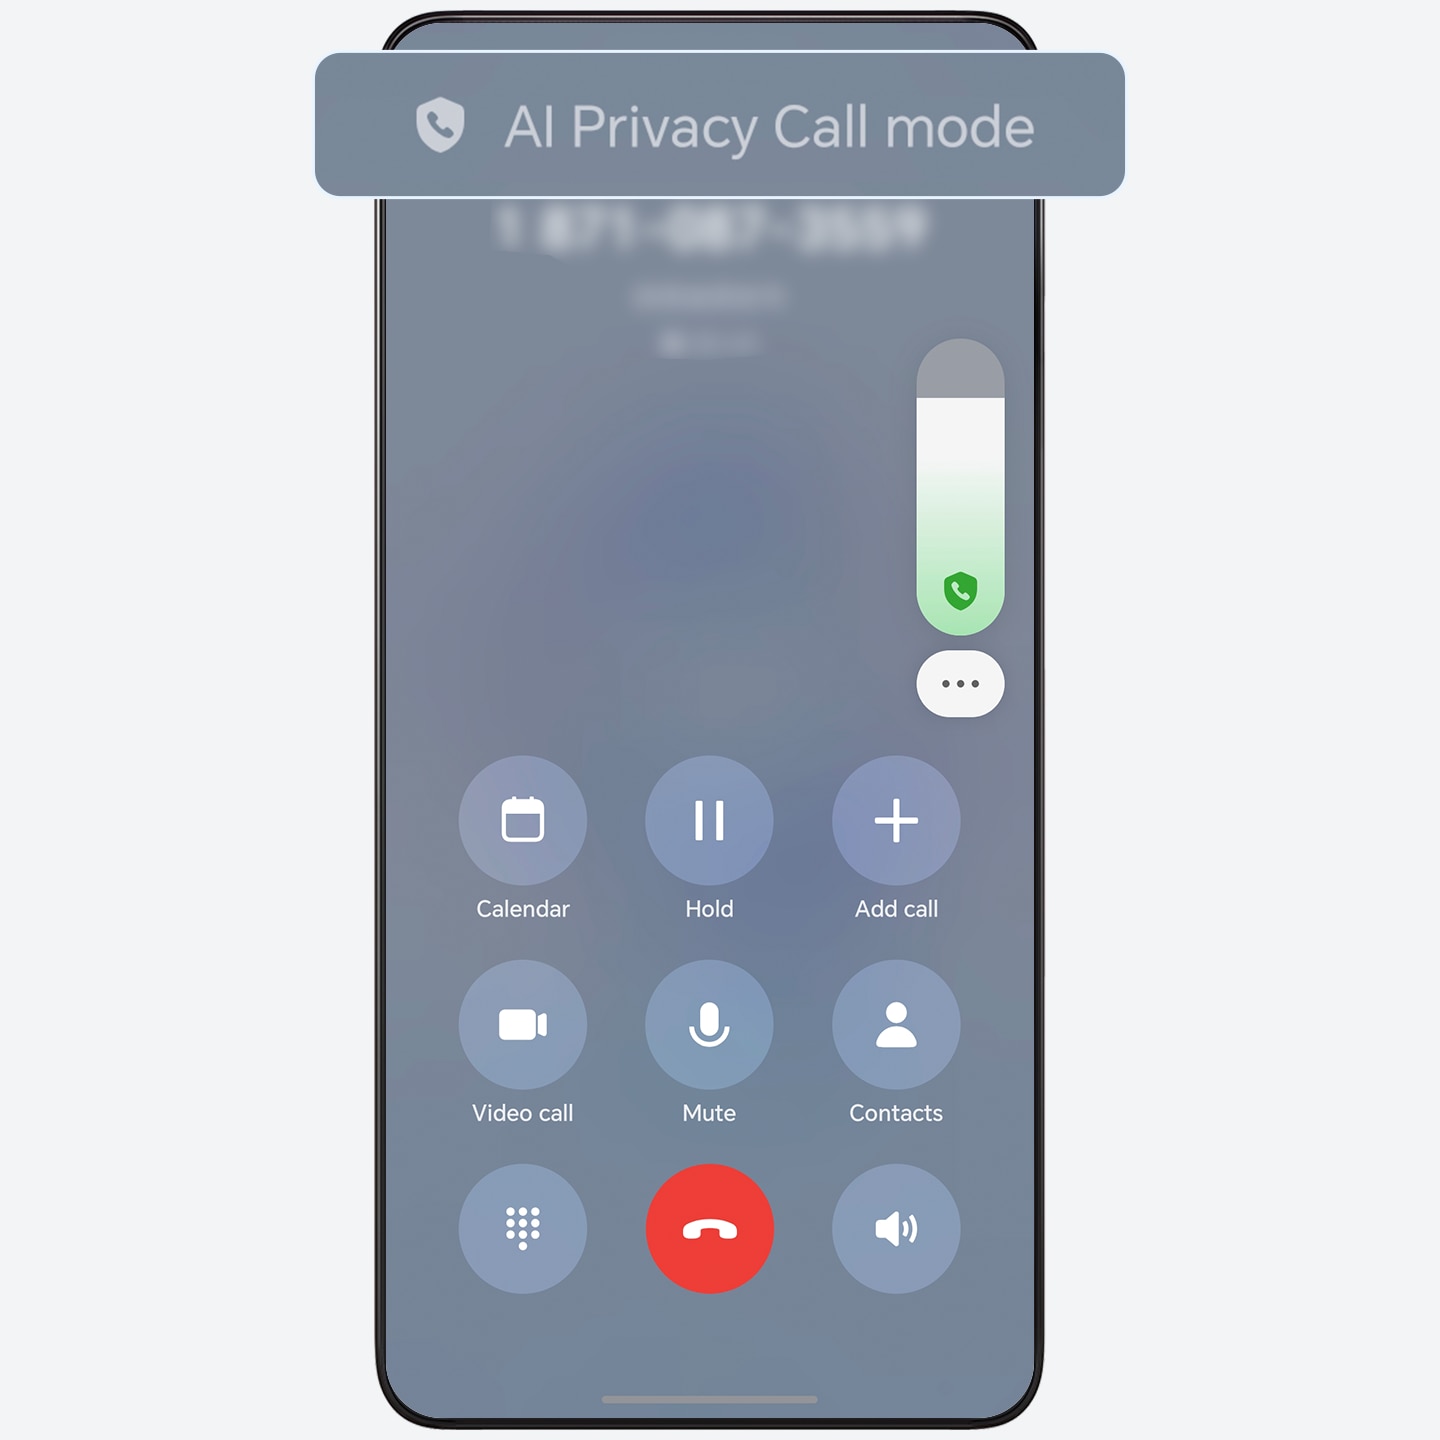
- Go to Settings > Accessibility features > AI privacy call:
- When the switch is on, after the call is connected, the privacy protection mode will be on at volume levels 1 to 13.
- When the switch is off, the normal call effect is applied.
- This feature can significantly reduce handset sound leakage, but it is not completely soundproof. The perception of sound leakage is related to the level of environmental noise. The handset volume has a total of 15 levels.
Motion sickness relief display
When using a phone while driving, dynamic dots will appear on both sides of the screen to show the vehicle's motion status, relieving motion sickness discomfort.
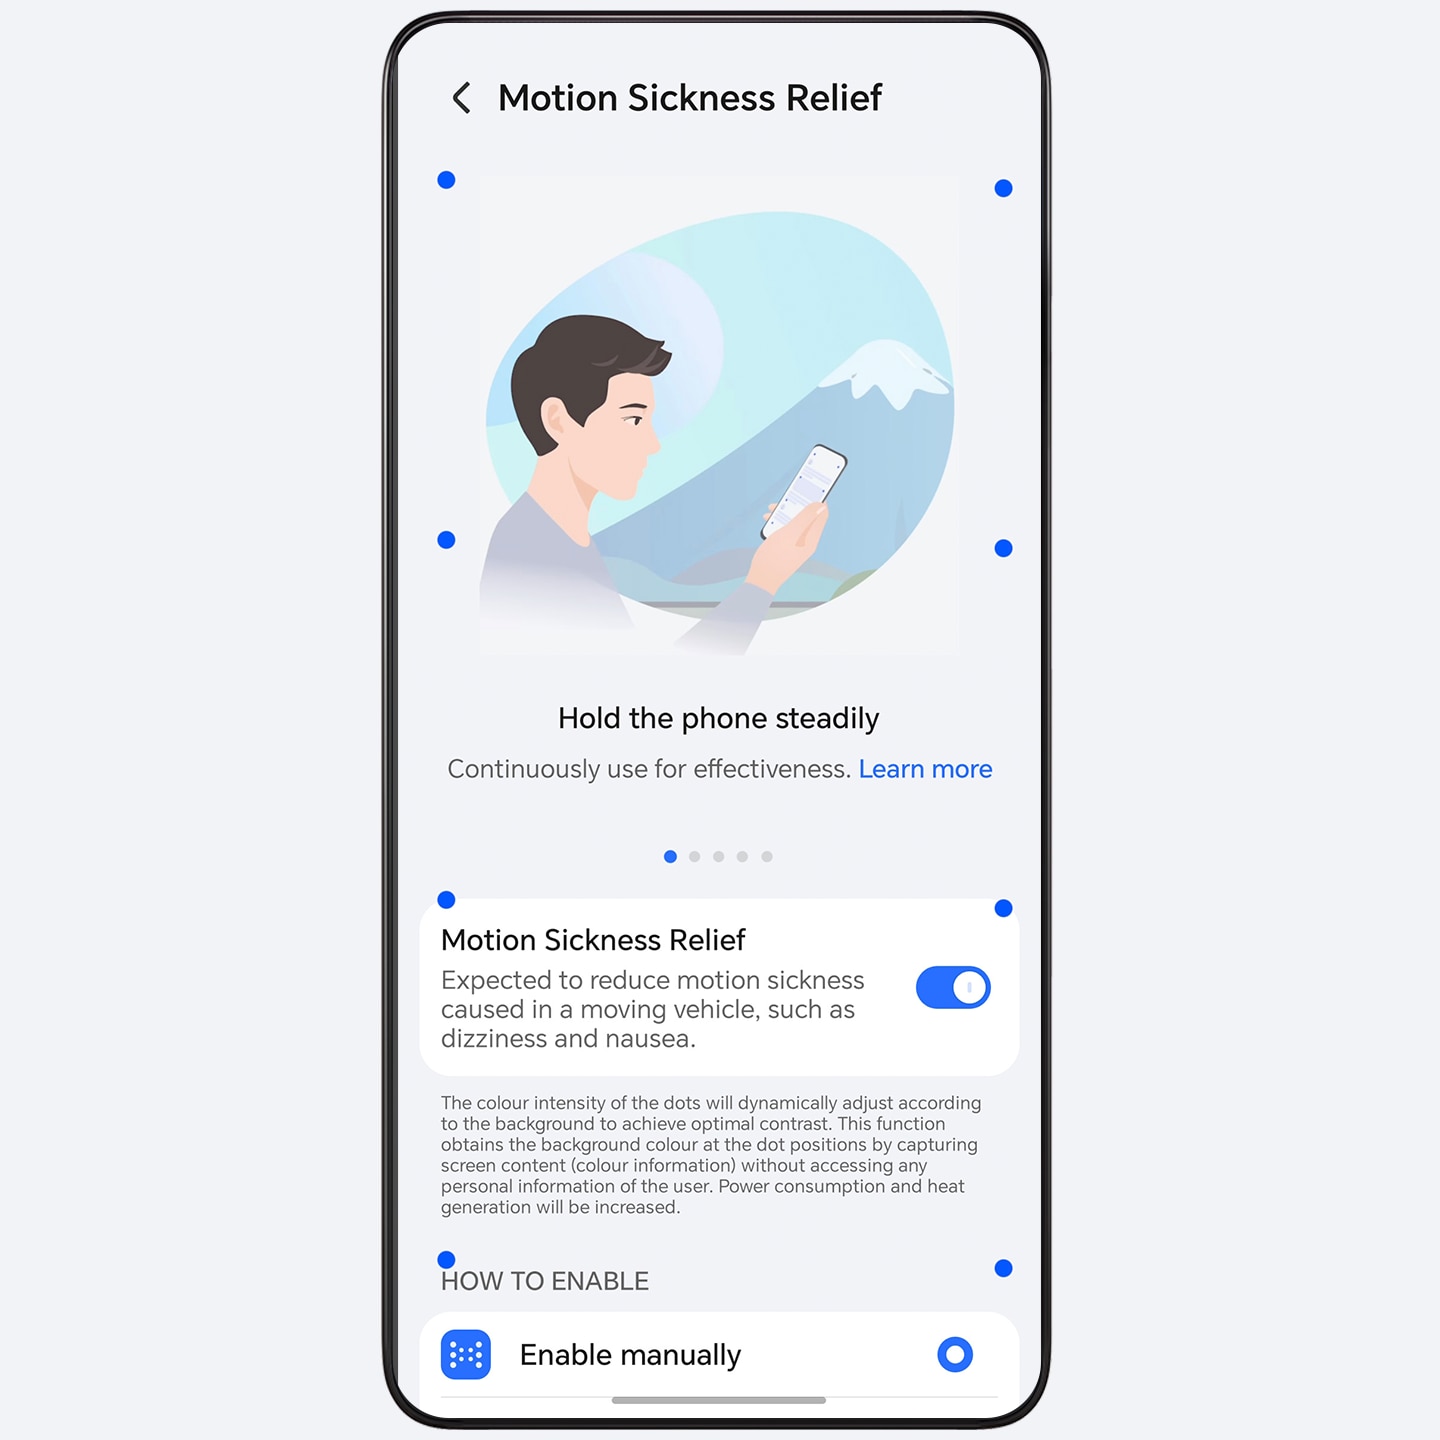
- Go to Settings > Accessibility features > Motion Sickness Relief, turn on the Motion Sickness Relief switch, and moving dots will appear on both sides of the screen to show the vehicle's motion status.
- Under the Dot color section, set the color of the dots according to your personal preference. Slide the control bar under Sensitivity to adjust the movement of the dots to better relieve dizziness, nausea and other discomforts associated with motion sickness.
- To ensure driving safety, do not use your phone while driving.
Enhanced Contrast for a More Vivid Experience
Switch on the Super Dynamic Vivid Display to bring out richer contrasts and more vivid light-dark scenes in videos in 1080p or above.
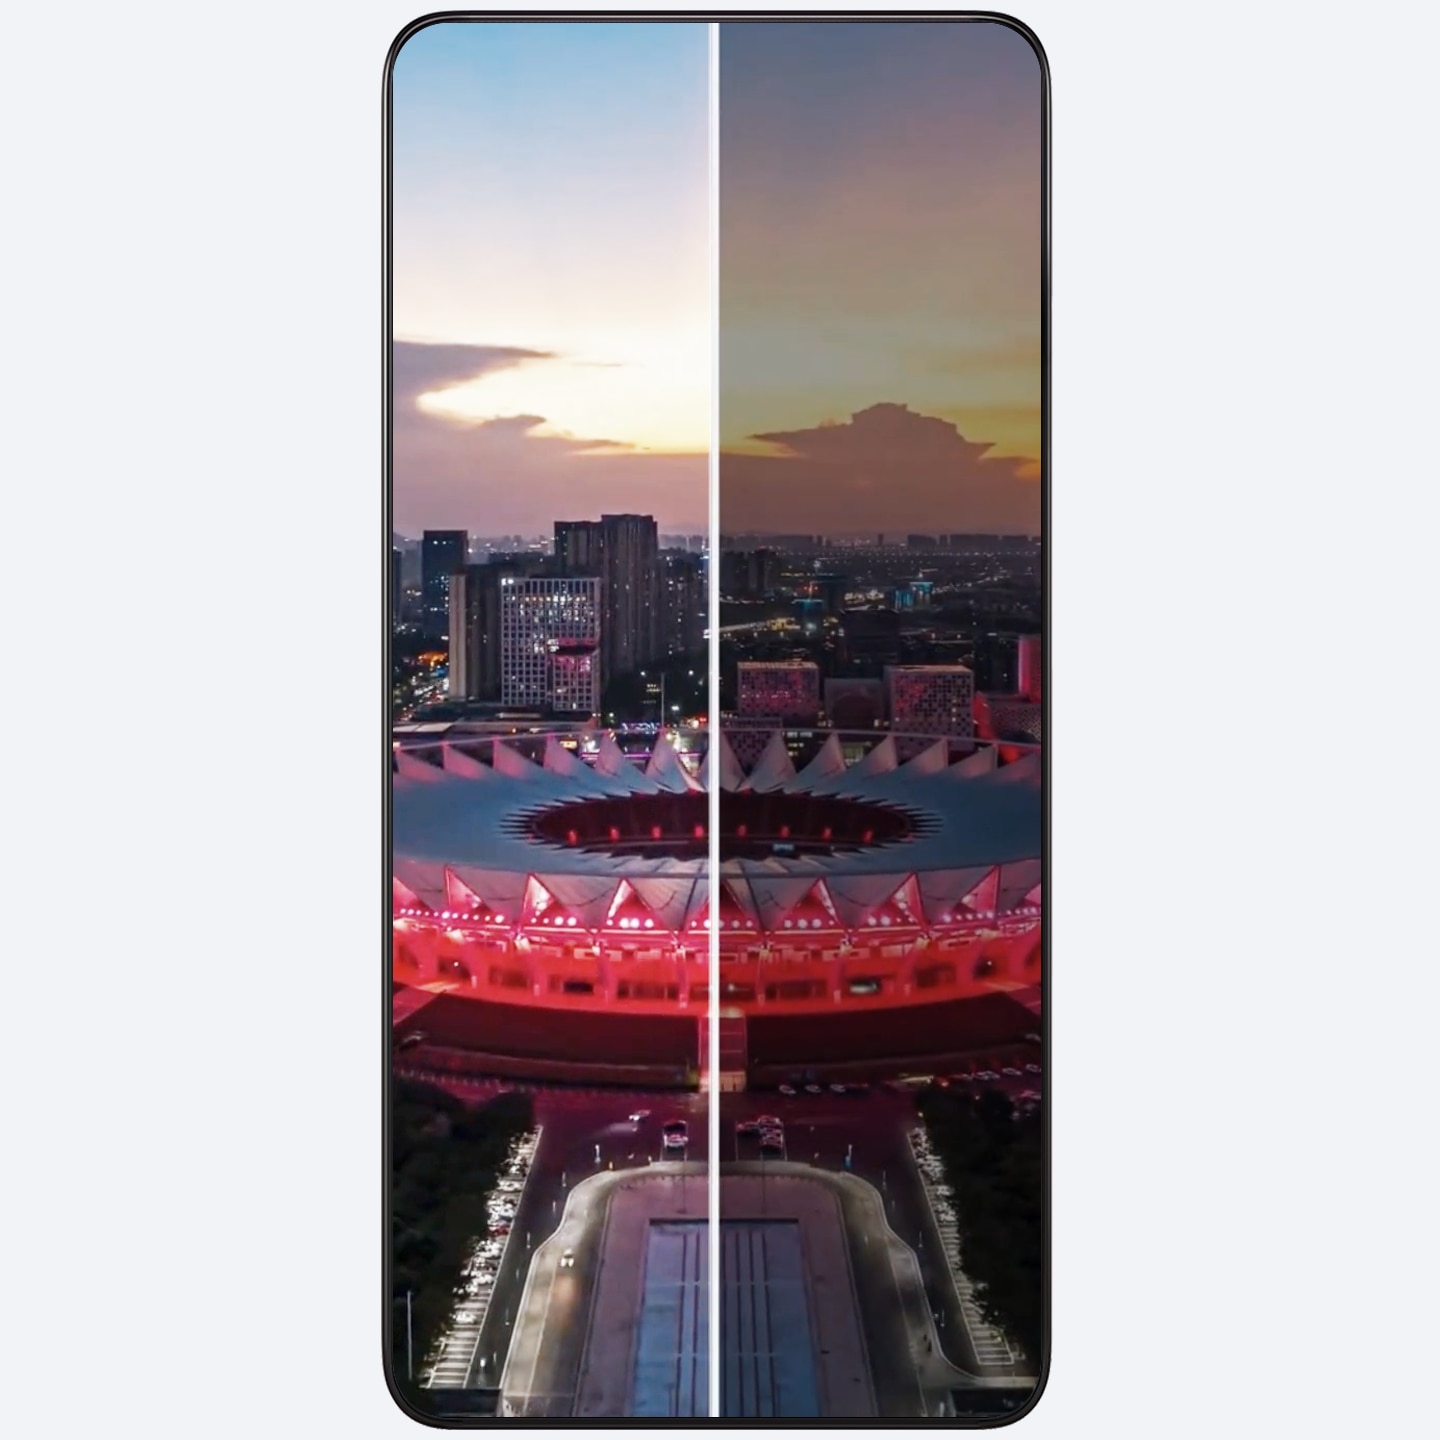
- Go to Settings > Display & brightness > Video enhancer and turn on Super Dynamic Display.
- This feature is available in limited apps, refer to the setting page for details.
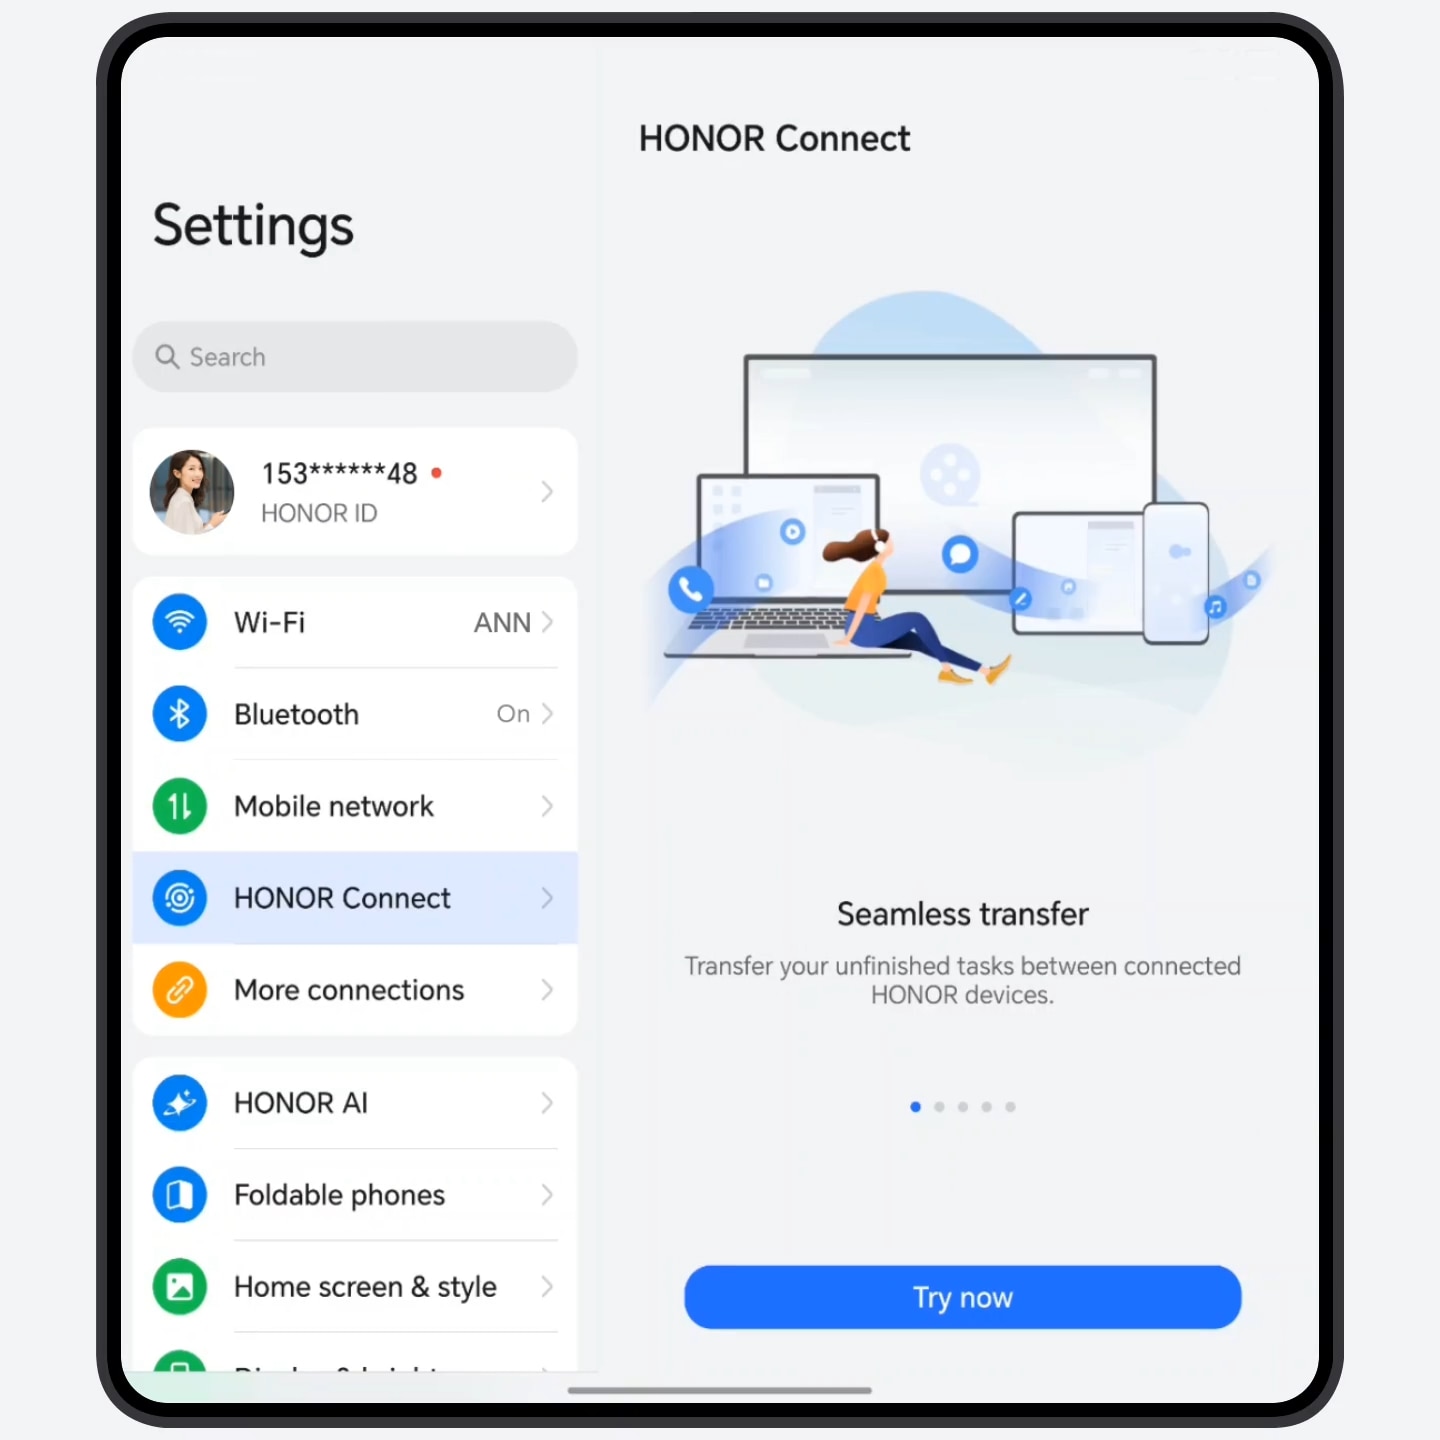
Smart Collaboration with HONOR Connect
When you sign in to your HONOR ID on your phone, tablet and laptop, you can transfer calls, notifications, files, and videos seamlessly across devices, which is efficient and convenient.
- Sign in to the same HONOR ID on each device and toggle on WLAN and Bluetooth.
- Devices will be connected automatically. Go to Settings > HONOR Connect on your phone to check all connected devices under the current HONOR ID (displayed as Nearby).
- When you use this feature for the first time, go to HONOR Connect settings page of each device, and ensure all devices Agree to the Service Statement.
One watch connecting to two phones: seamlessly manage work and life
With one watch, you can connect to two phones simultaneously, receiving notifications and calls from both while you wear it, ensuring you never miss a beat.
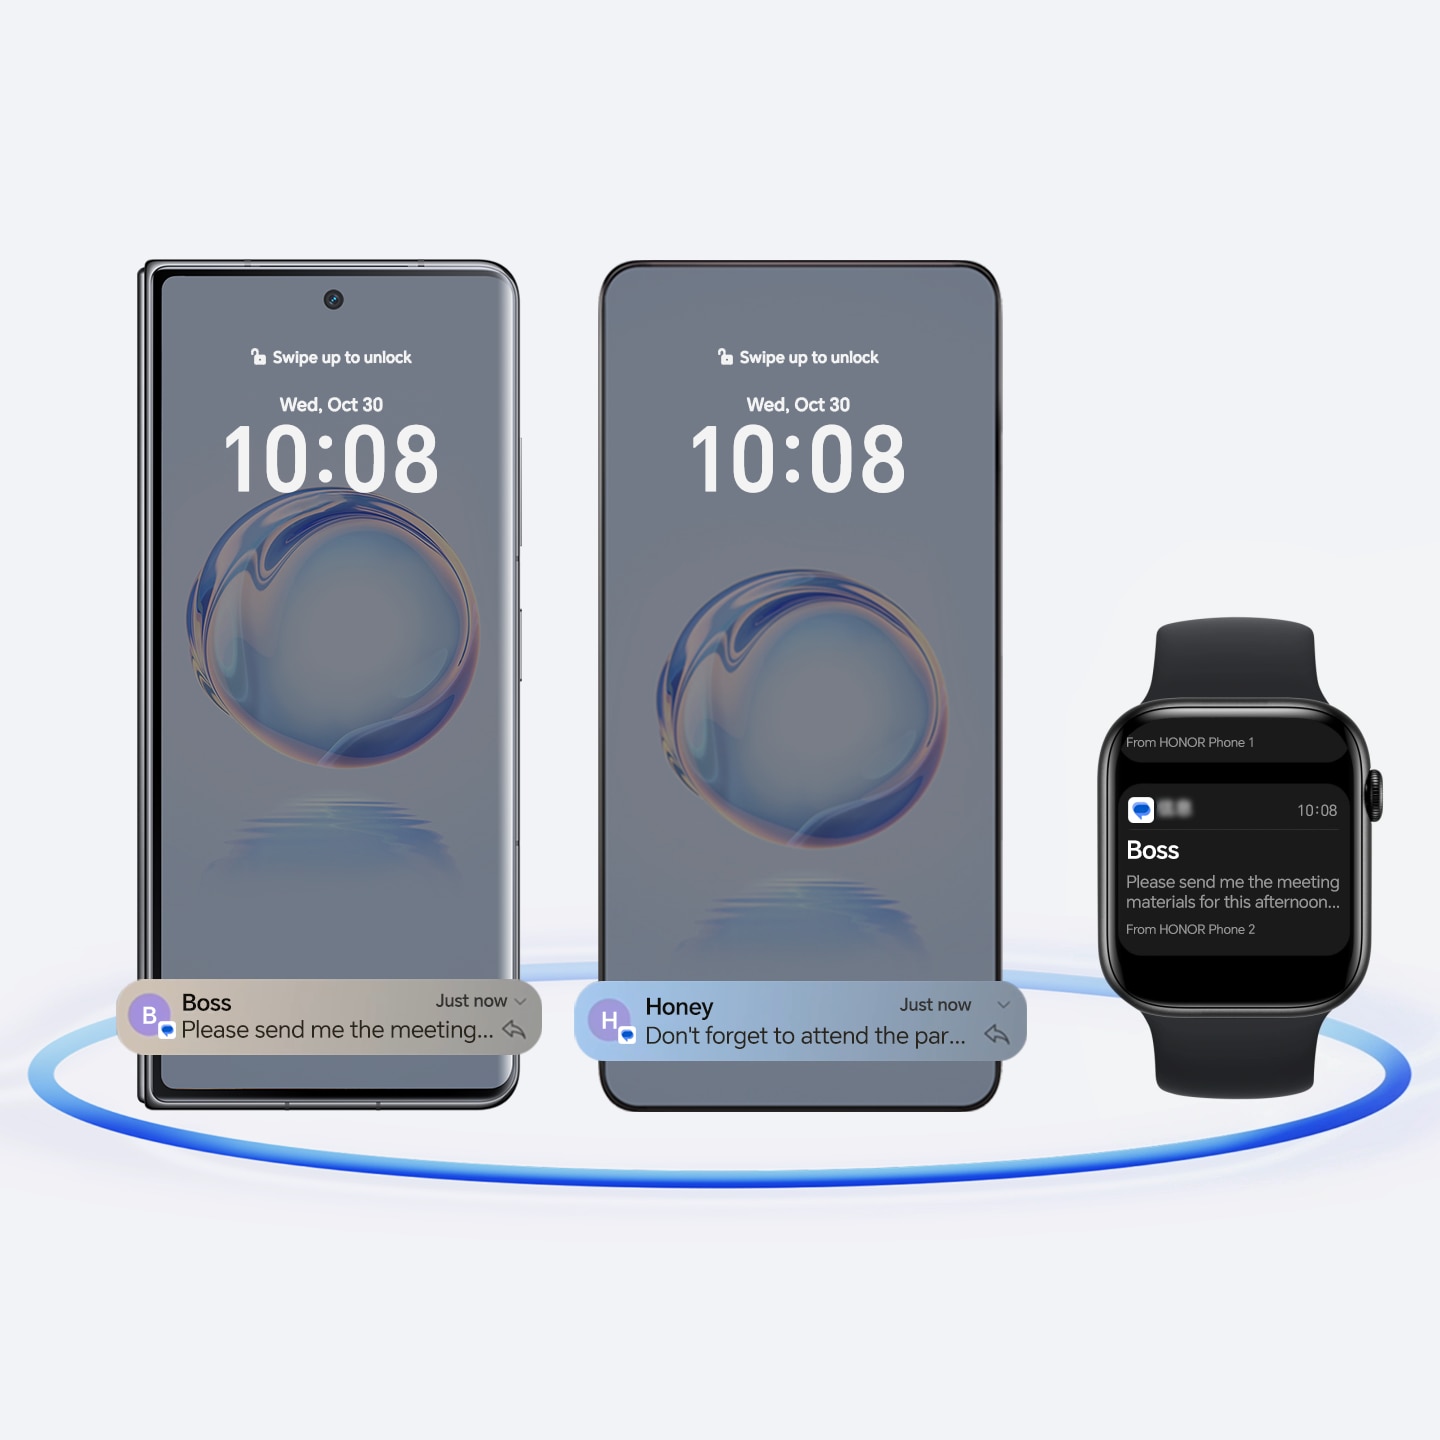
Turn on the Bluetooth and Wi-Fi on both phones, log in with the same HONOR ID, and go to settings to enable the HONOR Connect service. Turn on the Bluetooth on your watch.
- Choose one phone as your primary device, and pair the watch with the primary phone using the HONOR Health APP.
- Once paired successfully, the watch will automatically recognize the other phone linked to the same account. On the watch, tap the Settings > HONOR Connect, turn on the Connected Notification switch to connect to the other phone, which will serve as your secondary device.
- The primary and secondary phones should respectively access Settings > HONOR Connect, turn on the Connected Notification switch and set the apps for which you want the watch to receive notifications.
WeChat messages only support near-field transfer, not far-field transfer.
Transfer Calls Seamlessly with Connected Call
Automatically sync incoming calls from your phone to nearby devices. Make or answer a call on any device to improve efficiency.

- Enable Connected Call
- Make sure all devices are logged into the same HONOR ID and have enabled WiFi and Bluetooth. Go to Settings > HONOR Connect and ensure Connected Call is enabled.
- Make or answer a call through multiple devices
- Incoming calls will automatically be transferred to connected devices you are using, such as your tablets and laptops. You can use any device to make or answer a call.
- Transfer a call to other devices
- When you are answering a call on your phone, tap
 on the call screen and choose any
device to continue the current call.
on the call screen and choose any
device to continue the current call.
Connected Camera for Flexible and HD Views
When you have a video conference or live stream on your computer, you can use the front and rear camera of your phone to flexibly switch shooting angles, and take professional clear pictures.
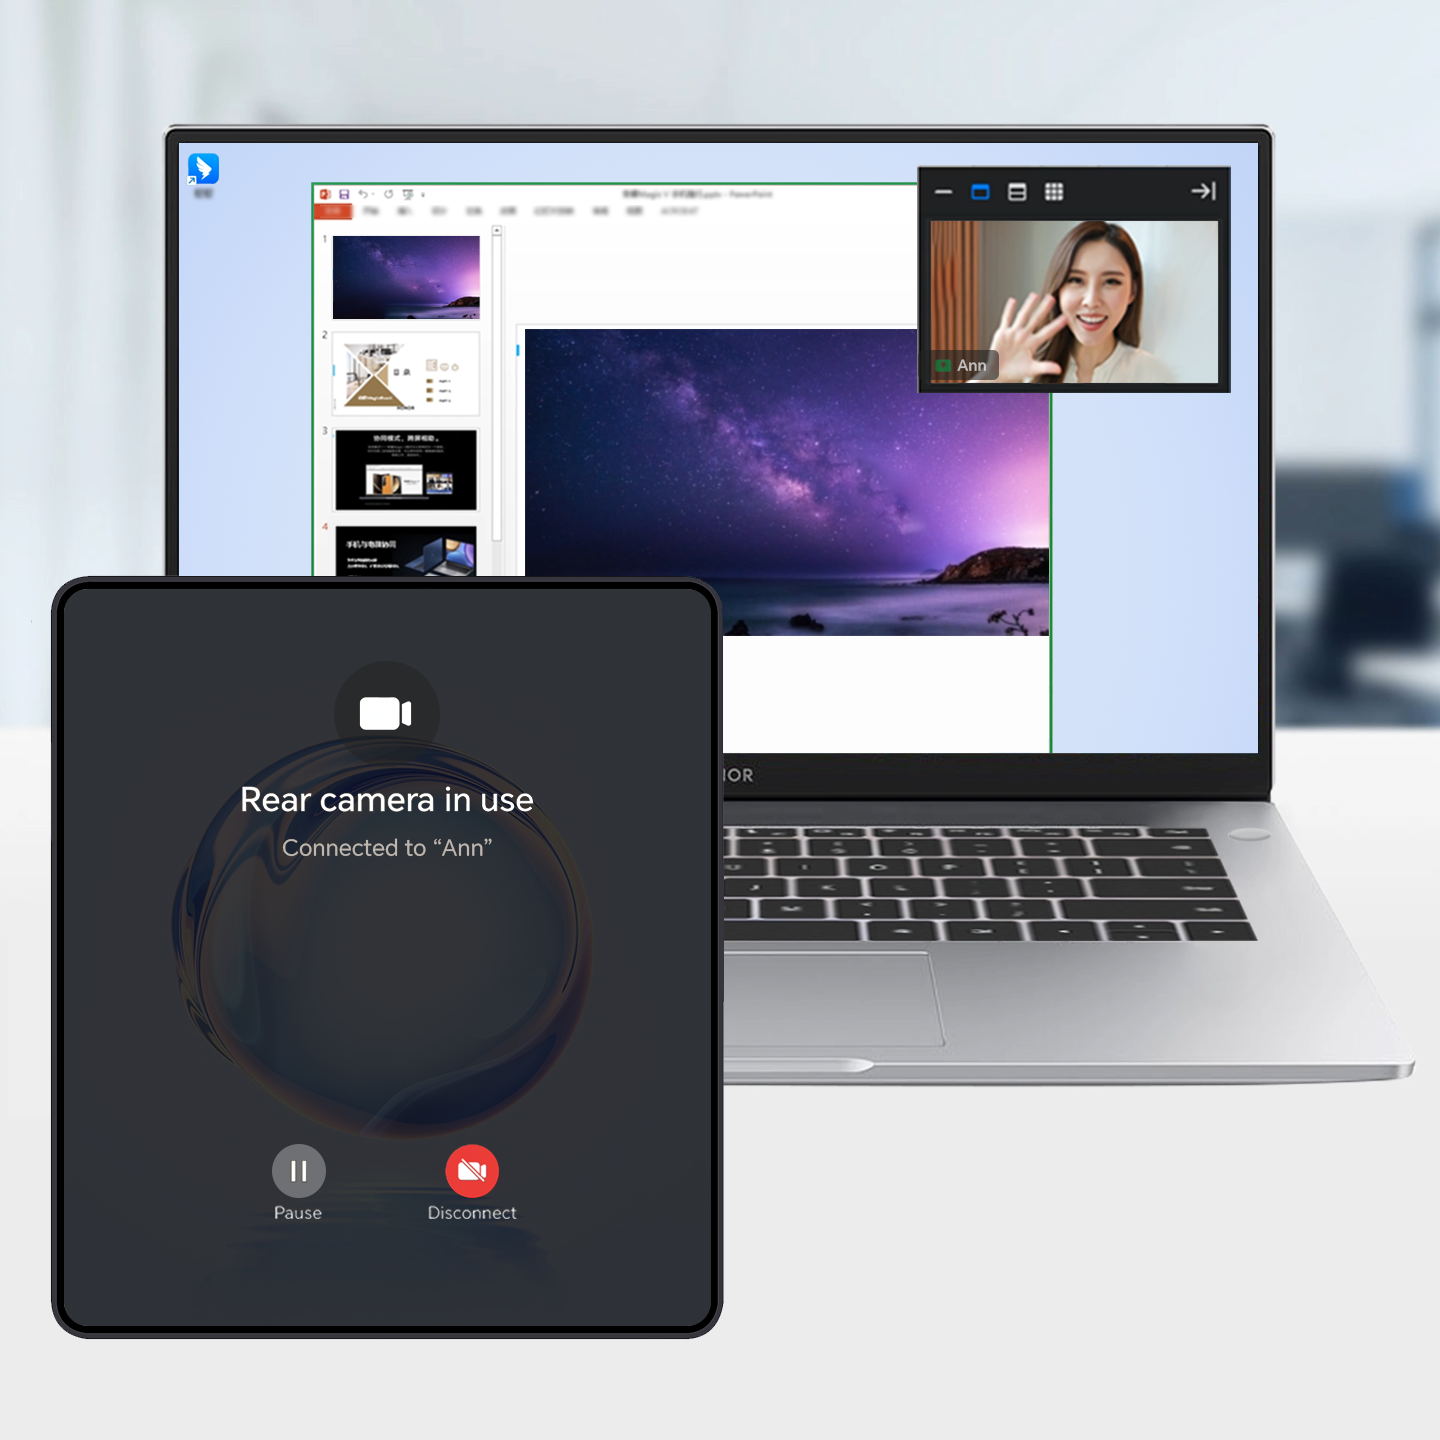
- Before using this feature, make sure that all devices are logged in with the same HONOR ID, and Wi-Fi and Bluetooth are toggled on. Go to Settings > HONOR Connect on your phone to enable Connected Camera, and enable Connected Camera on your computer.
- When you have a video conference on your computer, you can also use the front and rear camera of your phone or computer’s camera to have real-time shooting.
Seamless Experience with Connected Apps
Continue to use apps seamlessly across devices. For example, you can transfer Notes from your phone to your computer, and continue editing without interruption.
- Before using this feature, log in on these devices using the same HONOR ID. Make sure that Wi-Fi (some apps require Internet access) and Bluetooth are enabled on all devices. Besides, ensure that Connected Apps is enabled in Settings > HONOR Connect.
- Take file transfer as an example:
- Edit content in Notes on your phone.
- When you tap the notice that pops up on the target device, the app will be transferred and you can continue to edit the file on that device.
Tap to Transfer files with Mac
Simply tap your Honor phone against the Mac to quickly transfer photos, videos, documents, and more. Whether it's work files or life moments, just a tap lets you enjoy seamless transfers, saying goodbye to cables and complicated steps.
Preparation before use: Mac needs to have HONOR WorkStation installed, be logged into the same Honor account as the Honor phone, and be connected to the same local network. It can also connect to the Honor phone's hotspot.
- Go to Settings > More connections > OneTap on Honor phone and enable OneTap.
- On your Honor phone, open and select the files you want to send, then gently tap the top of your Honor phone against any part of the Mac.
- Select the receiving device on your Honor phone according to the on-screen instructions. A prompt will automatically appear on Mac, and you can simply follow the instructions to receive the files.
- This feature requires your Mac to be running macOS 12.0 or above.
- The feature availability varies by device.
Customize Your Home Screen
Access your personalized space in one step and choose from trendy themes to fit your style. Customize Icon style, Rounded corners, Color and more to create your unique home screen.
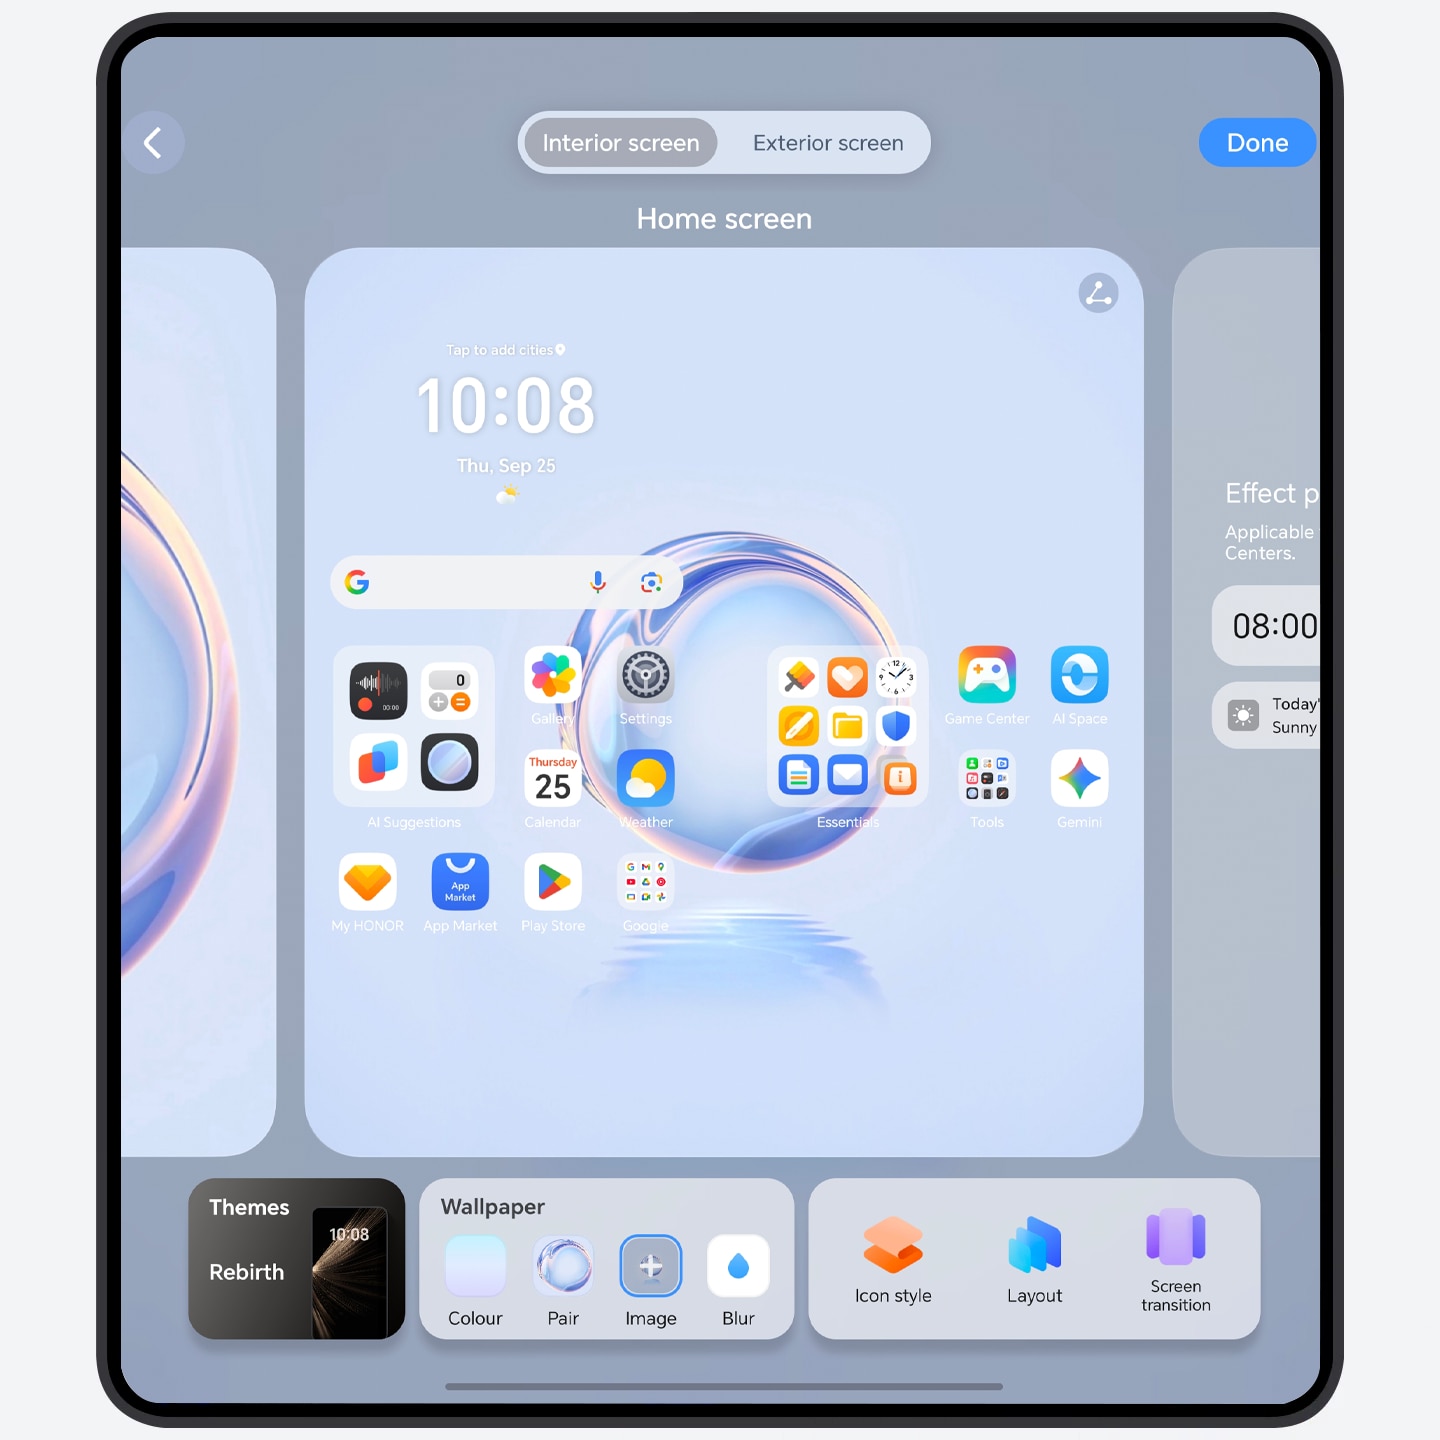
Pinch with two fingers on the main screen, and tap Wallpaper and style, and swipe left or right to set the Home screen, Lock screen, System display effects.
- Set the Home screen effect: on the Home screen screen, you can tap to set Themes, Wallpaper, Icon style, Layout, Screen transition etc. When selecting Themes within My themes, Home screen, Lock screen, System display can be completely refreshed.
- Set the Lock screen effect: on the Lock screen screen, you can tap to set Lock screen style, Decoration etc.
- Set the System display effect: drag the control bar to adjust the corner radius of the notification and control center, and preview the effect.
Access App Services With a Single Tap on Home Screen
Create shortcuts for diverse atomic services on your Home screen and access apps quickly and easily. Personalize your Home screen with simple drag-and-drop actions.
- Tap to access common services: Long
press the app icon,
then release it and drag any corner
 to create a shortcut. Now, with a single tap,
you can
directly access the desired service.
to create a shortcut. Now, with a single tap,
you can
directly access the desired service. - Personalize folders: Customize the size
and shape of
your folders by long pressing the icon, then release it and drag any
corner to adjust its appearance to your liking. Tap
the large
folder widget to instantly access your personalized folders.
- Some apps may not support these features.
Dual-Screen Layout
When you unfold your device, embrace the dual-screen layout to to unlock the full potential of a larger screen. Enjoy the convenience of swiftly navigating through more apps and card sets.

- Unfold your device, go to Settings > Home screen & style > Home screen settings and toggle on Dual-screen layout.
- In the Dual-screen layout, you’ll find a quick access divider at the bottom of your home screen. Swipe left or right on this divider to adjust the visibility of your recently used apps.
- To have a better display effect, you can select 4×6 for Layout when you toggle on Dual-screen layout.
Better Sleep with Night Display
When you use the mobile phone before going to bed, screen exposure will suppress the production of sleep hormone. Night display can mitigate that effect to help you fall asleep faster.
- Go to Settings, search for Circadian Night Display and enable Circadian Night Display. When enabled, the phone will intelligently adjust the screen color temperature according to sunrise and sunset times.
- The interface may vary by device model.
Magic lock screen: make your screen shine
Personalized lock screens with customizable templates and decorations, bringing a surprise with every unlock.

On the Lock screen, pinch with two fingers to access the My styles interface (after unlocking the device):
- Swipe up and down to choose and set your preferred Magic Lock Screen, Official, and more. Tap to select your favorite wallpaper or template.
- Tap Custom, go to Lock screen to set the screen, and set Lock screen style, Decoration, Depth effect etc.
- Once the Depth effect switch is turned on, the clock display area may be partially obscured. You can tap the lock screen preview, then drag the screen to adjust it to the desired position, and return to the interface.
- Please note that customizable elements may vary with different wallpapers; refer to the actual settings for details.